MediaArtTutorials
W8 — Production Week Framework
From Pre-Production Plan to On-Set Execution
This document supports the W8 - Production Week by outlining technical requirements, on-set best practices, and shot execution tips.
Sections
- Before Shooting: Lighting
- Before Shooting: Camera
- Before Shooting: Sound
- While Shooting: Composition & Camera Control
- Space & Shooting Strategy
Before Shooting: Lighting
Set up your lighting before adjusting camera exposure settings.
Remember: lighting will look different through the lens of the camera than it does to your eyes.
You must balance the intensity of your lighting equipment with your camera exposure settings (aperture, shutter speed, ISO).
Do not adjust camera settings to compensate for poorly positioned lighting.
First shape and position the light, then fine-tune exposure.
For guidance, review:
W2 — Tech Walkthrough: Lighting Setup (Three-Point Logic)
W7 — Pre-Production Framework: Character Portrait Lighting Setups
Aim for a Cinematic Look
Your lighting approach should aim for a cinematic look:
- Intentional direction of light (not flat overhead lighting)
- Visible depth through light and shadow
- Controlled contrast
- Consistent color temperature
- Separation between subject and background
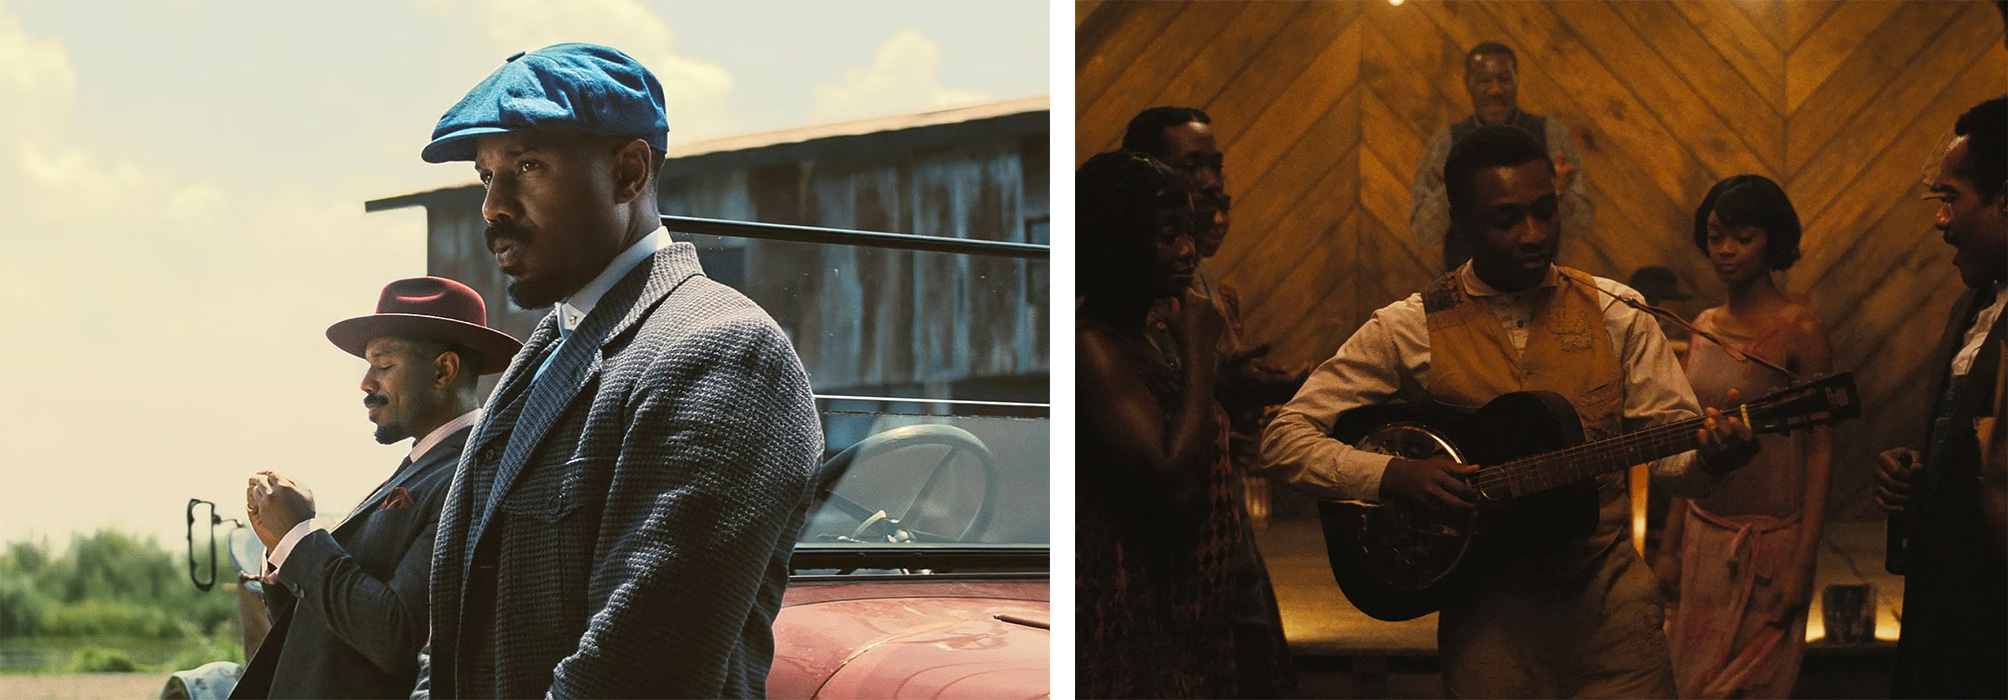
Cinematic Lool Example
Sinners (2025) – Dir. Ryan Coogler
Cinematographer: Autumn Durald Arkapaw
Strong shadow control; clear subject separation through contrast; motivated directional light sources (windows, practical lamps); defined depth between foreground and background.

High-Key / Low-Contrast (Not Great Cinematic Look) Example
Wicked (2024) – Dir. Jon M. Chu
Cinematographer: Alice Brooks
Even facial illumination; minimal shadow depth; soft, diffused lighting; pastel tonal range; reduced contrast between subject and background.
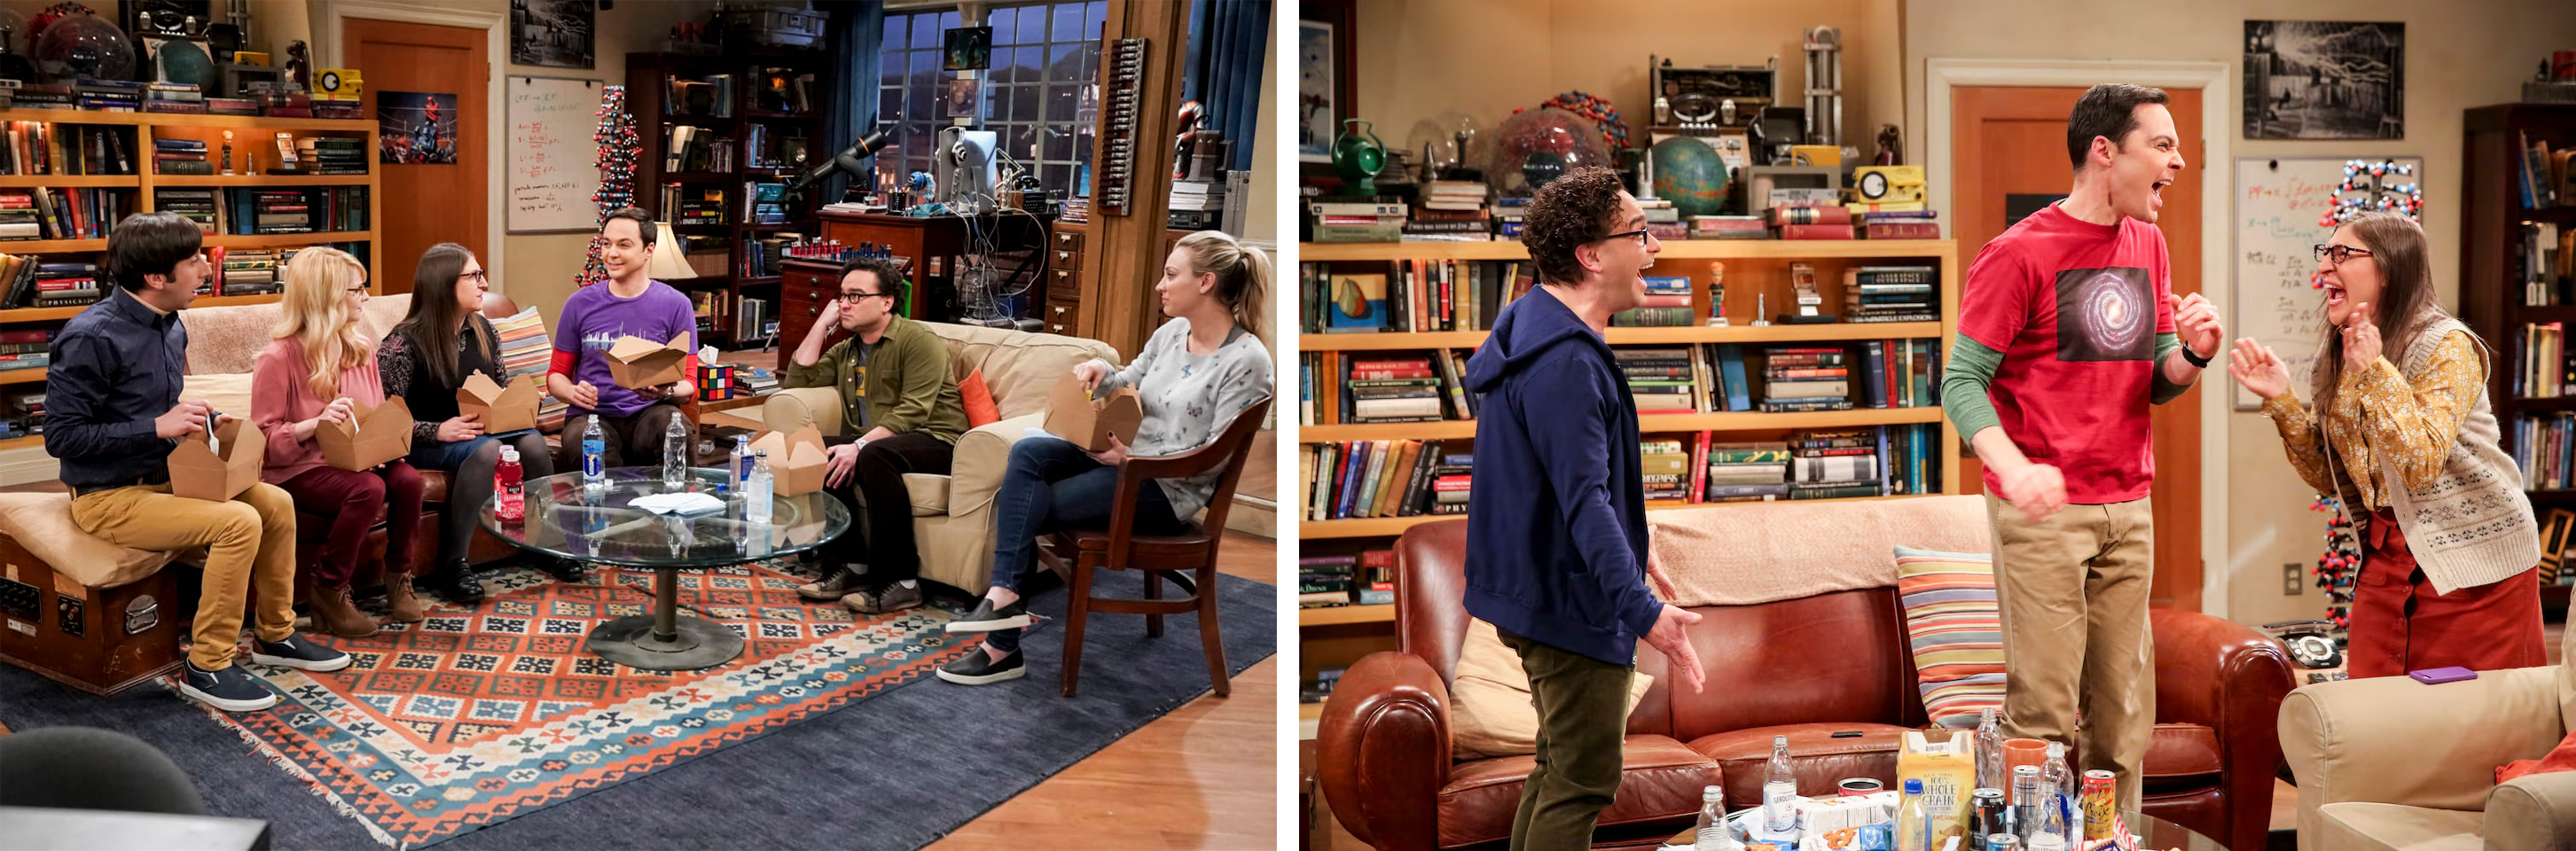
Flat (Sitcom/TV Lighting) Example
The Big Bang Theory (2007–2019) Network: CBS
Sitcom lighting prioritizes consistent exposure across multiple actors and camera angles.
The goal is clarity and performance visibility, not dramatic shadow or depth.
Consistency
Lighting must remain consistent between takes.
Be aware of:
- Changing daylight (cloud movement, sunset)
- Practical lights being turned on/off
- Shadows shifting across faces
- Reflections in the background
If lighting changes significantly, adjust your setup and re-check exposure.
❗ Lighting must be controlled on set. Do not rely on fixing exposure or color in post-production.
Before Shooting: Camera
Resolution & Aspect Ratio
- You must record in 1920 × 1080 (Full HD) at 24 fps.
- You must activate the grid overlay to support composition and framing.
- All footage must be recorded in 16:9 aspect ratio, regardless of your intended final crop.
📌 How to set this up:
Follow the instructions in the W2 — Tech Walkthrough: Camera on Video
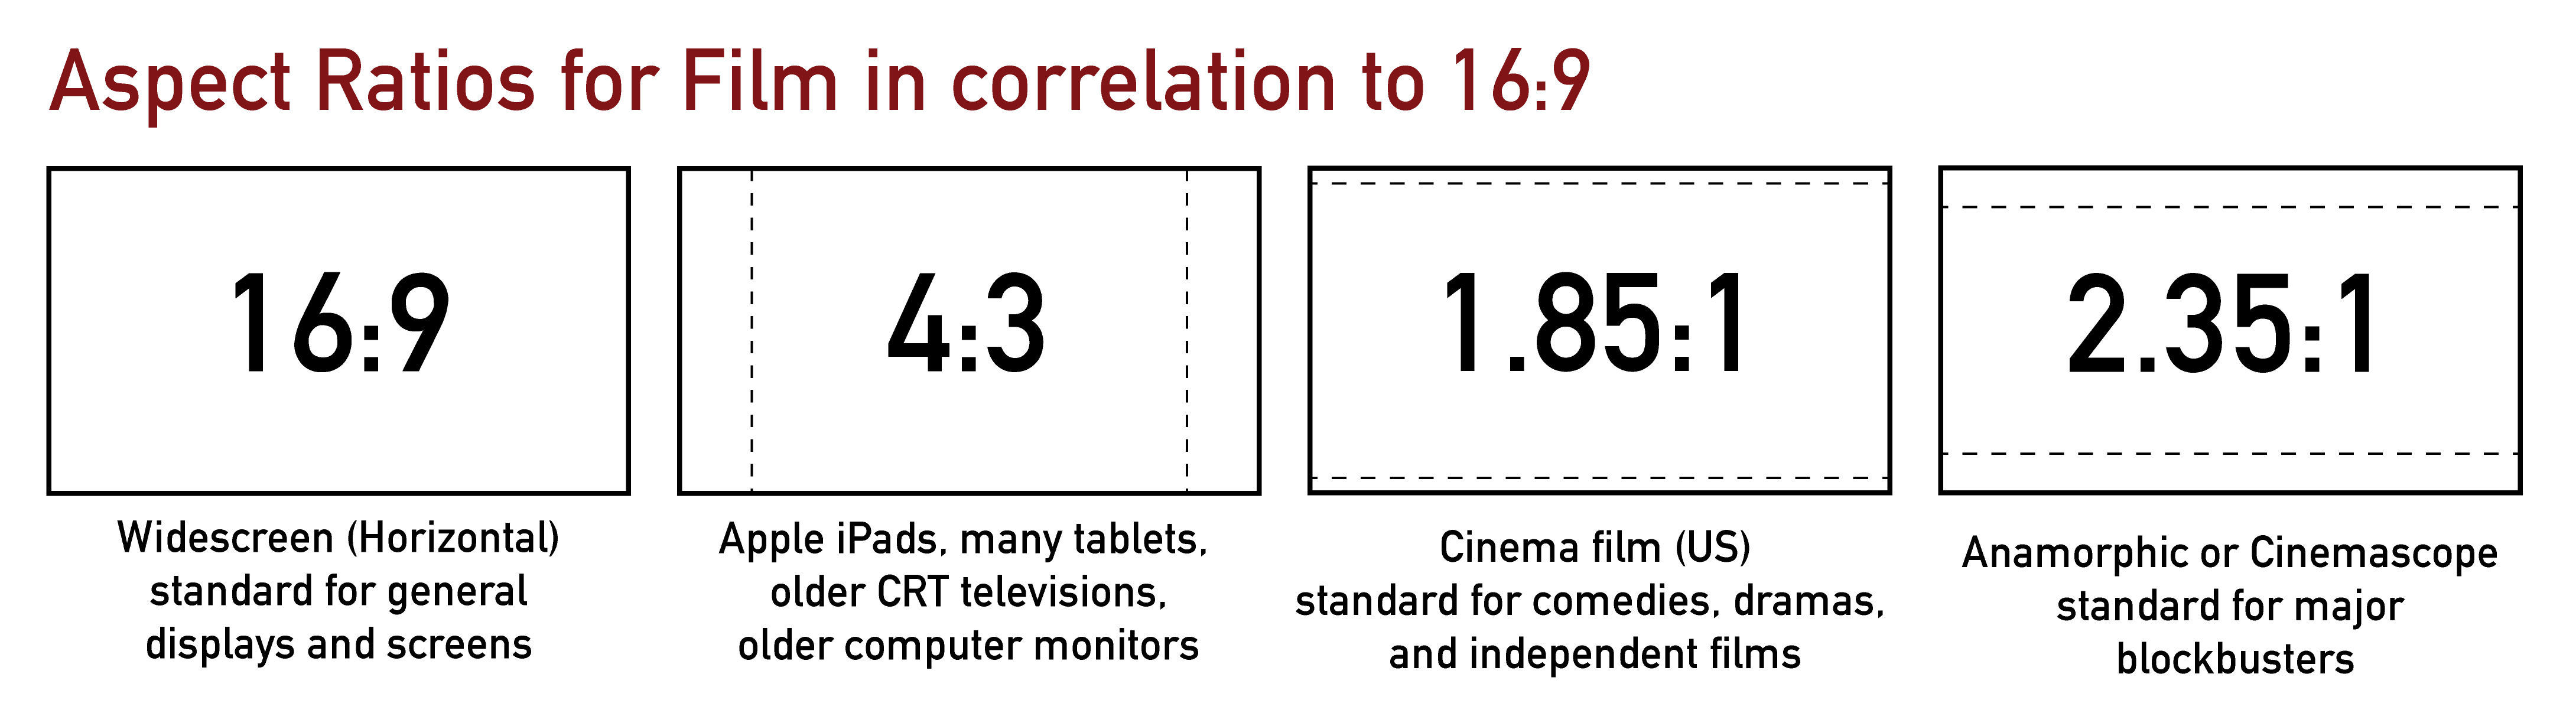
16:9 = 16 units wide for every 9 units tall.
4:3 = 4 units wide for every 3 units tall.
1.85:1 = 1.85 units wide for every 1 unit tall.
2.35:1 = 2.35 units wide for every 1 unit tall.
You will always capture the full 16:9 frame in-camera.
If you change the aspect ratio in editing, you will be cropping the image.
This means you must compose your shots carefully during recording, anticipating how your final aspect ratio will affect what remains visible in the frame.
White Balance
Set Custom White Balance.
You may use a white sheet of paper to calibrate it.
📌 How to set this up:
Follow the instructions in the
W2 — Tech Walkthrough: White Balance
Manual Mode (Aperture / Shutter / ISO).
Set your camera to Manual Mode, add the lenses you will use, and setup exposure.
Exposure Setup
Once white balance is set, adjust:
- Aperture
- Shutter Speed
- ISO
Your settings should respond to your lighting conditions.
Use the histogram to monitor exposure rather than relying only on what you see on the screen.
For guidance, review:
W4 — Tech Walkthrough: Exposure Compensation & Exposure Control & Monitoring (Advanced)
Shutter Speed
First, use your Stabilization ON (handheld) or OFF (on tripod/monopod) depending on your setup.
Start with a shutter speed that is approximately double your frame rate.
If you are recording at 24 fps, begin with 1/48 or 1/50.
This follows the standard 180-degree shutter rule and produces natural-looking motion blur.
You may increase the shutter speed if:
- The scene includes fast movement
- You want sharper motion
- You need to reduce light without changing ISO or aperture
You may decrease the shutter speed slightly if:
- You want visible motion blur
- Moving elements in the background (e.g., cars) should appear softer
- The subject remains relatively still while movement happens around them
Lower shutter speeds will create motion blur or “drag.”
Higher shutter speeds will create sharper movement.
For examples, review:
W2 — Tech Walkthrough: Shutter Speed
W3 — Tech Walkthrough: Shutter Speed as a Motion & Exposure Tool

Chungking Express (1994) – Dir. Wong Kar-wai Cinematographer: Christopher Doyle Motion blur conveys emotional isolation and the feeling of time moving too fast around the character.
ISO Considerations
The general recommendation is to use the lowest ISO possible while maintaining proper exposure.
However, ISO decisions are not always straightforward.
- Higher ISO increases brightness.
- Higher ISO also increases digital grain (noise).
- Grain is not inherently bad — it can be an artistic choice.
- If you choose a higher ISO for aesthetic reasons, keep it consistent across your shots.
In some cases, visible grain can simulate the look of 35mm, Super 8, 65mm, and other film formats.
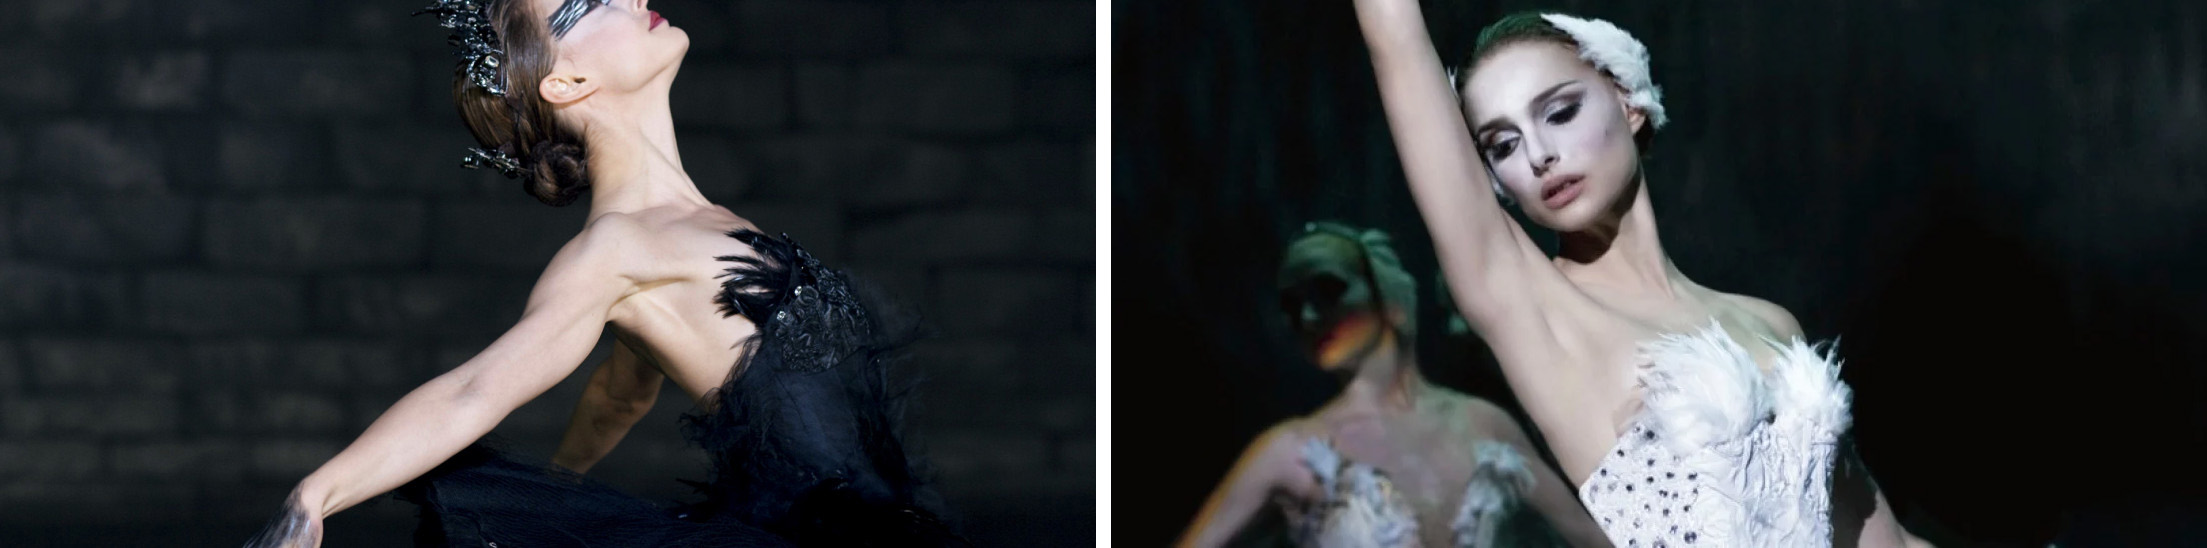
Black Swan (2010) – Dir. Darren Aronofsky
Shot on Super 16mm film.
The visible grain in darker areas creates an organic texture that supports the psychological tone of the film.
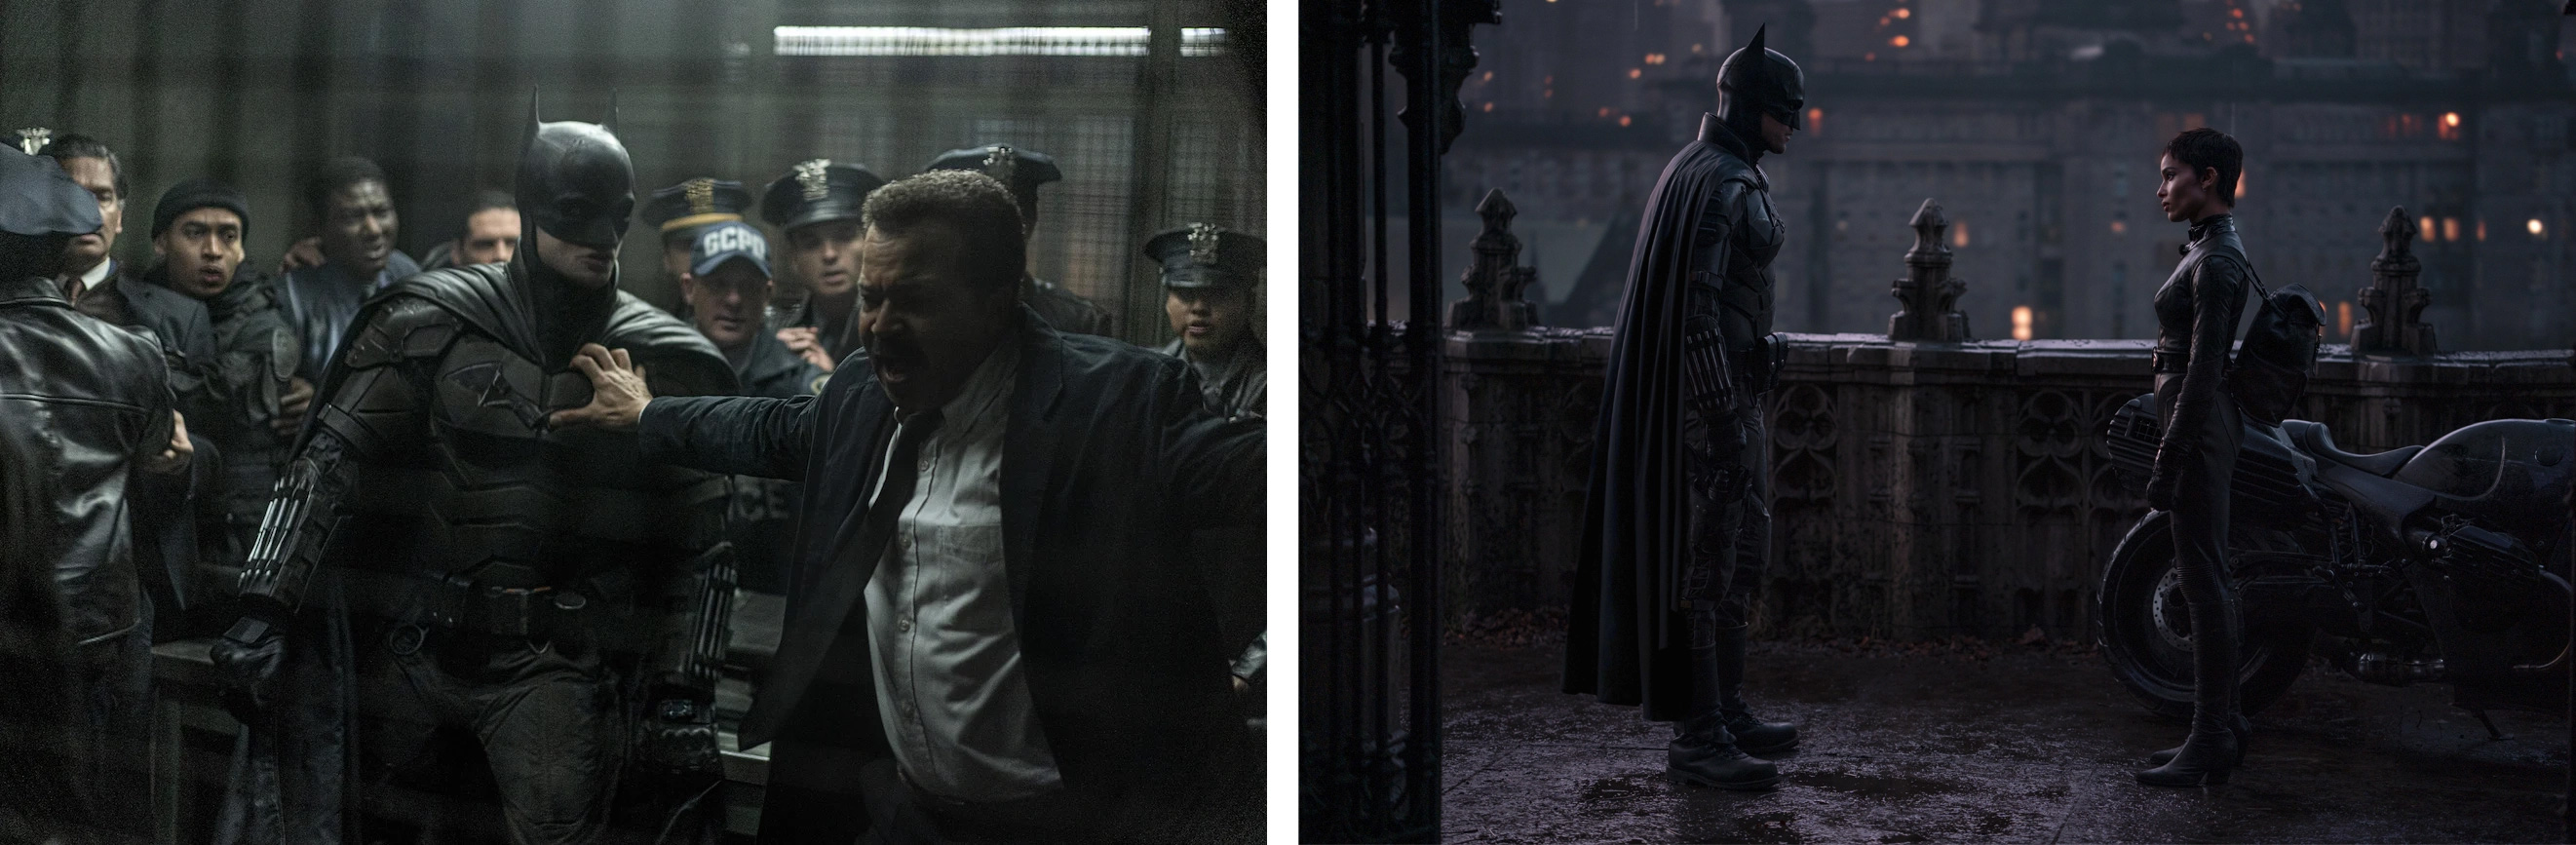
The Batman (2022) – Dir. Matt Reeves
Shot digitally (ARRI Alexa LF).
Heavy shadow areas contain visible texture and noise, contributing to the film’s dark, atmospheric aesthetic.
Manual Focus
Set your camera to Manual Focus.
Your subject and focal point must always remain sharp. Do not rely on autofocus, as it will shift during recording.
Before each take:
- Confirm that your subject is in focus.
- Re-check focus if the subject moves or changes distance.
Always double-check focus — especially in shallow depth-of-field shots.
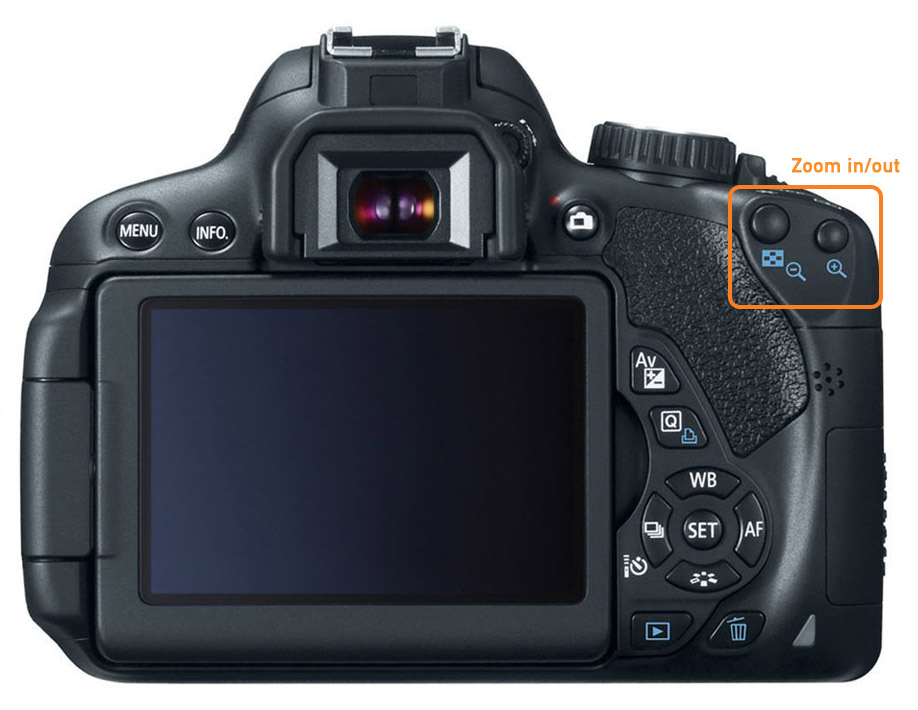
Use your camera’s zoom-in keys (focus assist) to verify sharpness before pressing record.
Before Shooting: Sound
For a non-dialogue one-minute film, the primary on-scene sounds you should record are:
-
Environmental sounds (ambient tone, subtle background activity).
→ Use a shotgun microphone connected directly to your camera. -
Sounds created by your main character interacting with the environment (object handling, footsteps, fabric movement, door sounds, etc.).
→ Use a condenser microphone connected to your Zoom recorder.
For guidance, review:
W2 — Tech Walkthrough: Audio Recording Method
W5 — Tech Walkthrough: Audio Setup — Microphones & Recorders
Do not rely entirely on foley or music added later. Your final film must demonstrate a complex, multi-layered sound design using:
- On-scene recordings
- Sound effects
- Foley
- Environmental sounds
- Music (optional)
You will develop the full sound design in later weeks.
For now, focus on capturing clean, usable on-scene sound.
Room Tone (Mandatory)
You must record 20–30 seconds of room tone per location.
Room tone is the natural ambient sound of a space when no one is speaking or moving. Room tone allows you to:
- Smooth edits between cuts
- Fill gaps in dialogue-free moments
- Maintain sonic continuity
- Avoid abrupt audio drop-offs
In some cases, room tone will function as your “silence.”
How to Record Room Tone
Record room tone using your Zoom recorder (built-in microphones).
- Place the Zoom recorder in the same position where your main sound was captured.
- Ask everyone to remain completely still and silent.
- Stop all intentional movement (no footsteps, no fabric movement).
- Begin recording.
- Capture 20–30 seconds of uninterrupted ambient sound.
- Label the file clearly (e.g.,
ProjectName_Ambience_Location_T01.wav).
❗ Do not skip this step. Room tone is essential for professional sound editing and for maintaining continuity between cuts.
Composition & Camera Control
This section combines composition, focus, and stability: the elements that visually make or break a one-minute film.
Watch Your Background
Your background is as important as your subject.
Every frame contains:
- Foreground – The area closest to the camera.
- Midground – Where your main subject usually sits.
- Background – The space behind the subject.
All three layers should be intentional.
Avoid:
- Distracting objects behind your subject (exit signs, poles, clutter, bright windows).
- Background elements that appear to “grow” from the subject’s head.
- Unbalanced empty space unless it is intentional.
- Cluttered or dirty backgrounds unless they serve the story — and even then, the messiness must be intentional and controlled.
Framing, Focal Point & Focus
Activate the camera grid to help with alignment and balance.
- Position your subject or focal point intentionally.
- Use rule-of-thirds alignment when appropriate.
- Keep horizons straight.
- Avoid accidental tilting unless stylistically motivated.
On a large screen, poor framing becomes immediately obvious.
For guidance, review:
W7 — Pre-Production Framework: Shot Types & Camera Angles
A focal point is the area of the frame that draws the viewer’s attention first.
It is usually your main subject or the most important visual element.
Your focal point must be sharp.
- Always double-check focus before recording.
- Use camera zoom-in preview to confirm sharpness.
- If unsure, re-focus and check again.
Focus in Motion
When the subject moves:
- Anticipate subject distance changes.
- Adjust the focus ring gradually as they move.
- Practice the movement before recording.
- Rehearse once without recording if needed.
If you cannot maintain focus during movement, simplify the shot.
Stabilization & Camera Movement
Avoid unnecessary camera movement.
Movement must have purpose.
For guidance, review:
W7 — Pre-Production Framework: Camera Movements
When to Use a Tripod.
Use a tripod when:
- The shot is static.
- The scene relies on performance.
- You need precise framing.
- You want a controlled, cinematic feel.
Controlled Tripod Movements:
- Tilt – Vertical movement (up / down).
- Pan – Horizontal movement (left / right).
- Locked-off (Static) – No movement at all.
- Motivated Reframe – Slight repositioning to follow a small subject shift.
- Zoom (Use Sparingly) – Changing focal length during recording.
When to Use Handheld
Handheld is appropriate when:
- Following a subject.
- Creating intimacy.
- Adding subtle realism.
- Capturing controlled movement.
Controlled Handheld Movements:
- Tracking – Following the subject forward or backward.
- Side Tracking – Moving parallel to the subject.
- Push-in / Pull-back – Slow movement toward or away from subject.
If shooting handheld:
- Turn stabilization ON.
- Keep elbows close to your body.
- Control your breathing.
- Move slowly and deliberately.
- Avoid quick jerks or unnecessary pans.
Shooting Strategy
This section focuses on efficiency, discipline, and control during production.
- Keep setups simple.
- Avoid overcomplicated settings.
- Prioritize clarity over ambition.
- Focus on executing fewer shots well rather than many shots poorly.
Shoot 2–3 Perspectives Per Scene
Record each scene from 2 angles or framings whenever possible.
This gives you flexibility during editing and strengthens rhythm and pacing.
Avoid relying on a single master shot.
Let the Camera Roll
- Start recording 3–5 seconds before the action begins.
- Continue recording 3–5 seconds after the action ends.
This buffer allows clean cuts and smoother transitions during editing.
Record Full Actions
Do not stop recording too early.
If a character:
- Sits → record until fully seated.
- Walks → record until fully stopped.
- Opens something → record until fully closed (if relevant).
Incomplete actions create editing problems.
Do Not Rely on Chronological Shooting
You do not need to shoot in story order.
If your project alternates between two spaces or time periods:
- Complete all shots in one space first.
- Then move to the next.
Avoid switching back and forth between locations unnecessarily.
Complete each scene before moving on.
Continuity
Continuity is visual consistency across cuts.
Always check:
- Object placement (position on table, doors open/closed, etc.)
- Body position (hand placement, posture, direction of movement)
- Eyelines (where the character is looking)
- Lighting consistency (match intensity and direction)
- Wardrobe details (hair position, sleeves rolled up/down)
Small inconsistencies become very obvious on a large screen.
Credits: Jessica A. Rodríguez
AI Disclosure:
AI tools (ChatGPT) was used for editing and clarity only. AI is not used to generate original course content.