MediaArtTutorials
W4 — Tech Walkthrough
Exposure Control While Moving
Objective
This technical walkthrough supports the Continuous Shot (Individual) assignment. Week 4 focuses on how exposure behaves over time and how to monitor and manage it while recording.
By the end of this session, students should be able to:
- Use the histogram to monitor exposure in real time while recording a continuous shot
- Recognize how changes in lighting affect exposure mid-shot
- Apply exposure compensation as support tools when lighting conditions shift
Camera Settings — What to Use for Week 4
For Week 4, we will continue using the same camera settings as Week 3, while expanding our attention to exposure changes over time and how to monitor and manage them during recording.
Camera Settings
Check W2 — Tech Walkthrough and W3 — Tech Walkthrough for reference.
- Set the camera to Video Mode
- Set the Aspect Ratio to 16:9
- Set the Resolution to 1920 × 1080
- Set the Frame Rate to 30 fps
- Activate the Grid
- Set the lens to Auto Focus (AF)
- Continue working in Manual Mode (M)
Set Apertute, Shutter Speed, and ISO
- Set up Custom White Balance
Tip: Use a Balance Card Set or a white sheet of paper
- Use Evaluative / Matrix Metering.
This metering mode analyzes light across the entire frame and provides a stable reference when moving through changing lighting conditions (indoors → outdoors)
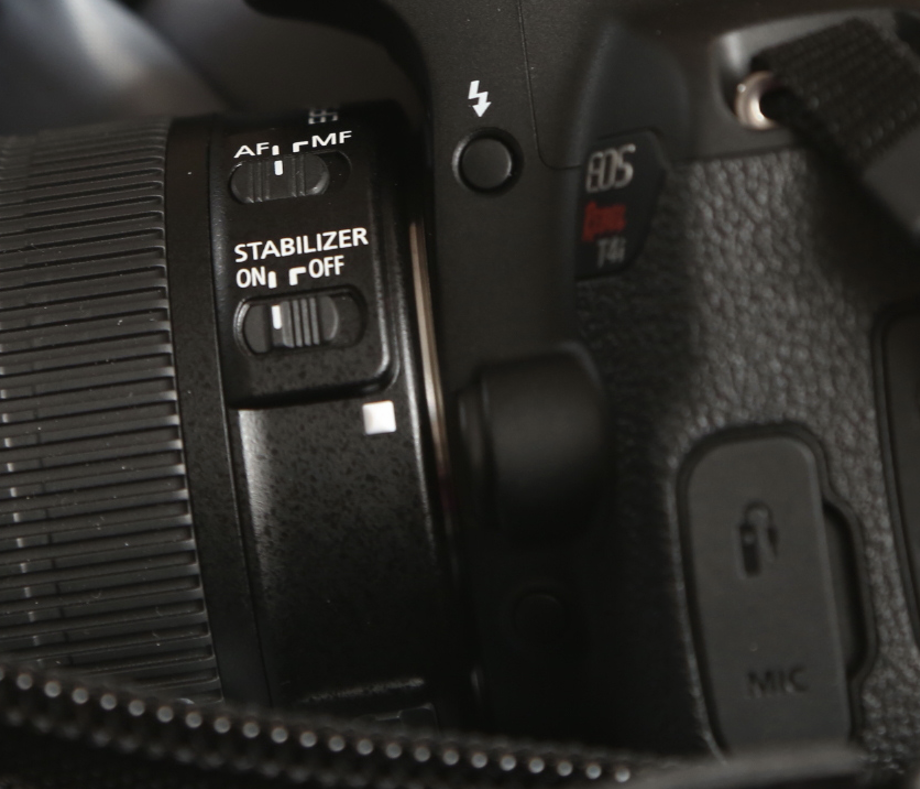
Image Stabilization (Handheld)
- Turn Image Stabilization ON
- This setting is located on the lens (see image below)
❗ Image stabilization helps reduce unwanted shake when recording handheld, but it does not prevent motion blur caused by incorrect shutter speed.
Exposure Compensation
As you move through different lighting environments, exposure can shift rapidly and unpredictably.
To help manage these changes, you will work with Exposure Compensation, which allows you to intentionally bias exposure brighter or darker than what the camera’s meter suggests.
❗ Exposure Compensation does not replace careful exposure decisions using aperture, shutter speed, and ISO.
It is a support tool that helps you protect image information when lighting conditions change.
Watch this short tutorial on how to set and adjust Exposure Compensation:
Monitoring Exposure While Recording
- Use the histogram to monitor exposure in real time
- Watch for:
- clipped highlights when moving into brighter areas
- crushed shadows when moving into darker areas
- Remember: exposure loss can happen mid-shot and cannot be corrected later
Exposure Control & Monitoring (Advance)
This section brings together the key concepts behind exposure control and monitoring, building on what you have already practiced in earlier weeks.
The focus here is on understanding how exposure decisions interact, how small adjustments can have large effects, and how to read and protect image information while recording.
Exposure Triangle
The Exposure Triangle describes the relationship between aperture, shutter speed, and ISO, which together determine how much light is recorded and how that light affects depth, motion, and image quality.

Watch this video for a deeper explanation of exposure:
Aperture — Advanced Concept (Vocabulary & Logic)
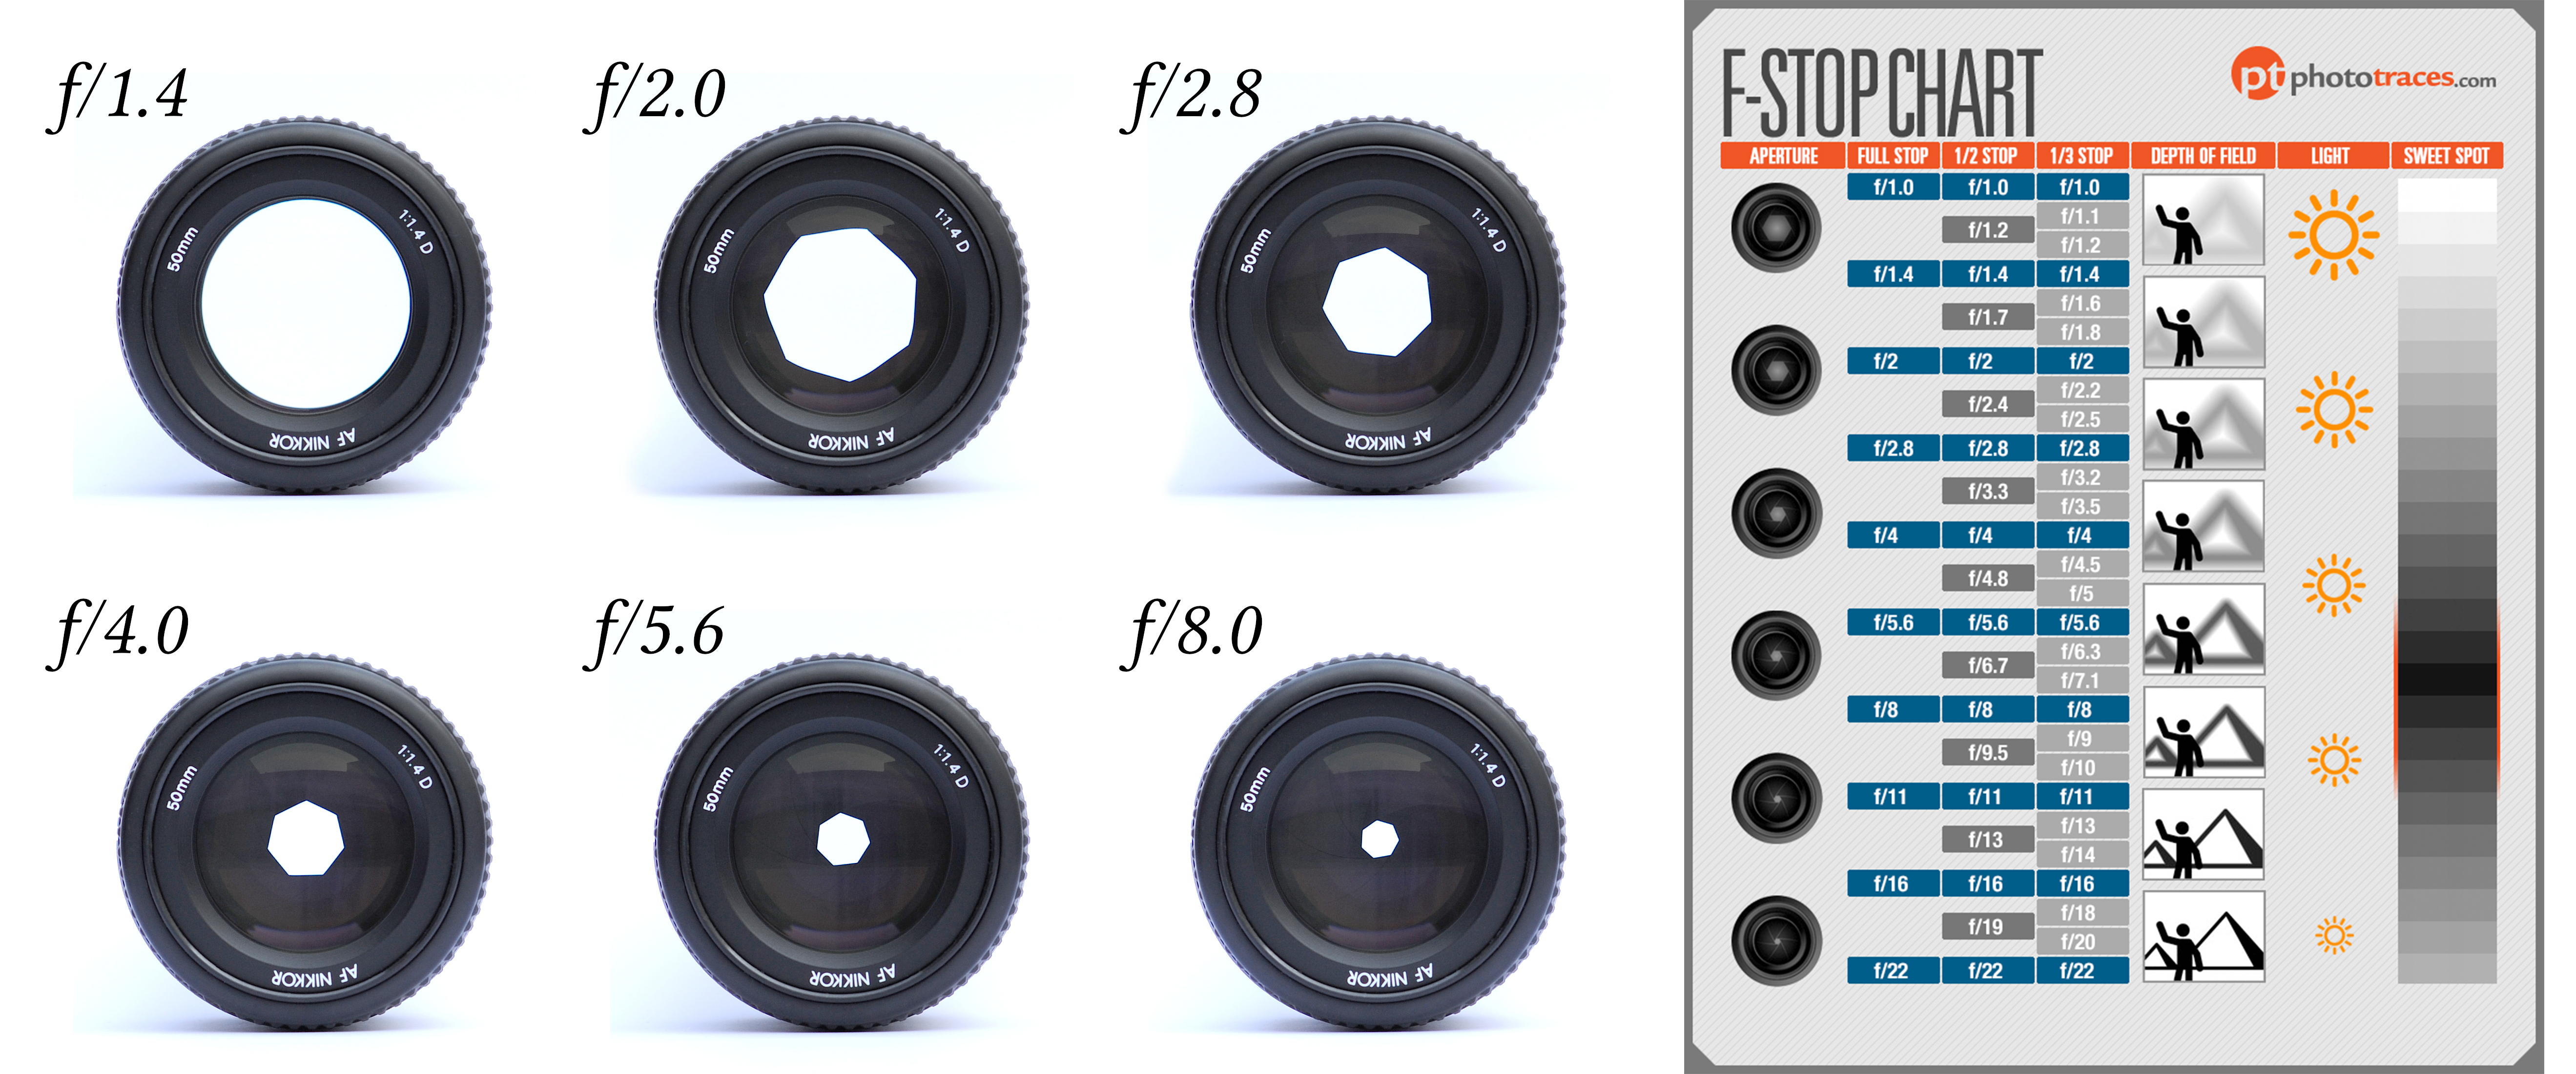
Reference: Download the F-Stop Chart (PDF)
Aperture is organized in steps called stops.
- Each full stop change either:
- doubles the amount of light entering the camera, or
- cuts the amount of light in half
Aperture values are written as f-numbers.
What “One Stop” Means (Conceptually)
- Lower f-number → larger opening → more light
- Higher f-number → smaller opening → less light
Examples:
- Moving from f/4 → f/2.8 lets in twice as much light
- Moving from f/5.6 → f/8 lets in half as much light
Each step compounds:
- One stop wider → double the light
- Two stops wider → four times the light
- One stop narrower → half the light
Aperture and Depth of Field
Aperture also controls depth of field:
- Wider apertures (lower f-numbers) → narrow / shallow depth of field
- Narrower apertures (higher f-numbers) → large / deep depth of field
This means aperture decisions always involve a trade-off between exposure, depth of field, and visual emphasis.
Shutter Speed — Advanced Concept (Vocabulary & Logic)
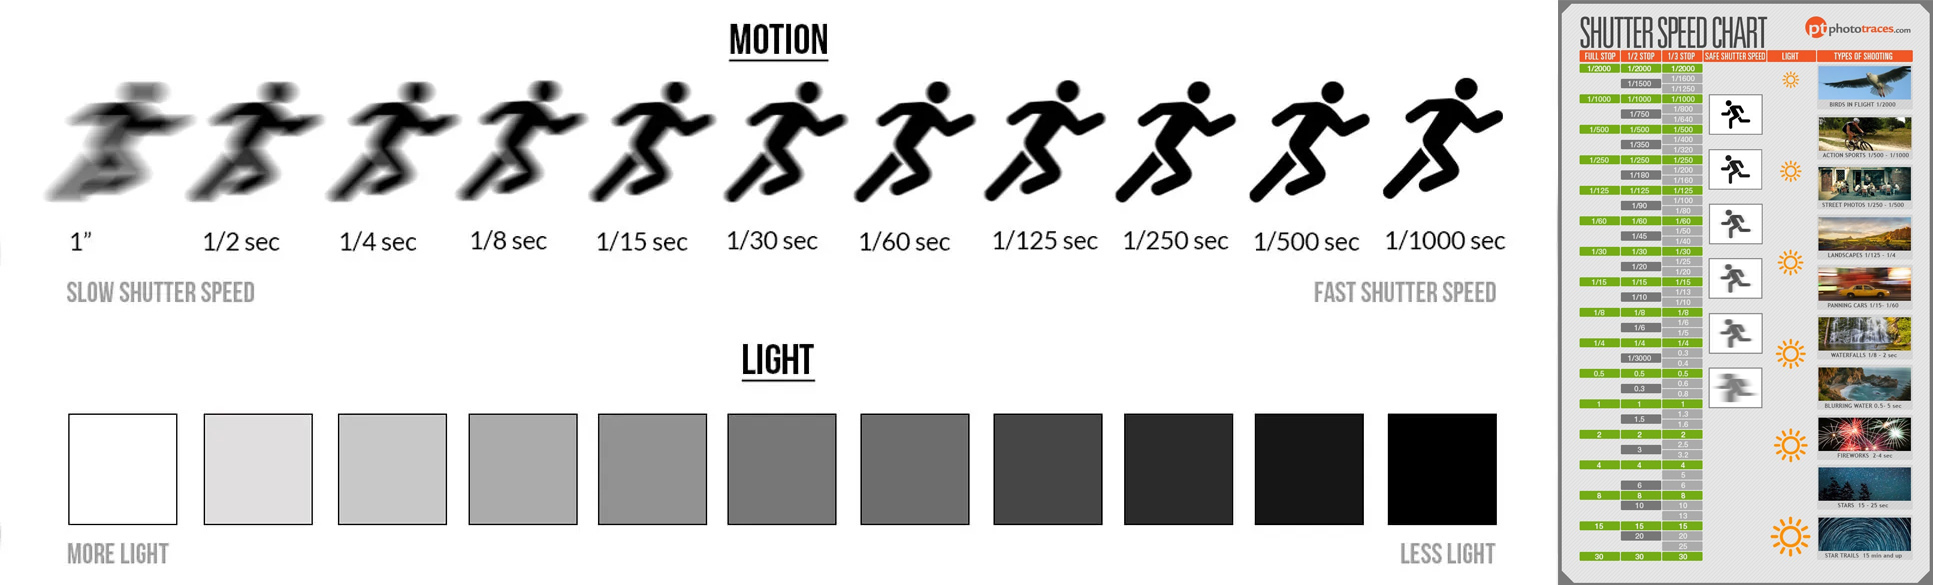
Reference: Download the Shutter Speed Chart (PDF)
Shutter speeds are organized in steps called stops.
- Each full stop change either:
- doubles the amount of light, or
- cuts the amount of light in half
This means exposure changes exponentially, not gradually.
What “One Stop” Means (Conceptually)
- Slower shutter speed → more time → more light
- Faster shutter speed → less time → less light
Examples:
- Moving from 1/60 → 1/30 lets in twice as much light
- Moving from 1/250 → 1/500 lets in half as much light
Each step compounds:
- One stop faster → half as much light
- Two stops faster → one quarter as much light
- Three stops faster → one eighth as much light
Reading the Histogram While Moving (Week 4)
In Week 4, the histogram is no longer used only to check exposure before recording, it becomes a live monitoring tool as you move through changing lighting conditions.
The Histogram Is Dynamic
- The histogram updates in real time as the camera moves
- Bright or dark areas entering the frame will immediately affect its shape
- Spikes may appear or disappear as you move indoors, outdoors, or between light sources
- This means exposure can change mid-shot, even if your camera settings stay the same.
The Histogram Depends on the Scene
There is no single “correct” histogram shape.
- Bright scenes naturally push the histogram to the right
- Dark scenes naturally push the histogram to the left
- A histogram does not need to be centered to be correct
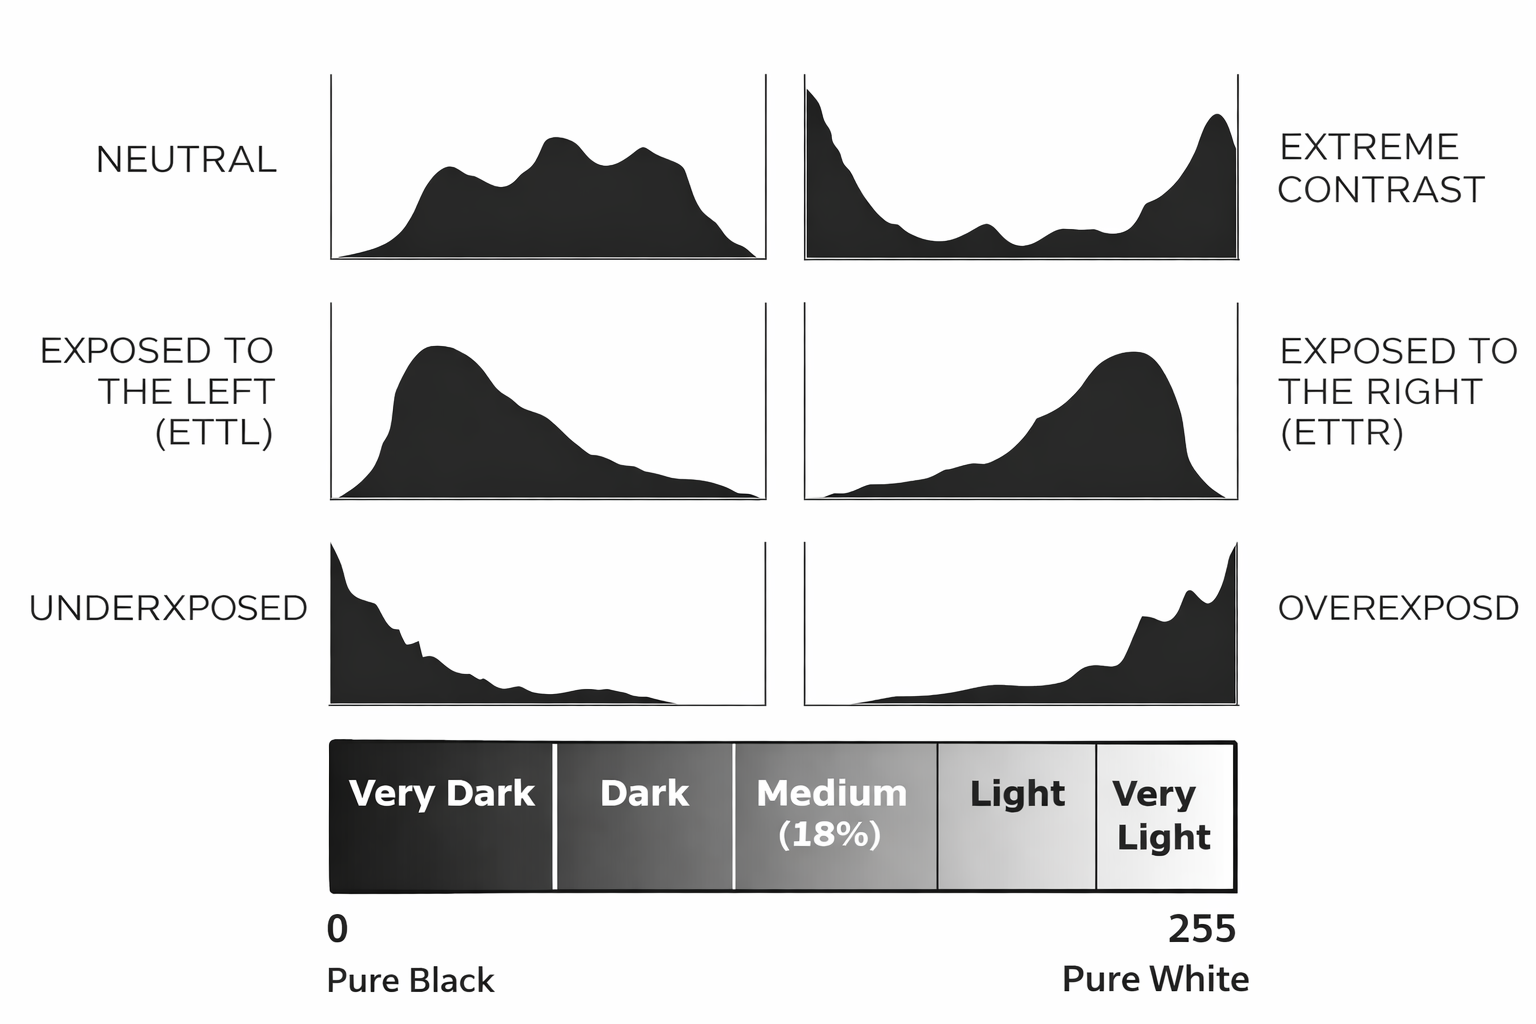
Highlight vs. Shadow Priority
Not all image information is lost in the same way.
- Highlights clip abruptly when overexposed
- Shadows lose detail more gradually, often introducing noise
Advise:
- Prioritize protecting highlights, especially when moving into brighter areas
- Use exposure adjustments to prevent the histogram from hitting the far right edge
Credits: Jessica A. Rodríguez
AI Disclosure:
AI tools (Microsoft CoPilot and ChatGPT) was used for editing and clarity only. AI is not used to generate original course content.