MediaArtTutorials
W2 — Tech Walkthrough
Chiaroscuro Interview: Camera, Lighting & Audio Setup
Objective
This technical walkthrough supports the Chiaroscuro Interview (Pairs) assignment.
By the end of this session, students should be able to:
- Set up a basic three-point lighting arrangement, adjusting key, fill, and back light to shape contrast
- Set and maintain manual mode, applying aperture, shutter speed, ISO, and camera placement to maintain consistent exposure across a multi-camera setup
- Set and maintain manual white balance for consistent color and skin tones across multiple cameras
- Configure and record audio using shot gun and lapel microphones
Space & Lighting Setup
1. Backdrop / Background Setup
❗ Even without a black backdrop, you can still create a chiaroscuro scene by prioritizing strong contrasts between light and shadow across the frame. The background does not need to be completely black.
Backdrop (If Available)
- Place backdrop 1–1.5 meters behind the subject
- Prevent light spill onto the background
Without a Backdrop
- Choose an uncluttered background
- Allow the background to fall into shadow
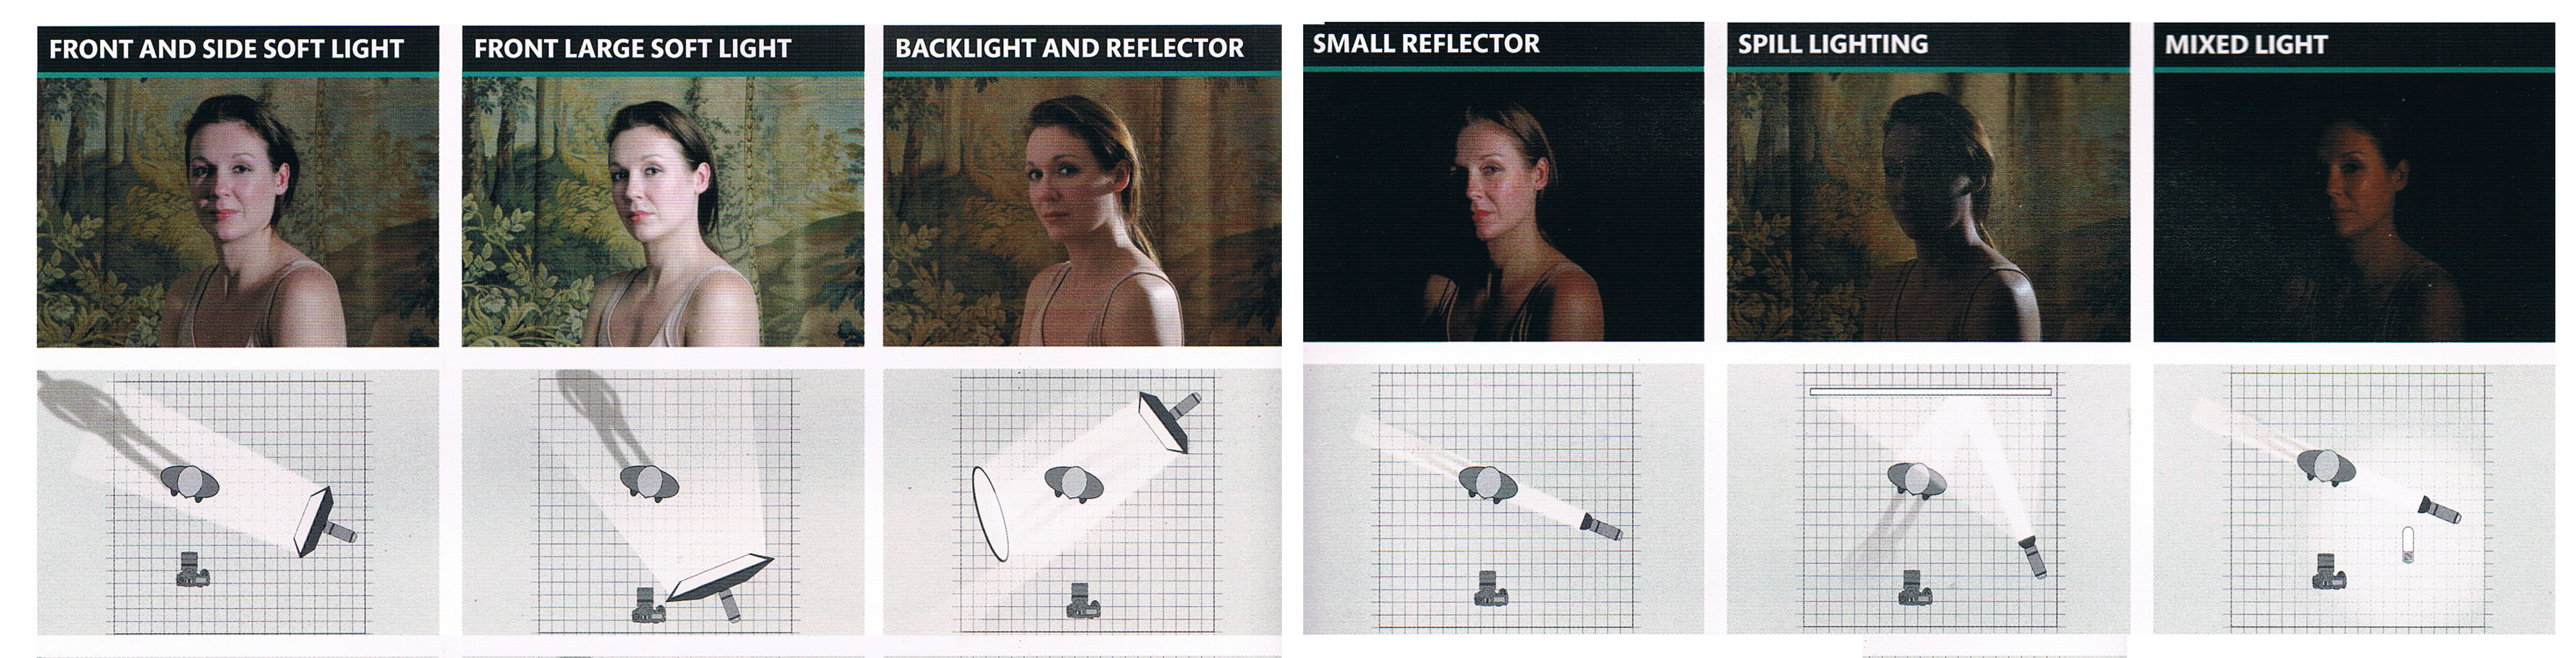
2. Lighting Setup (Three-Point Logic)
This assignment uses a three-point lighting approach for chiaroscuro. Check the Available Lighting Equipment.
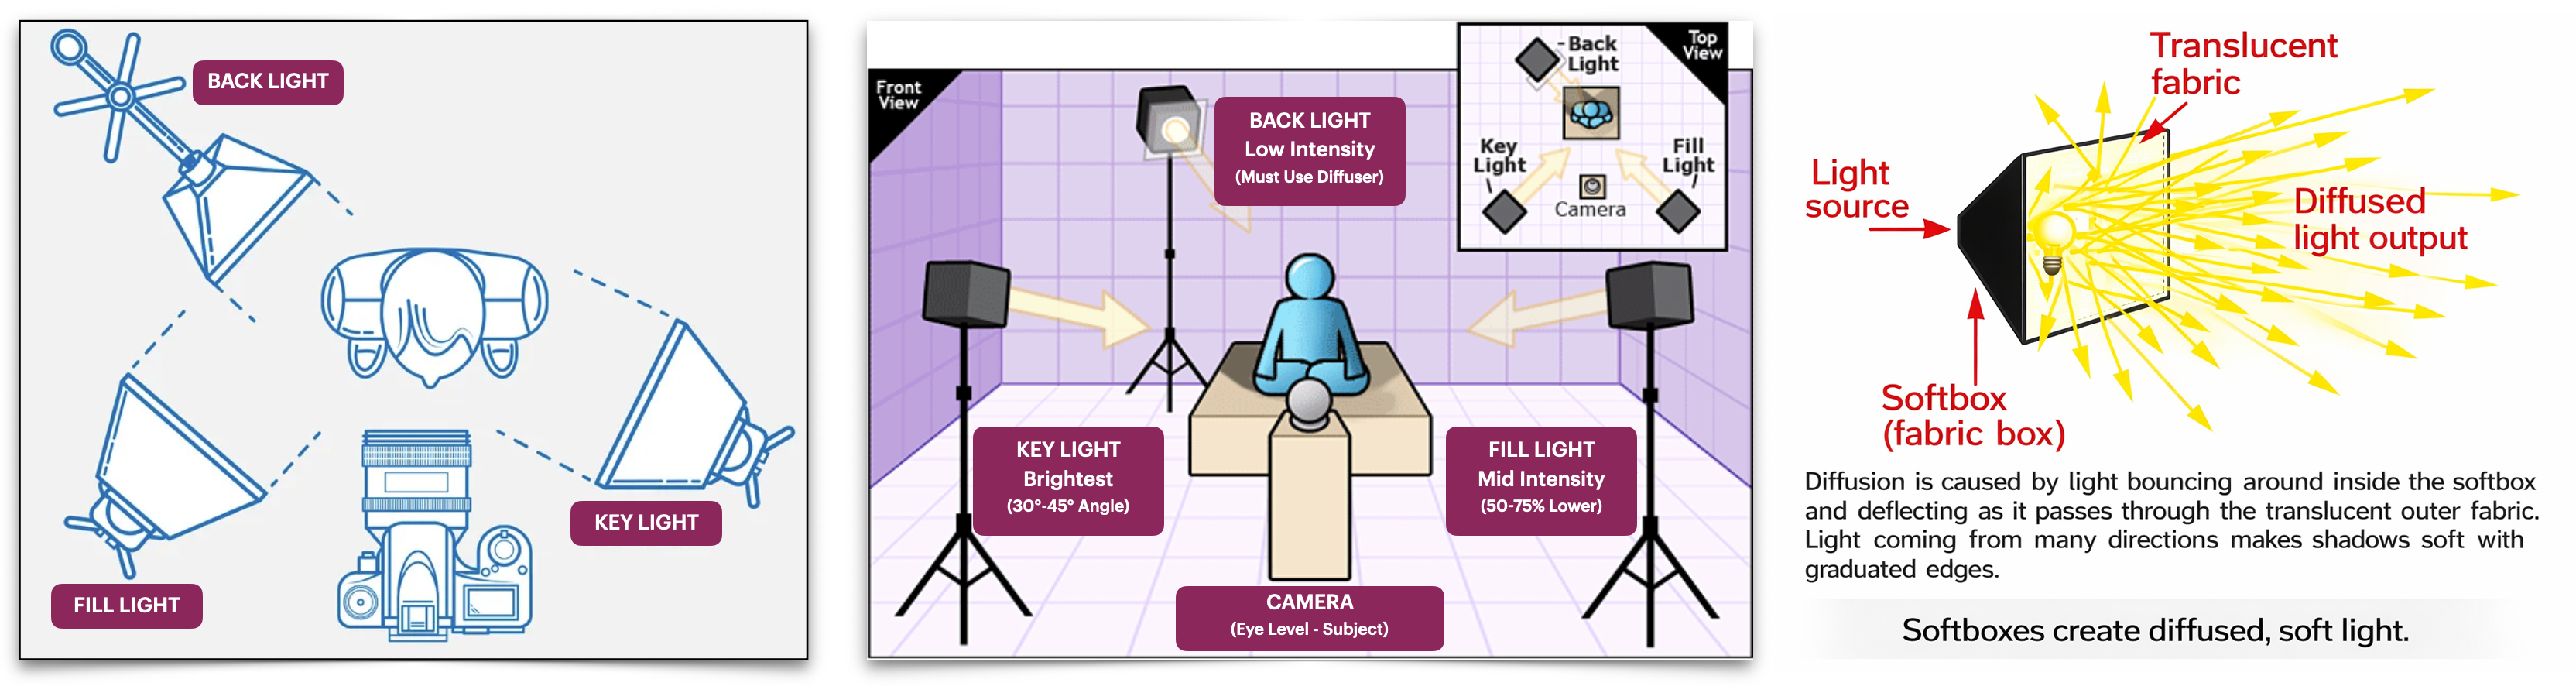
Key Light
- Position: Close to the subject, slightly above, at a steep 45-90 degree angle to create strong contrast and shape (often short lighting).
- Power: Set as the primary exposure source; adjust for desired highlight intensity.
Fill Light
- Position: Can be used as a very low-power fill opposite the key for minimal detail, or positioned to light a specific background element.
- Power: Very low; its purpose is to add dimension without flattening the high-contrast look.
Back (Rim) Light
- Position: Behind the subject, aimed at the edge of their hair/shoulders to create separation from the dark background just o specific zones.
- Modifier: Use a softbox to control spill and create focused light.
A softbox is a light modifier that surrounds a light source with reflective interior walls and a translucent front diffuser.
- Power: Leep power low.
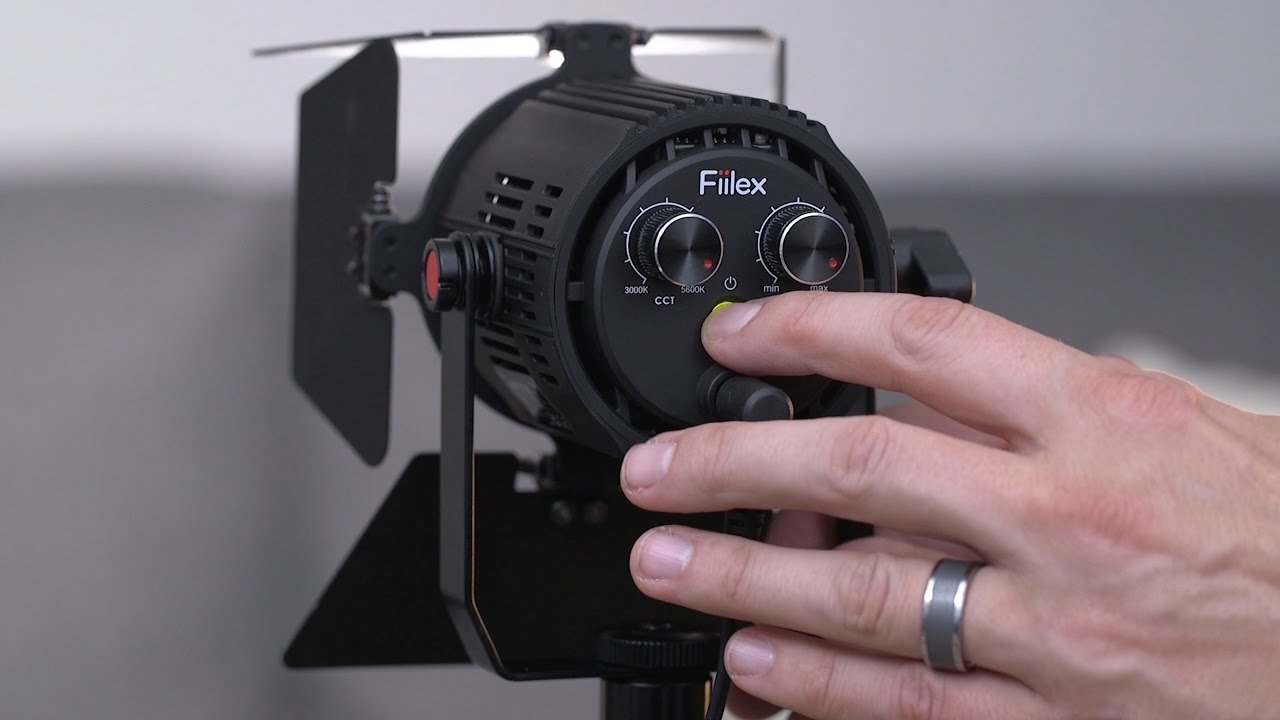
Setup Fiilex P360 LED Light Kit
Lighting 101: Intro to Light Placement
Other Studio Lighting Setups
3. Lighting Intensity & Color Temperature (Warmth)
Use the control knobs on the back of the light to adjust:
- Light intensity (brightness)
- Color temperature (warm ↔ cool)
Camera Settings — What to Use for Week 2
1. Camera on Video
- Set the camera to Video Mode
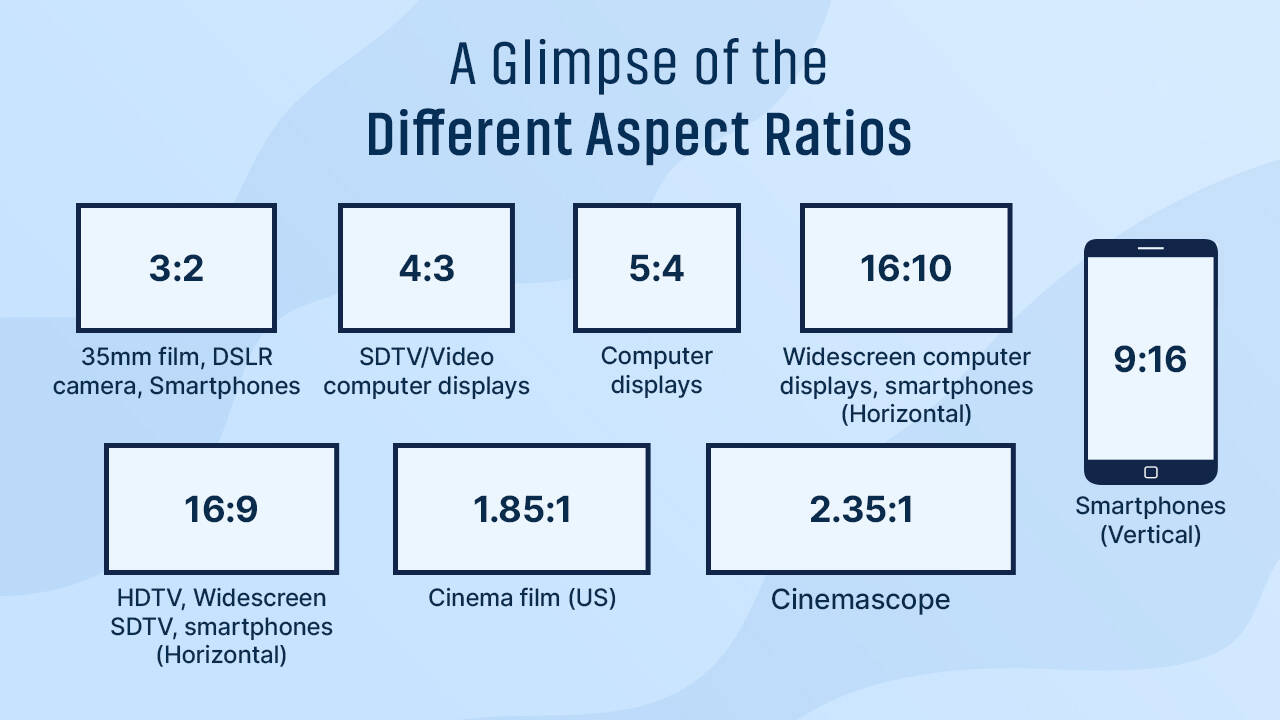
- Set the Aspect Ratio to 16:9
An aspect ratio is the proportional relationship between an image or screen’s width and height, expressed as two numbers separated by a colon.
- Set the Resolution to 1920x1080
Resolution refers to the pixel dimensions (width x height) of an image or display, which determines the level of detail.
- Set the Frame Rate to 30 fps
Frame rate (FPS) refers to how many individual images (frames) are recorded per second.
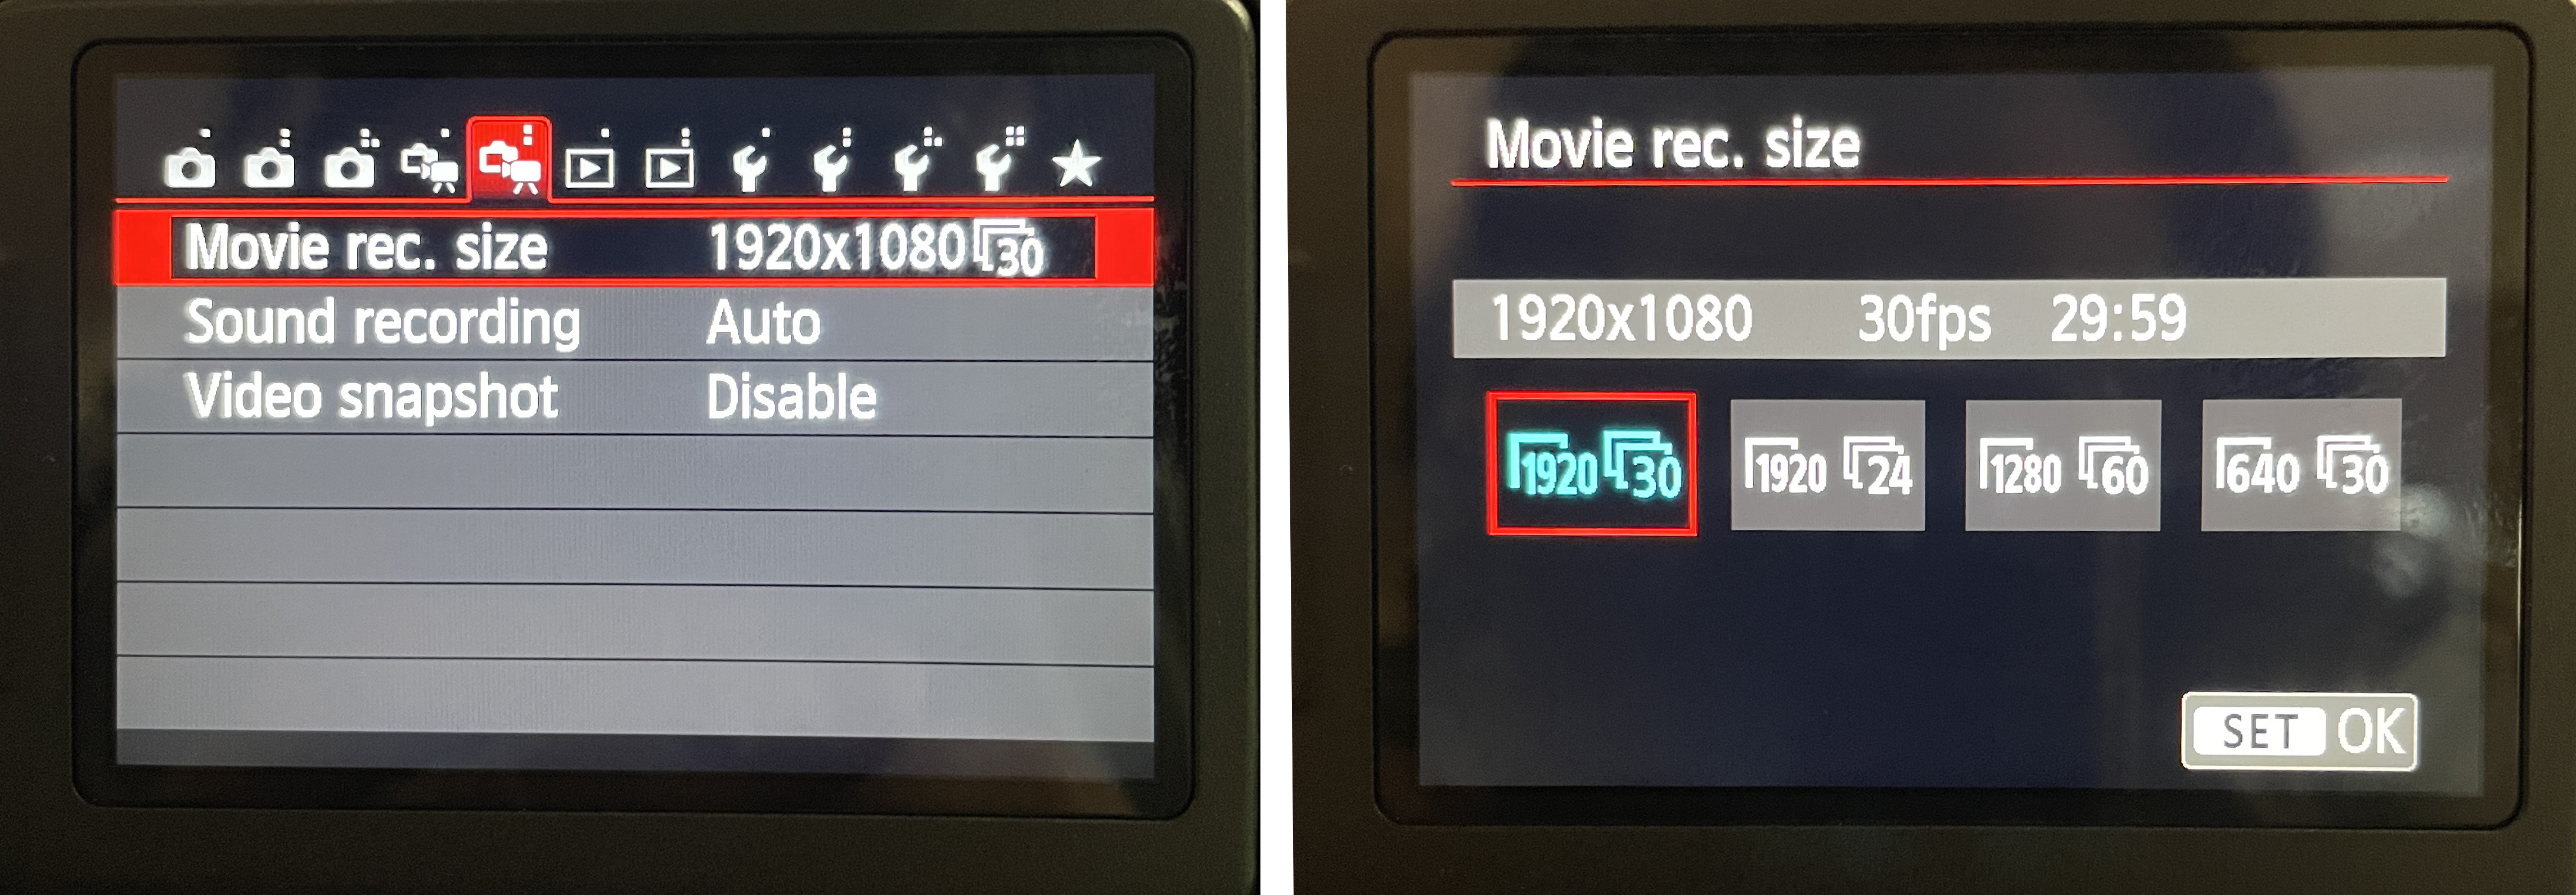
How to set aspect ratio, resolution, and frame rate:
- Go to Menu
- Navigate to the second video tab
- Select Movie rec. size
- Choose 1920 30
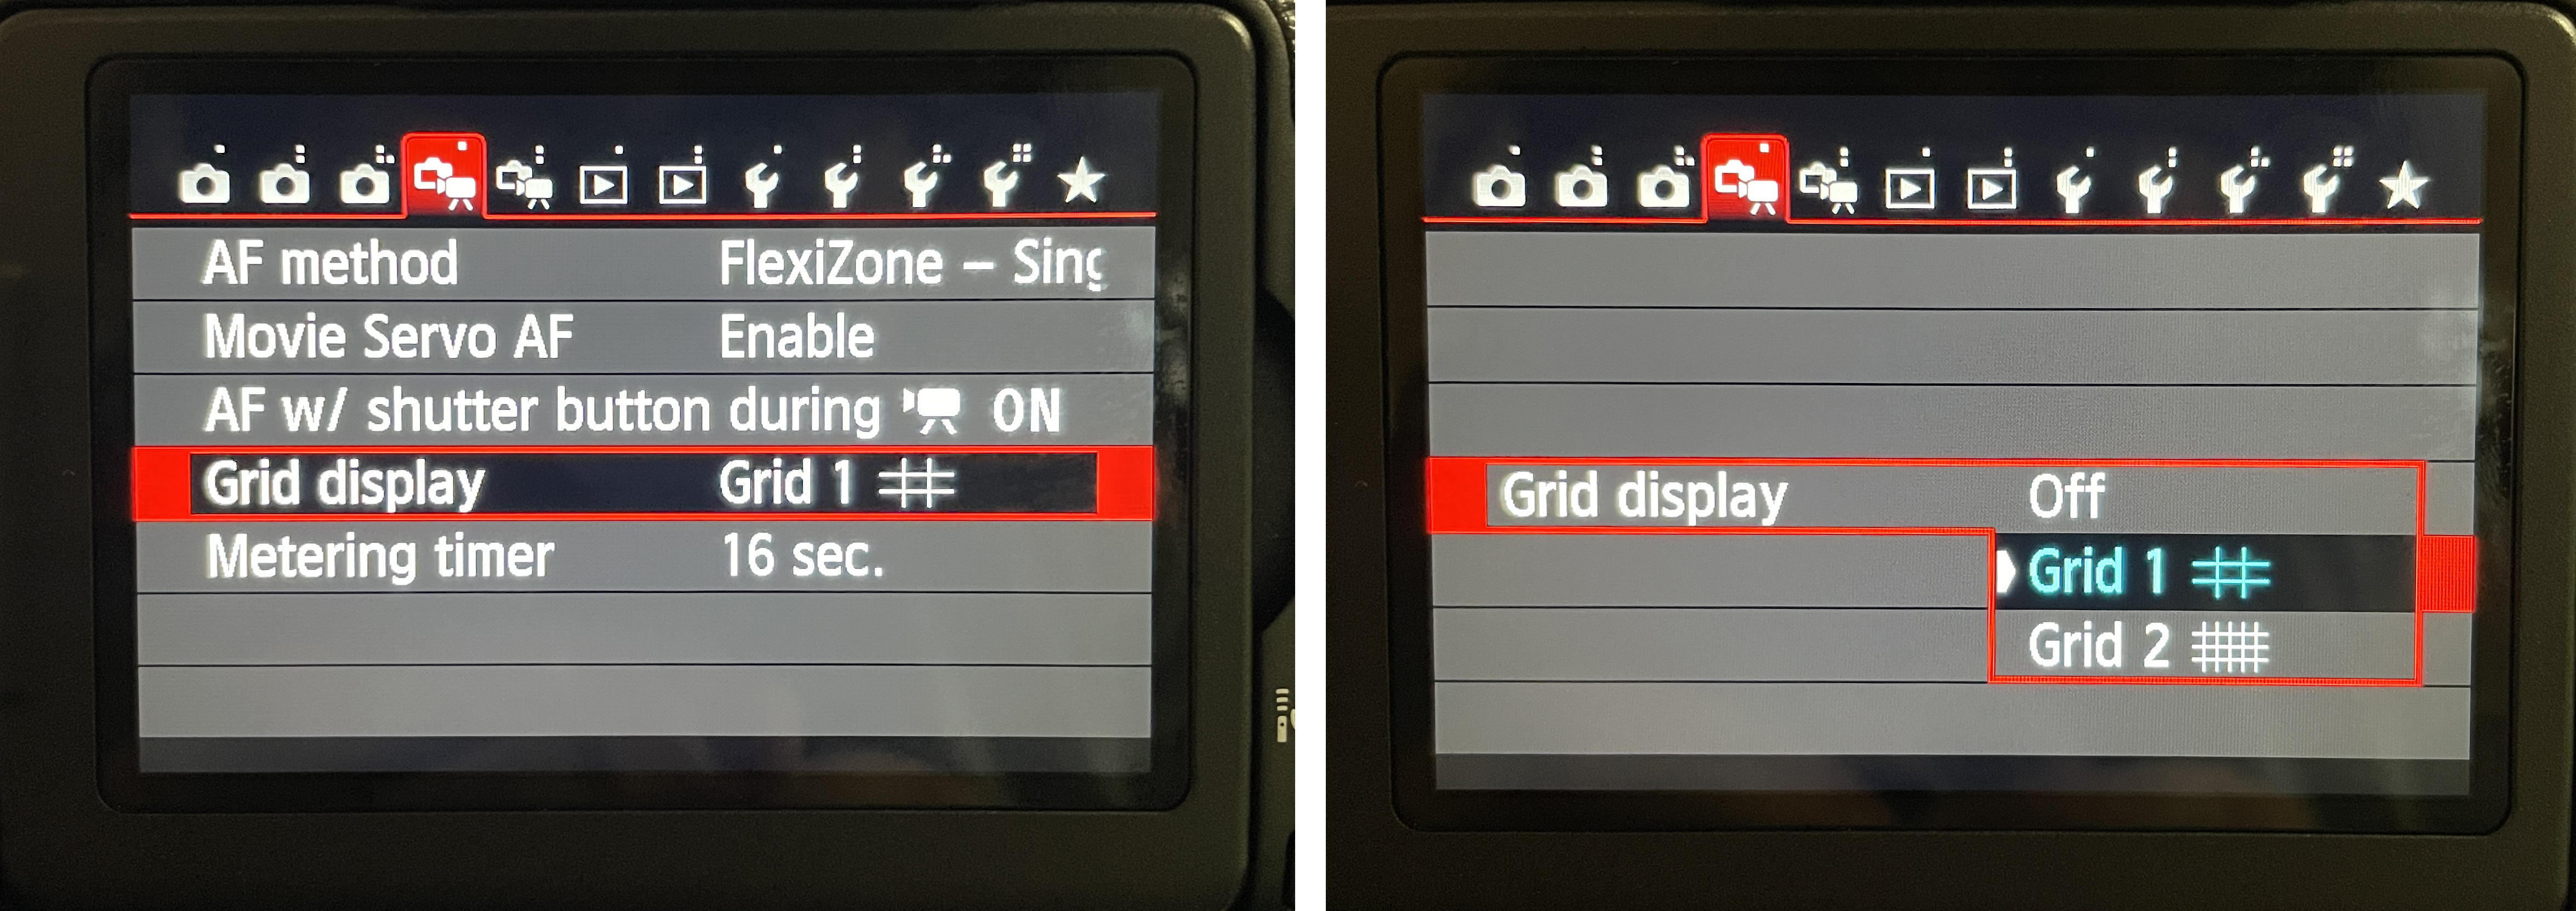
Recommended: Activate the Grid display
- Go to Menu
- Navigate to the first video tab
- Select Grid Display
- Choose Grid 1
2. Camera Lenses
Available DSLR Cameras & Lenses
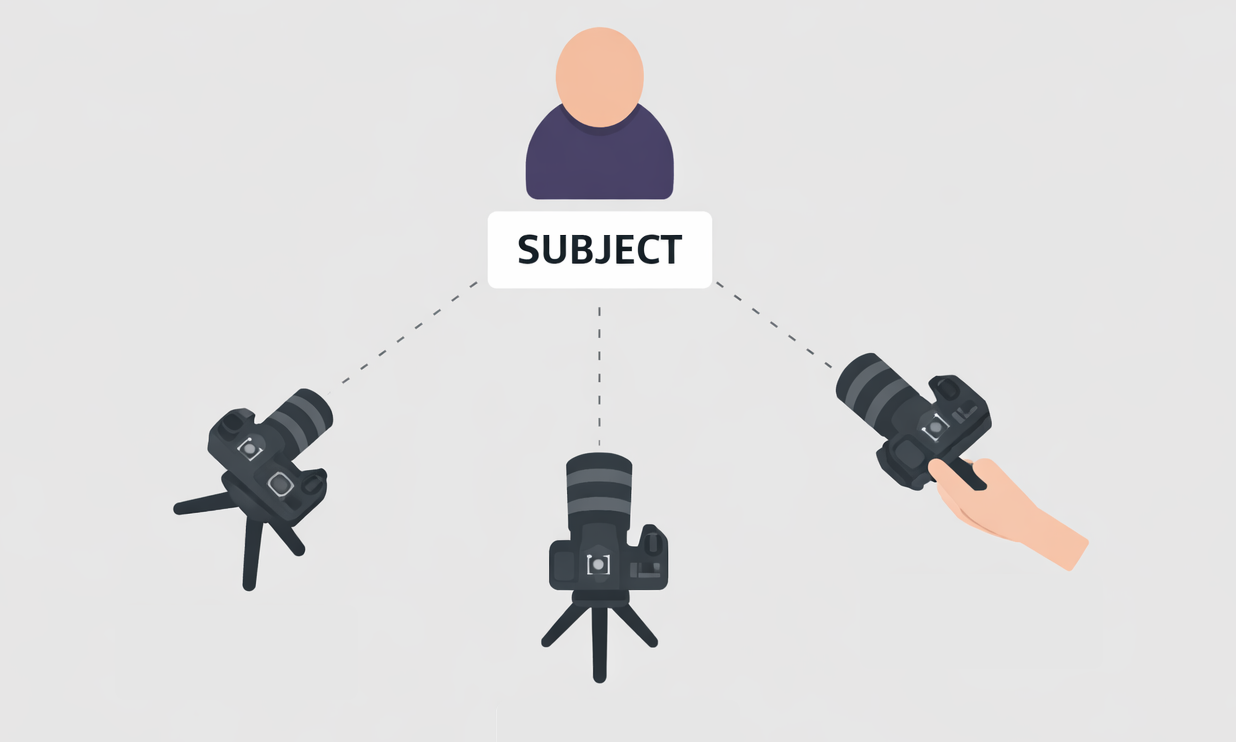
On Week 2, you will work with three cameras, each with a different lenses. Setup the lens for each camera first, then go over the rest of the settings below.
- Camera A: Default kit lens (static - on tripoid)
- Camera B: 50mm (static - on tripoid)
- Camera C: 85mm (moving - handheld)
3. Camera Settings
For this assignment, use Manual Mode (M).
- Shooting in Manual Mode gives you full control over the camera’s exposure settings, including aperture, shutter speed, and ISO.
- Keep exposure consistency across all three cameras
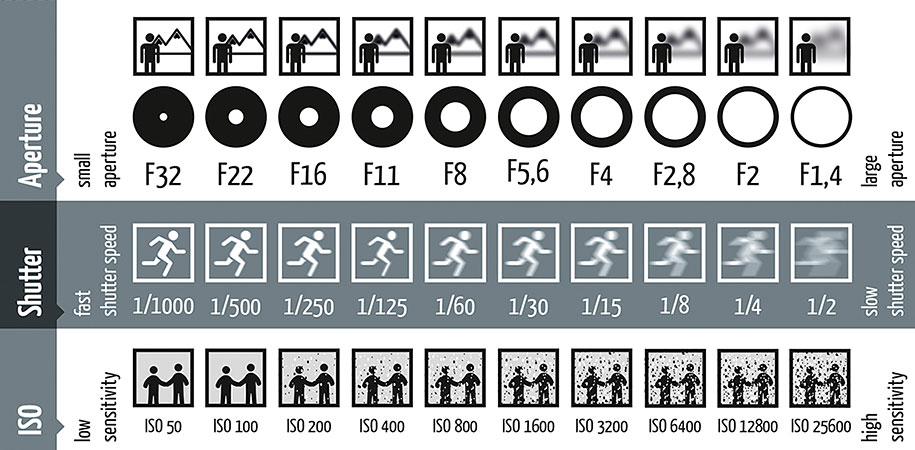
Aperture (f-number)
- Start with a wide aperture, such as f/2.8 – f/5
- A wider aperture lets in more light, creates a shallow depth of field, helps separate the subject from the background, reinforcing the dramatic effect of chiaroscuro
- Note: Each lens has a specific range of available apertures, determined by its physical design and focal length.
- Recommendation: Keep the same or similar aperture across all cameras to make multi-camera exposure easier to manage.
Shutter Speed
- Start at 1/60s. You may raise it or lower it slighthly if needed
- Shutter speed in this assignment is used primarily to fine-tune overall exposure, and avoid motion blur while keeping movement natural
- Because the subject is mostly still, extreme shutter speeds are not required.
- Recommendation: Keep the same shutter speed across all cameras to make multi-camera exposure easier to manage.
ISO
- Begin at ISO 400 for the cleanest image
- Increase to ISO 800-1600 only if the scene is still too dark after adjusting lights and aperture
- Avoid going higher unless instructed, as higher ISO introduces visible noise (especially in low-light scenes)
Additional Settings
- Ignore Auto-Exposure Bracketing (AEB) for this assignment
Leave it at the default setting
4. White Balance
White Balance is the appearance of Color determined by the pigments present in the subject, and the light illuminating it.
In Week 1, you used Auto White Balance (AWB). In this mode, the camera automatically analyzes the scene and adjusts color temperature to neutralize what it assumes should be white.
For Week 2, we will switch to Custom White Balance to maintain consistent skin tones in all three cameras. Follow this tutorial to set White Balance manually.
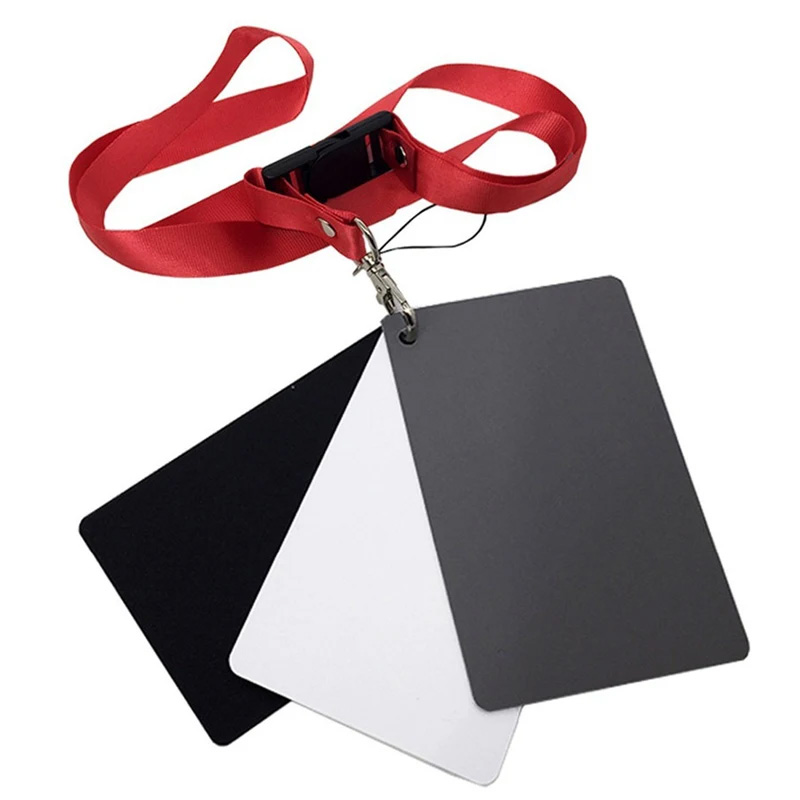
A 3 in 1 Balance Card Set (2”x 3”) will be available for White Balance (this item is included on the Department rentals).
3 in 1 Balance Card Set (2”x 3”)
5. Camera Placement
- Camera A: eye-level, directly facing the subject (on tripoid)
- Camera B: positioned 30–45° to left or right side (on tripoid)
- Camera C: flexible (moving around), focused on details (handheld)
6. Audio Recording Method
You will record audio directly into two of your cameras (A & B) using two a lapel microphone and a shotgun microphone.
Check the Available Microphones.
Follow this tutorial to setup the RODE VideoMic NTG On-Camera Shotgun Microphone to your main camera (A):
Follow one of these tutorials to setup the lapel Microphone to your side camera (B):
Connect CAMERA to Rode Wireless GO II Microphone
Note: You only need to setup one microphone.
Connect CAMERA to Sennheiser Evolution Wireless(G4 Sys 100-P Series)
Basics of Audio for Video:
Credits: Jessica A. Rodríguez
AI Disclosure:
Microsoft CoPilot and ChatGPT was used for editing and clarity only, as well as to create some to the image visualizations. AI is not used to generate original course content.