MediaArtTutorials
W3 — Tech Walkthrough
Lenses, Aperture & Depth of Field for Outdoor Recording
Objective
This technical walkthrough supports the Static Outdoor Scene (Groups of 3 students) assignment.
By the end of this session, students should be able to:
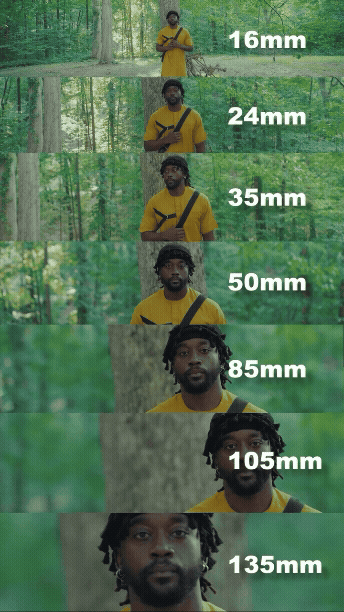
- Notice how lens focal length (24mm, 35mm, and 50mm) shapes perceived space, scale, and spatial relationships
- Use aperture as both a depth-of-field and exposure tool, working within the physical limits of each lens
- Identify moments where image information is irreversibly lost at the time of recording due to overexposure or underexposure, and understand why this loss cannot be fully recovered in post-production
Lenses (24mm - 35mm - 50mm)
Check Available Lenses
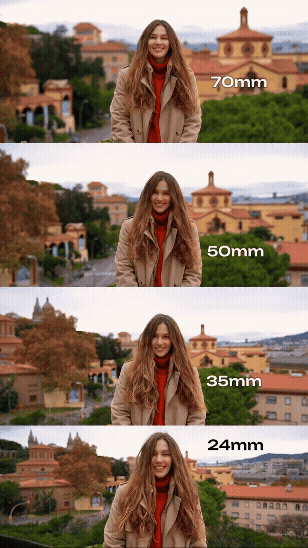
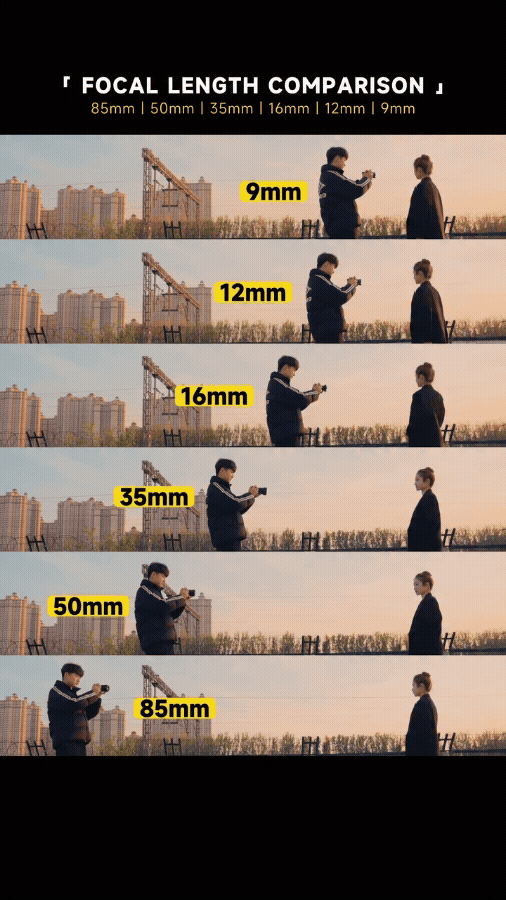
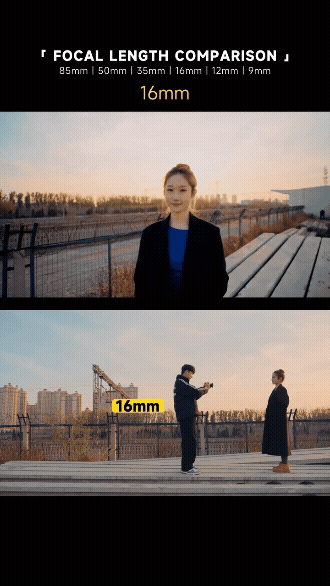
Lens Focal Length & Perceived Space
Lens focal length does not simply change how much you see — it changes how space is perceived in the image.
- 24mm
- Wider field of view
- Expands space and exaggerates distance between foreground and background
- Emphasizes environment and spatial context
- 35mm
- Still wide, but more natural-looking
- Slightly compresses space compared to 24mm
- Balances subject and environment
- 50mm
- Narrower field of view compared to 24mm and 35mm
- Produces a more “natural” perspective closer to human vision
- Compresses space more noticeably, reducing the sense of depth between foreground and background
- Isolates subjects more easily, even in outdoor environments

Distance to Subject (More Important Than You Think)
- Being closer to the subject exaggerates depth and separation
- Stepping back compresses space and increases depth of field
- Distance affects how depth is perceived, even at the same aperture
Wide lenses exaggerate these effects, especially when the camera is close to the subject.
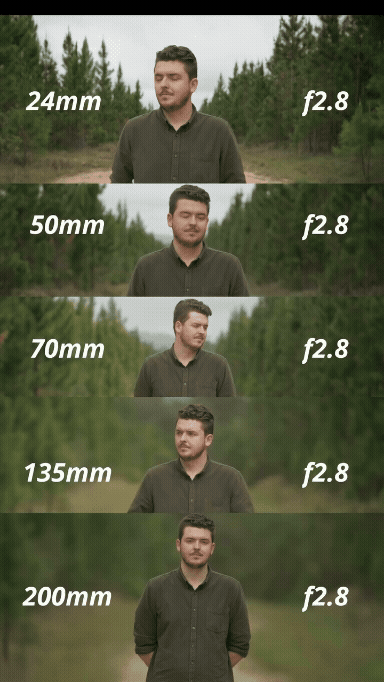
Depth of Field
Depth of Field is the area in front of and beyond the focal plane where objects still appear in focus.
This area can be narrow (shallow depth of field)—where only a small portion of the scene is in focus—or large (deep depth of field)—where more of the scene appears sharp.
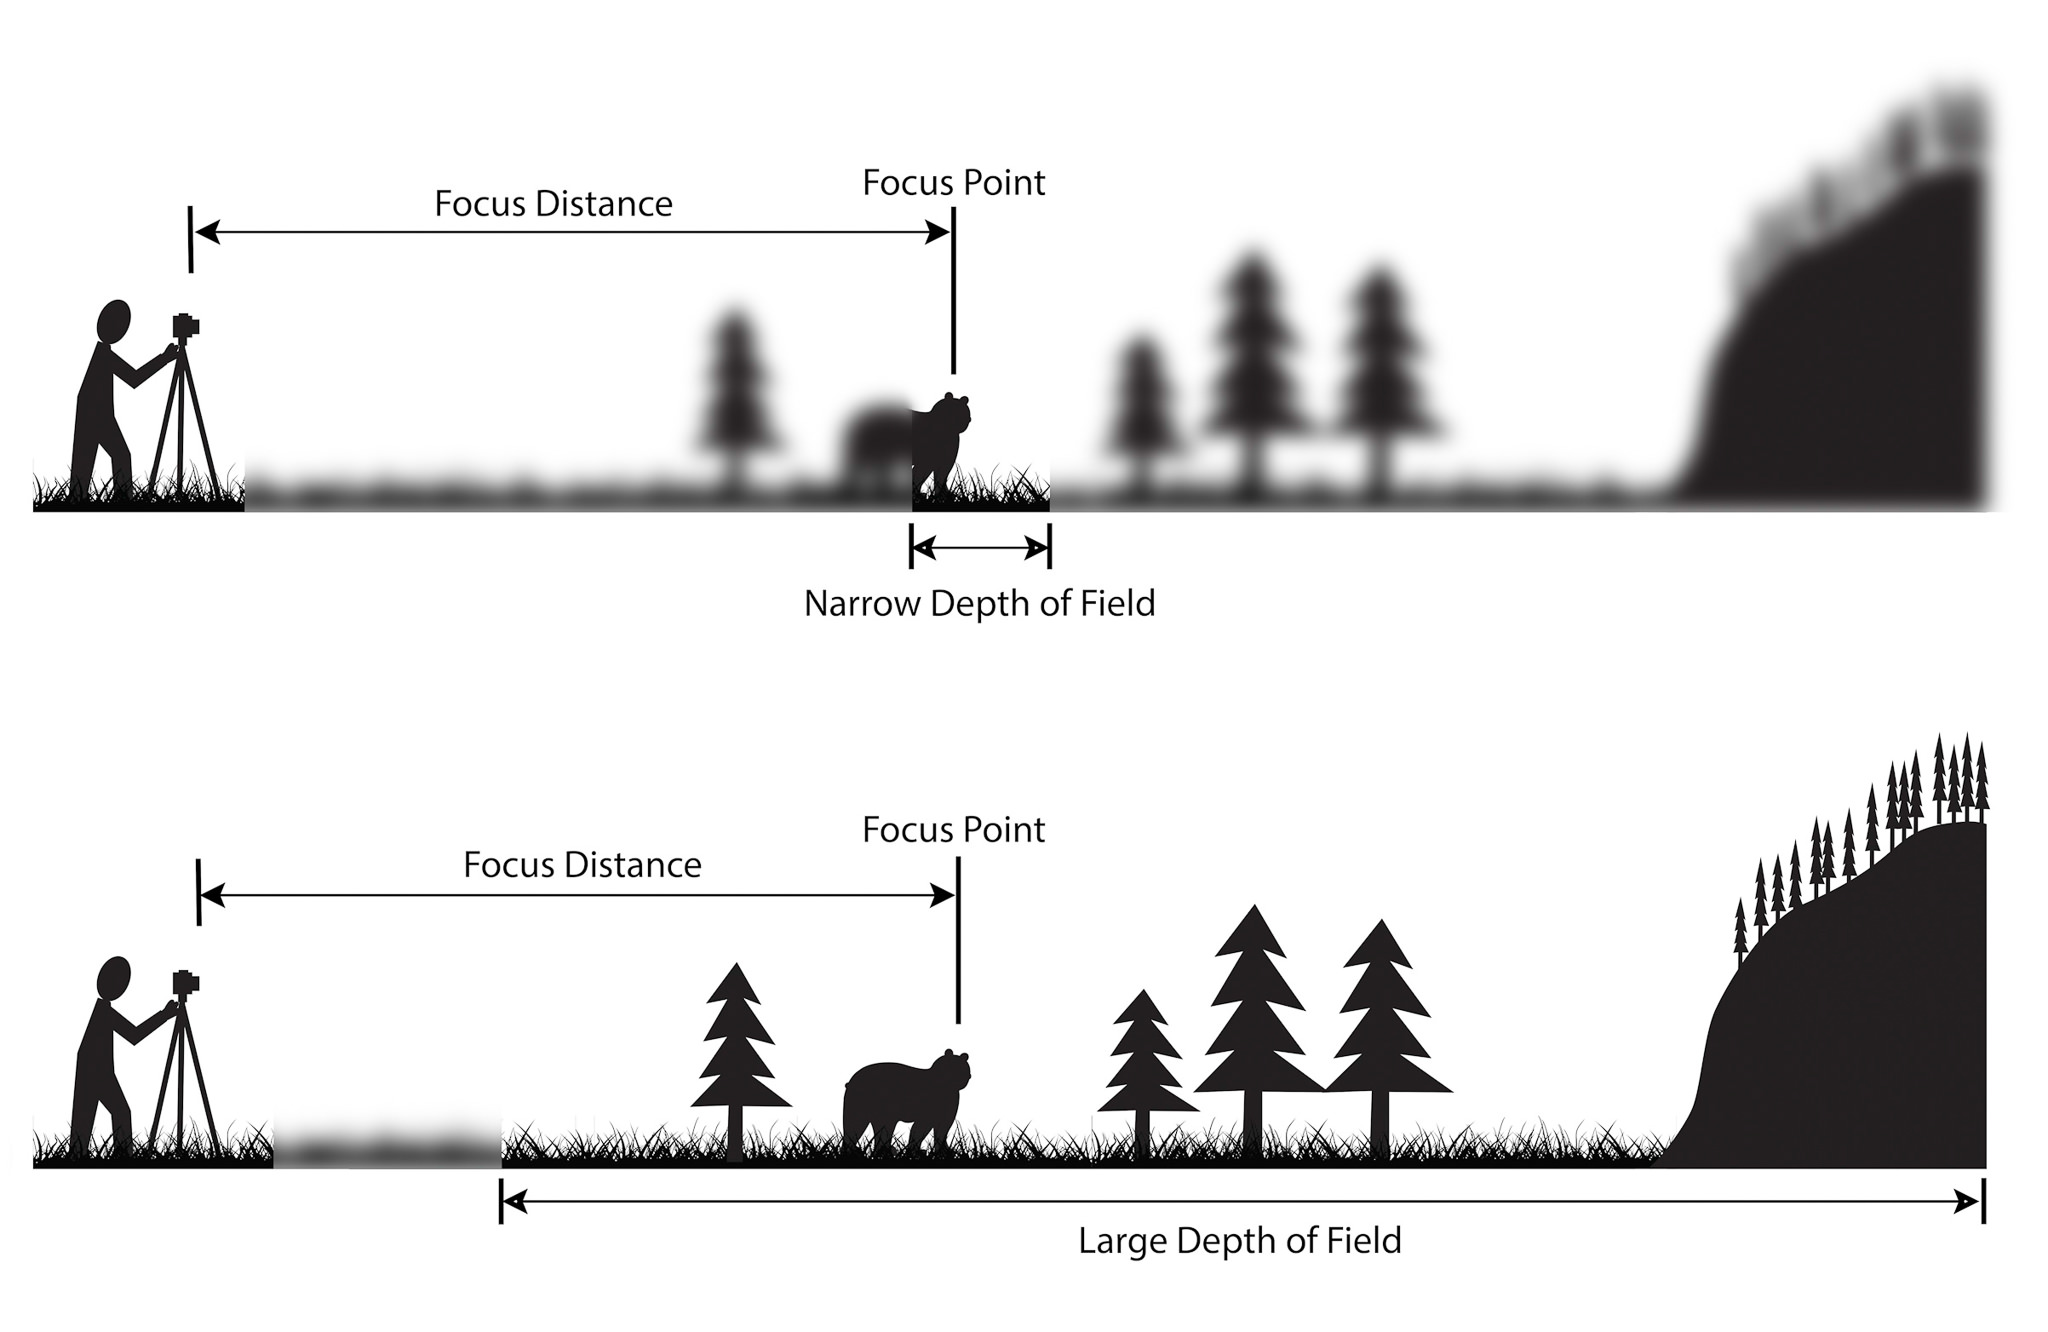
Three main factors affect depth of field:
-
Aperture size
Smaller apertures (e.g., f/11 or f/16) produce a greater depth of field, keeping more of the scene in focus. -
Distance to subject
The farther the camera is from the subject, the greater the depth of field. -
Focal length of the lens
Shorter focal lengths (wide-angle lenses) generally produce a greater depth of field than longer lenses.
❗ Always use Manual Focus (MF) instead of Auto Focus to maintain precise control over depth of field.
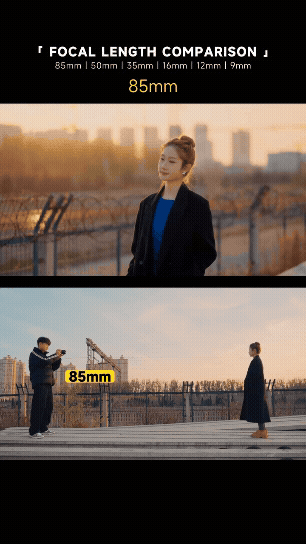
Wide Lens ≠ Infinite Depth of Field
A common misconception is that wide lenses automatically keep everything in focus.
This is not true.
- Wide lenses can produce shallow depth of field
- Background blur becomes visible when:
- The subject is close to the camera
- The aperture is wide
- Depth is still shaped by distance + focal length + aperture
Before adjusting camera settings, always consider where the camera is placed.
Camera Settings — What to Use for Week 3
For Week 3, we will continue using the same settings as Week 2, while expanding our attention to how lens choice and exposure decisions affect the image at the moment of recording.
❗ The goal is not to memorize settings, but to understand how each choice shapes space, light, and image information.
Camera Settings
Check W2 — Tech Walkthrough for reference.
- Choose one of the available lenses (24mm, 35mm, or 50mm) and install it
- Set the camera to Video Mode
- Set Aspect Ratio to 16:9
- Set the Resolution to 1920 × 1080
- Set the Frame Rate to 30 fps
- Activate the Grid
- Set the lens to Manual Focus (MF)
- Set up Custom White Balance
Tip: Use a Balance Card Set or a white sheet of paper
Manual Mode + Exposure
- For this assignment, use Manual Mode (M).
- You will also use the histogram to monitor exposure consistency and identify potential loss of image information.
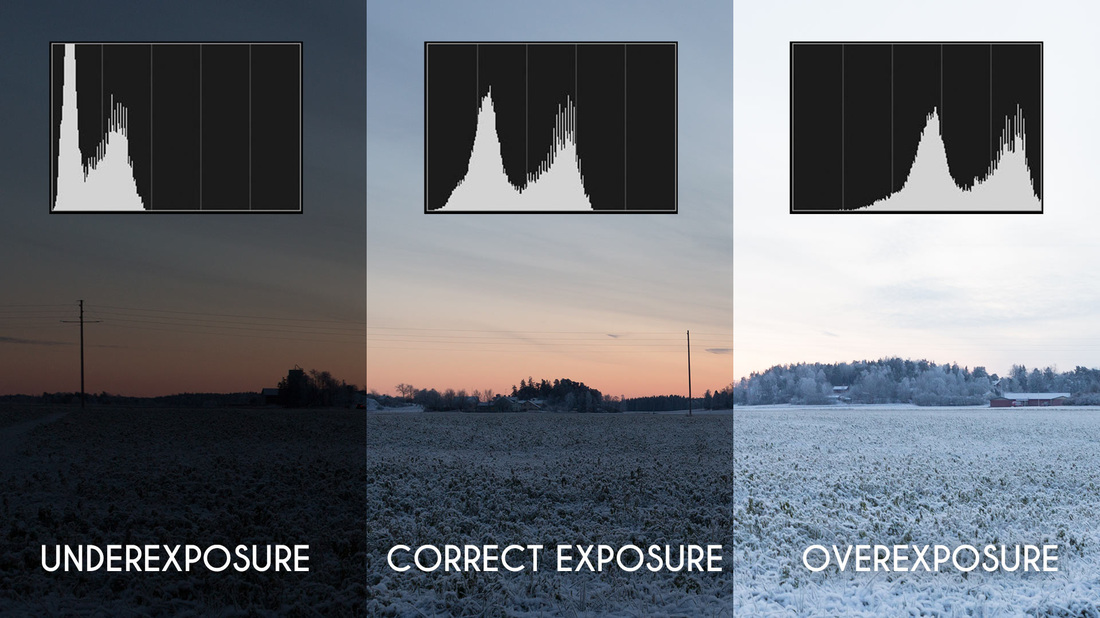
Exposure
Exposure refers to how much light reaches the camera’s sensor at the moment an image is recorded.
-
Normal Exposure
Occurs when highlights, midtones, and shadows are balanced in a way that preserves visible detail across the image, allowing the scene to be represented clearly and consistently. - Overexposure
Happens when too much light reaches the sensor. Bright areas become washed out, and detail in the lighter zones (highlights) is permanently lost.Once highlight information is clipped, it cannot be recovered in post-production.
- Underexposure
Happens when not enough light reaches the sensor. Dark areas become muddy or flat, and detail in the darker zones (shadows) is permanently lost.Shadow detail lost to underexposure cannot be restored later without introducing noise or artifacts.
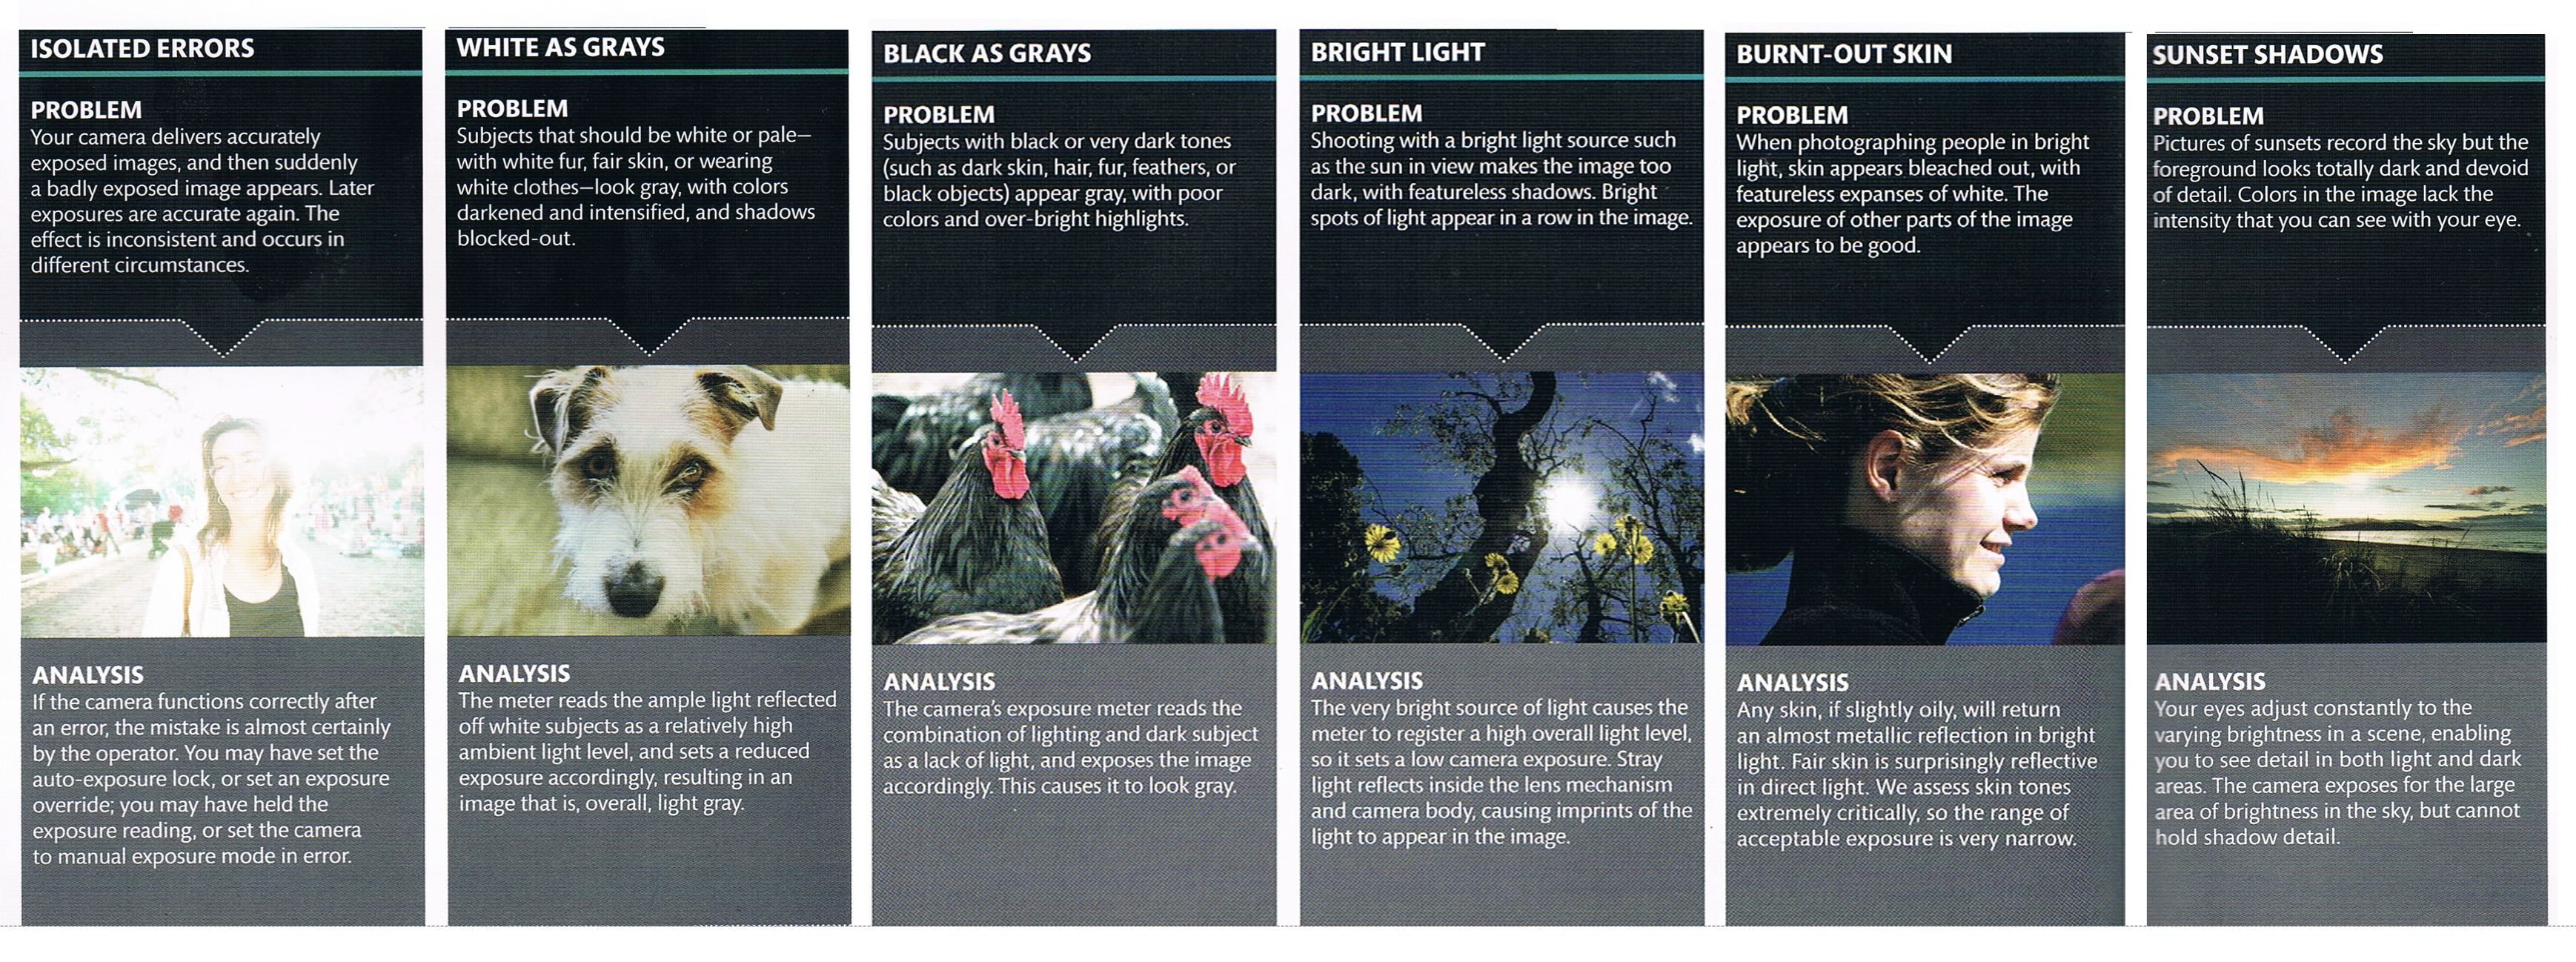
Some Exposure Problems
Exposure Triangle
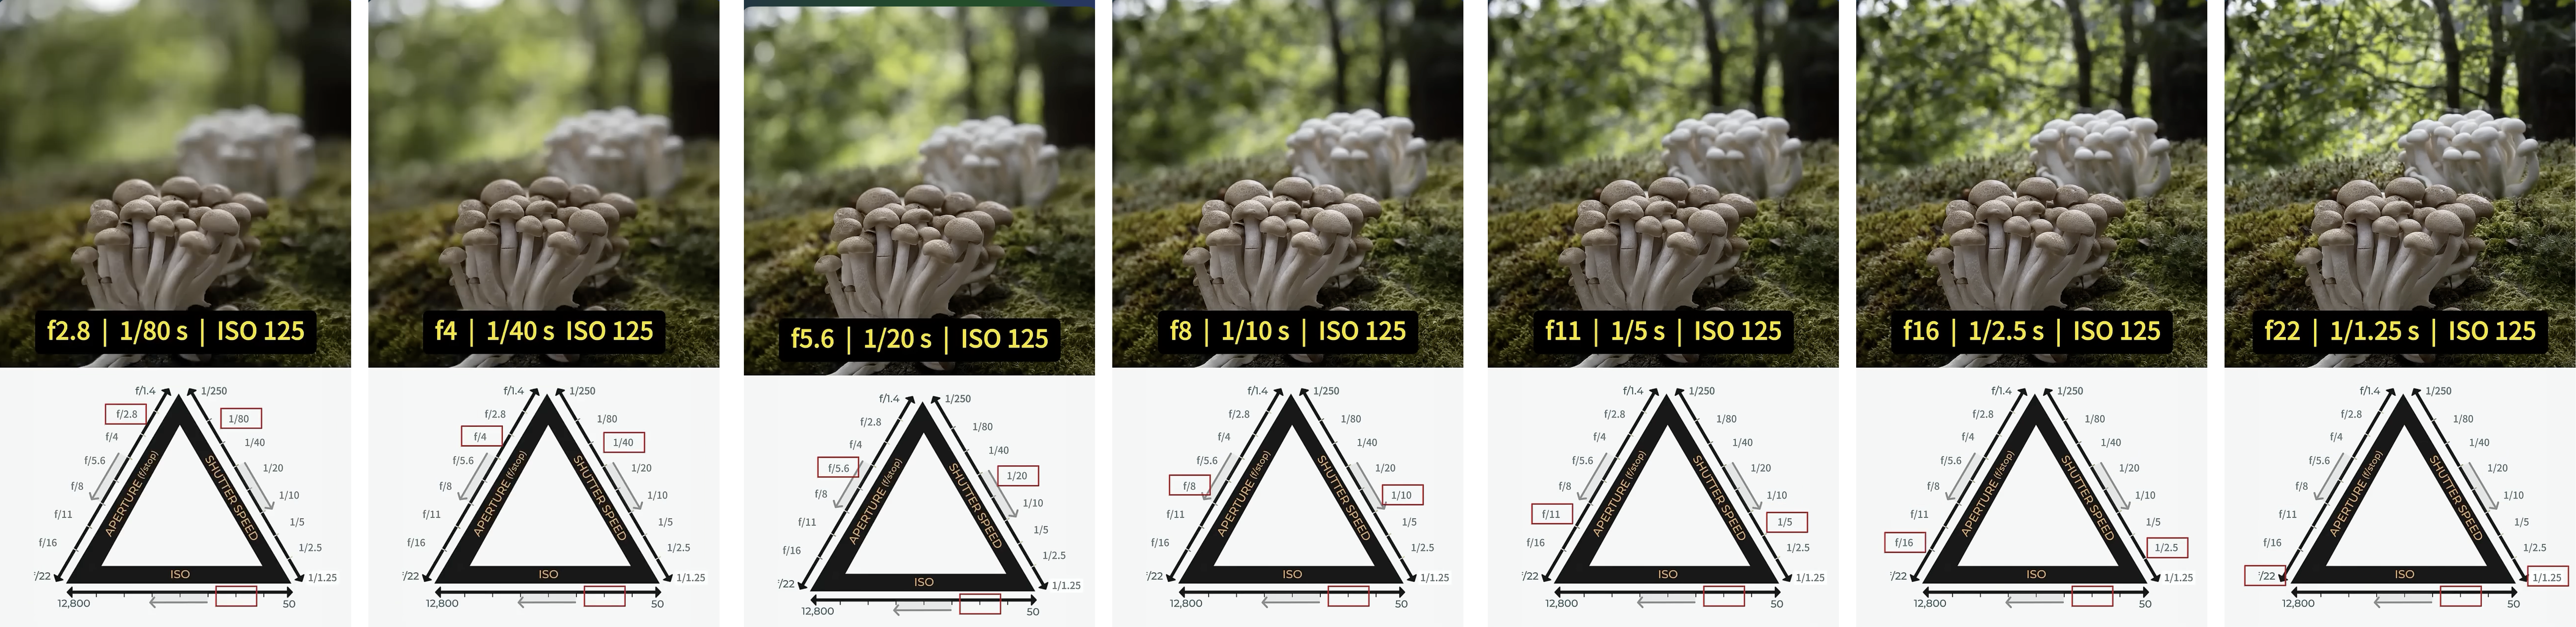
Exposure is controlled by the combined relationship between three camera settings: aperture, shutter speed, and ISO.
These three elements work together — changing one always affects the others.
- Aperture controls how much light enters the camera and influences depth of field
- Shutter Speed controls how long light reaches the sensor and affects motion blur
- ISO controls the sensor’s sensitivity to light and affects image noise

Metering
Metering is the system the camera uses to measure the brightness of a scene and estimate what it considers a “correct” exposure.
For Week 3 (Static Outdoor Scene):
- Use Evaluative / Matrix Metering
- This mode analyzes light across the entire frame
- It provides a stable baseline when lighting conditions are relatively consistent
Because the camera position is fixed, metering is used primarily to set exposure once and confirm that it remains stable.
⚠️ Metering can be misled by bright skies, snow or concrete, and large areas of shadow. For this reason, metering should always be checked against the histogram.
How to change the metering
Histogram
The histogram is a visual graph that shows how brightness values are distributed across an image.
- Left side → Shadows
- Middle → Midtones
- Right side → Highlights
Normal exposure = not peaking either in shadows or highlights
To activate the histogram, simply press the INFO. botton (to the right of MENU) until it appears.

For this assignment, use the histogram to:
- Identify clipped highlights (loss of information in bright areas)
- Identify crushed shadows (loss of information in dark areas)
- Confirm that exposure remains consistent across shots
❗ Advise: Expose for Highlights and let the shadow areas fall where they may (better to have less detail in black than blown out whites).
Aperture as a Depth Tool (Range-Based)
Aperture controls both light and depth of field.
For this assignment:
- Lower f-number (e.g., f/2.8) = More light + Shallower depth of field
- Higher f-number (e.g., f/8) = Less light + Deeper focus
❗ Each lens has a specific aperture range determined by its physical design:

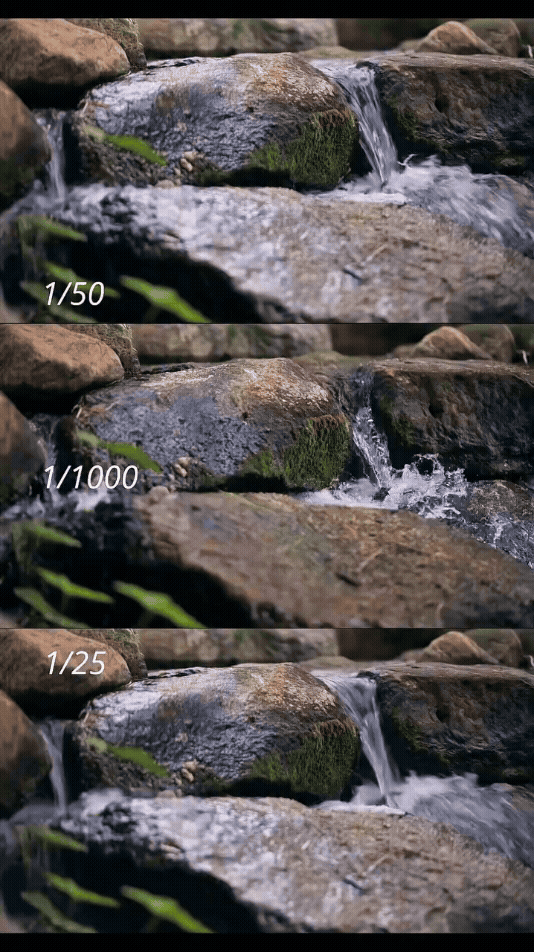
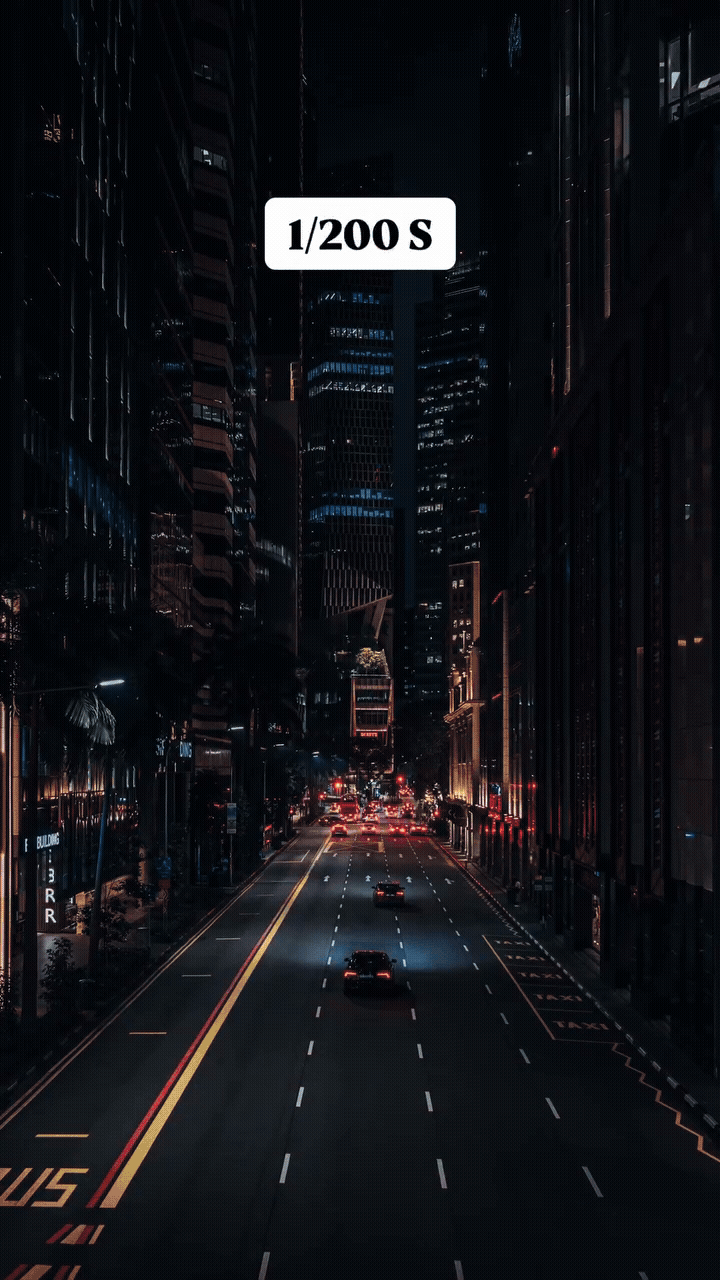
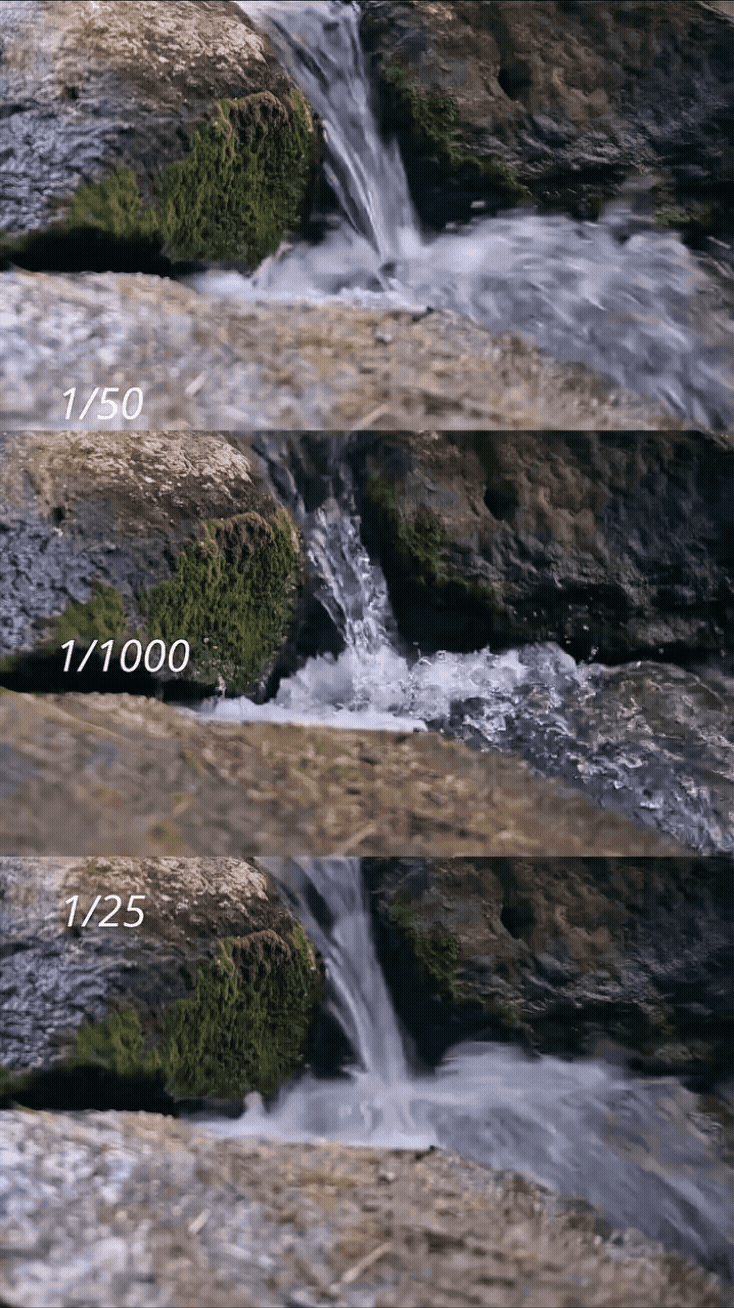
Shutter Speed as a Motion & Exposure Tool
Shutter speed controls how long light reaches the camera’s sensor and affects both exposure and motion rendering.
For this assignment:
- Slower shutter speeds (e.g., 1/30s)
- Allow more light into the camera
- Can introduce motion blur if the subject or camera moves
- Faster shutter speeds (e.g., 1/125s)
- Allow less light into the camera
- Freeze motion more effectively
ISO as a Sensitivity & Image Quality Tool
ISO controls the camera sensor’s sensitivity to light.
Unlike aperture and shutter speed, ISO does not change how light enters the camera — it amplifies the signal (digitally) after light is captured.
For this assignment:
- Start at a low ISO (e.g., ISO 100–400)
- Produces the cleanest image
- Preserves fine detail and smooth tonal transitions
- Prioritize lens choice, aperture, and shutter speed before increasing ISO.
- Increase ISO only if necessary (e.g., ISO 800–1600)
- Use this after adjusting aperture and shutter speed
- Higher ISO introduces visible noise, especially in shadow areas
- ISO should always be treated as a last resort, not a primary exposure control.
- ⚠️ Raising ISO cannot recover lost image information from overexposure or underexposure — it only amplifies what was already recorded.
Audio Recording Method
You will record audio separately using a ZOOM H4N Handheld Recorder.
Recording audio separately with professional sound recording devices gives you better sound quality and more control during editing.
Important Checks Before Recording
- Use the built-in microphone for this assignment
- If available, always use a windscreen for outdoor audio recording
- Set the Rec Format to WAK48KHz/24 bit
- Set mode to stereo
- Wear headphones to monitor sound
- Check that audio levels are not peaking (avoid red level indicators)
Tips
- One person must hold the ZOOM H4N steadily at all times
- Press Record on both the ZOOM and the camera at the same time, then do a clear hand clap
This clap will help you sync audio and video later in Premiere Pro
- Do not tap, touch, or adjust the recorder while recording — this will introduce unwanted handling noise
- Everyone else must stay still and quiet during recording
- The student holding the ZOOM may move carefully to get closer to specific sound sources
Do not move in front of the camera or enter the frame
ZOOM H4N TUTORIAL - How to set up the Zoom H4N to record - Recording audio for film
Credits: Jessica A. Rodríguez
AI Disclosure:
Microsoft CoPilot and ChatGPT was used for editing and clarity only. AI is not used to generate original course content.