MediaArtTutorials
W6 — Lighting as Temporal Transformation
Objective
You will build on your W5 scene by designing and animating moving lights, exploring how lighting cues over time reshape space, attention, and emotional trajectory.
This activity focuses on how changes in lighting position, intensity, colour, and dominance, combined with camera movement, transform the experience of a space without changing the objects, audience placement, or stage layout.
Materials Required
- Computer (laptop or desktop)
- Blender (free software)
👉 Download: https://www.blender.org/download/ - Computer mouse (recommended)
- Your Week 5 Blender file (.blend)
- Paper + pen (preferred) or digital drawing tool
Activities
Complete the following in order. Ask your professor or TA for help as needed.
[15 min] Lighting Intentions — Start Here
Select one of the two following approaches (A or B) and write a lighting intention.
Lighting Intention 🅰️ — Single Emotion, Evolving Over Time
Write 3–4 sentences describing how a single emotional state evolves through lighting changes.
Your description must:
- focus on change over time, not a static look
- include 3–5 distinct cues or transitions
- describe how lighting intensity, colour, dominance, and spatial effect shift
Lighting Intention 🅱️ — Mixed Emotions Over Time
Write 3–4 sentences describing how multiple emotions coexist or compete through lighting changes.
Your description must:
- describe how different emotional forces overlap or shift dominance
- include 3–5 distinct cues or transitions
- focus on contrast, tension, or collapse rather than smooth progression
[20 min] 2D Lighting Map
Using your Week 5 scene layout, create a lighting map, representing the selected prompt (from the previous step):
- Lighting Map A: Single Emotion, Evolving Over Time
OR - Lighting Map B: Mixed Emotions Over Time
⚠️ You must not change object placement, stage position, audience placement, or entrances.
You are only designing lighting changes over time.
Each lighting map must include:
- a Top View
- a Side View
- a Front View
Hand-drawn (preferred) or digital.
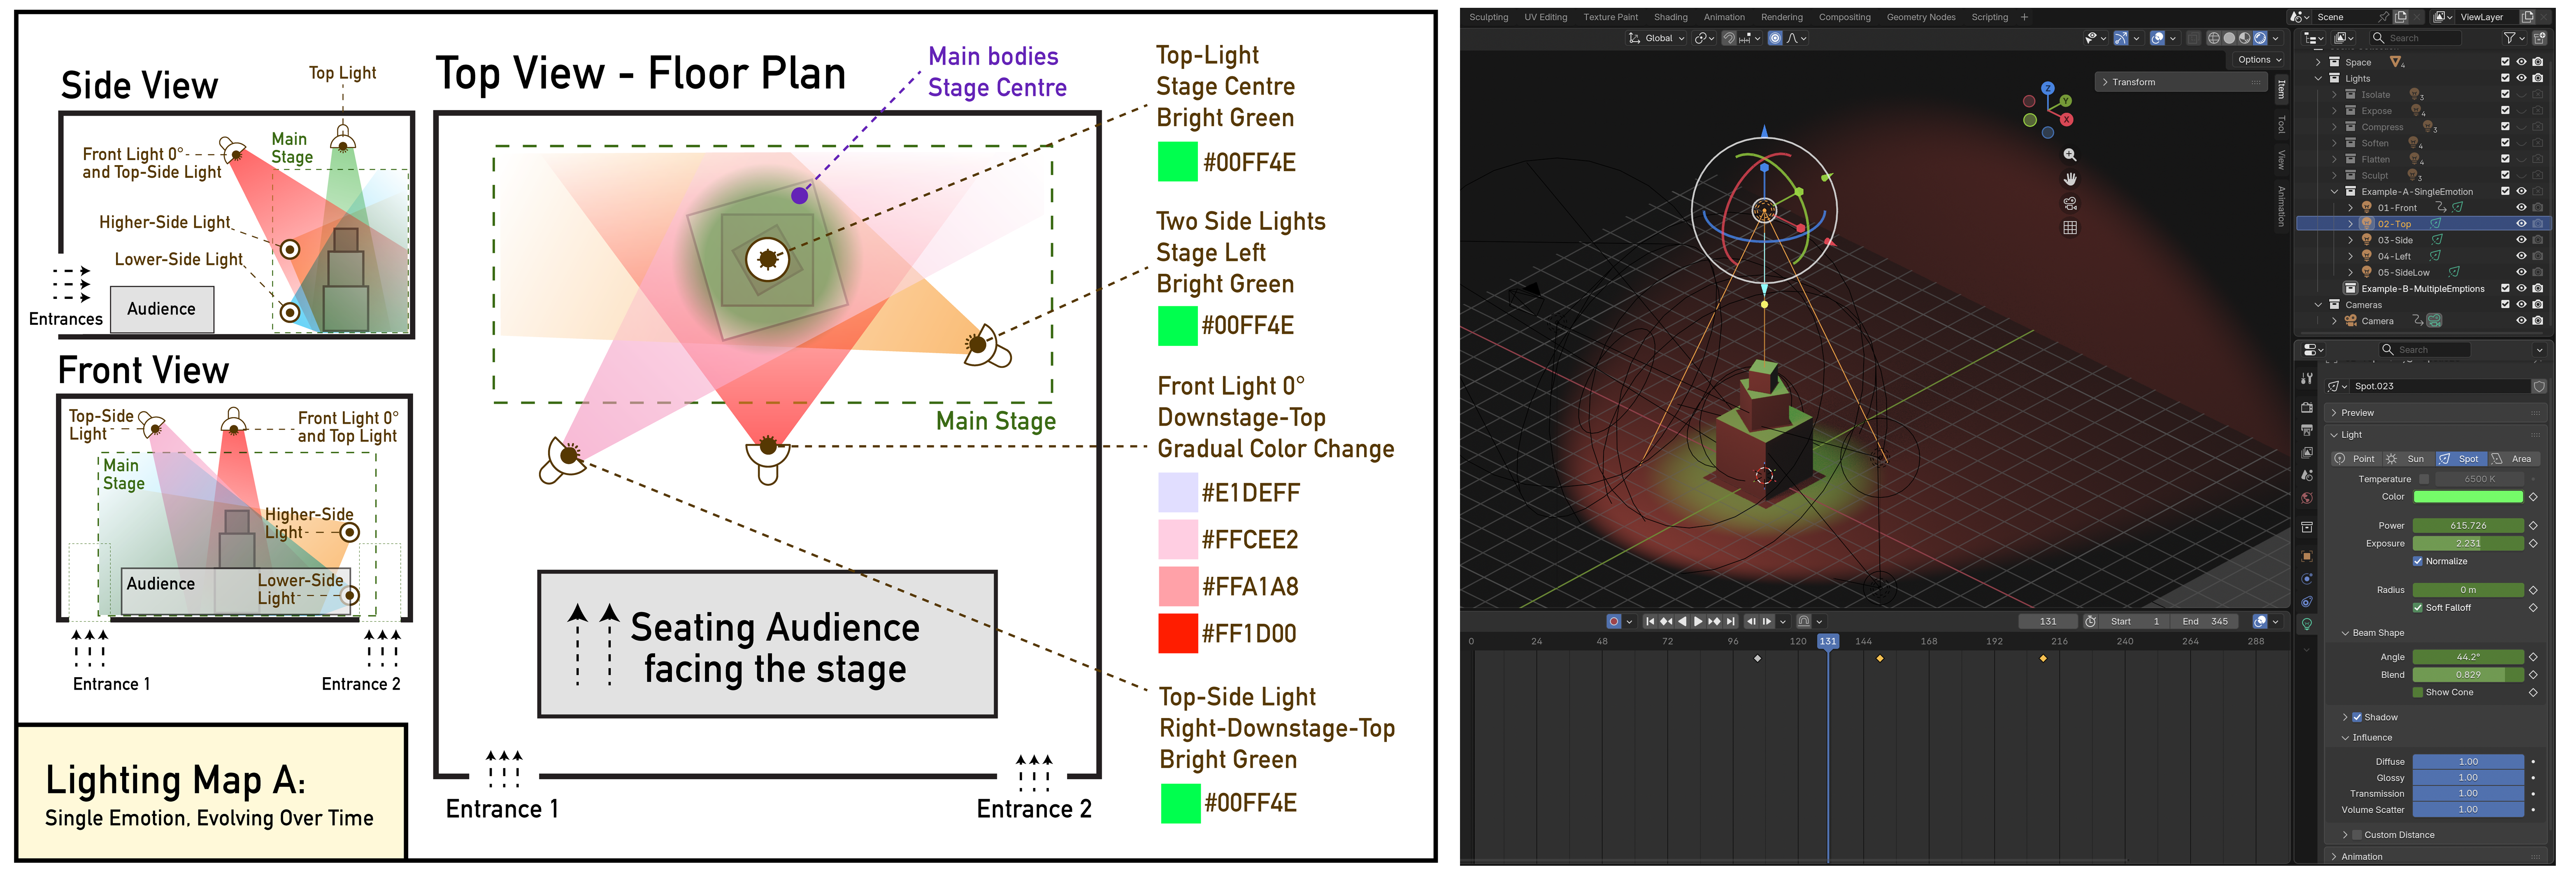
Example
You are not copying the example — you are using it as a reference for how to clearly communicate lighting decisions and cue logic.
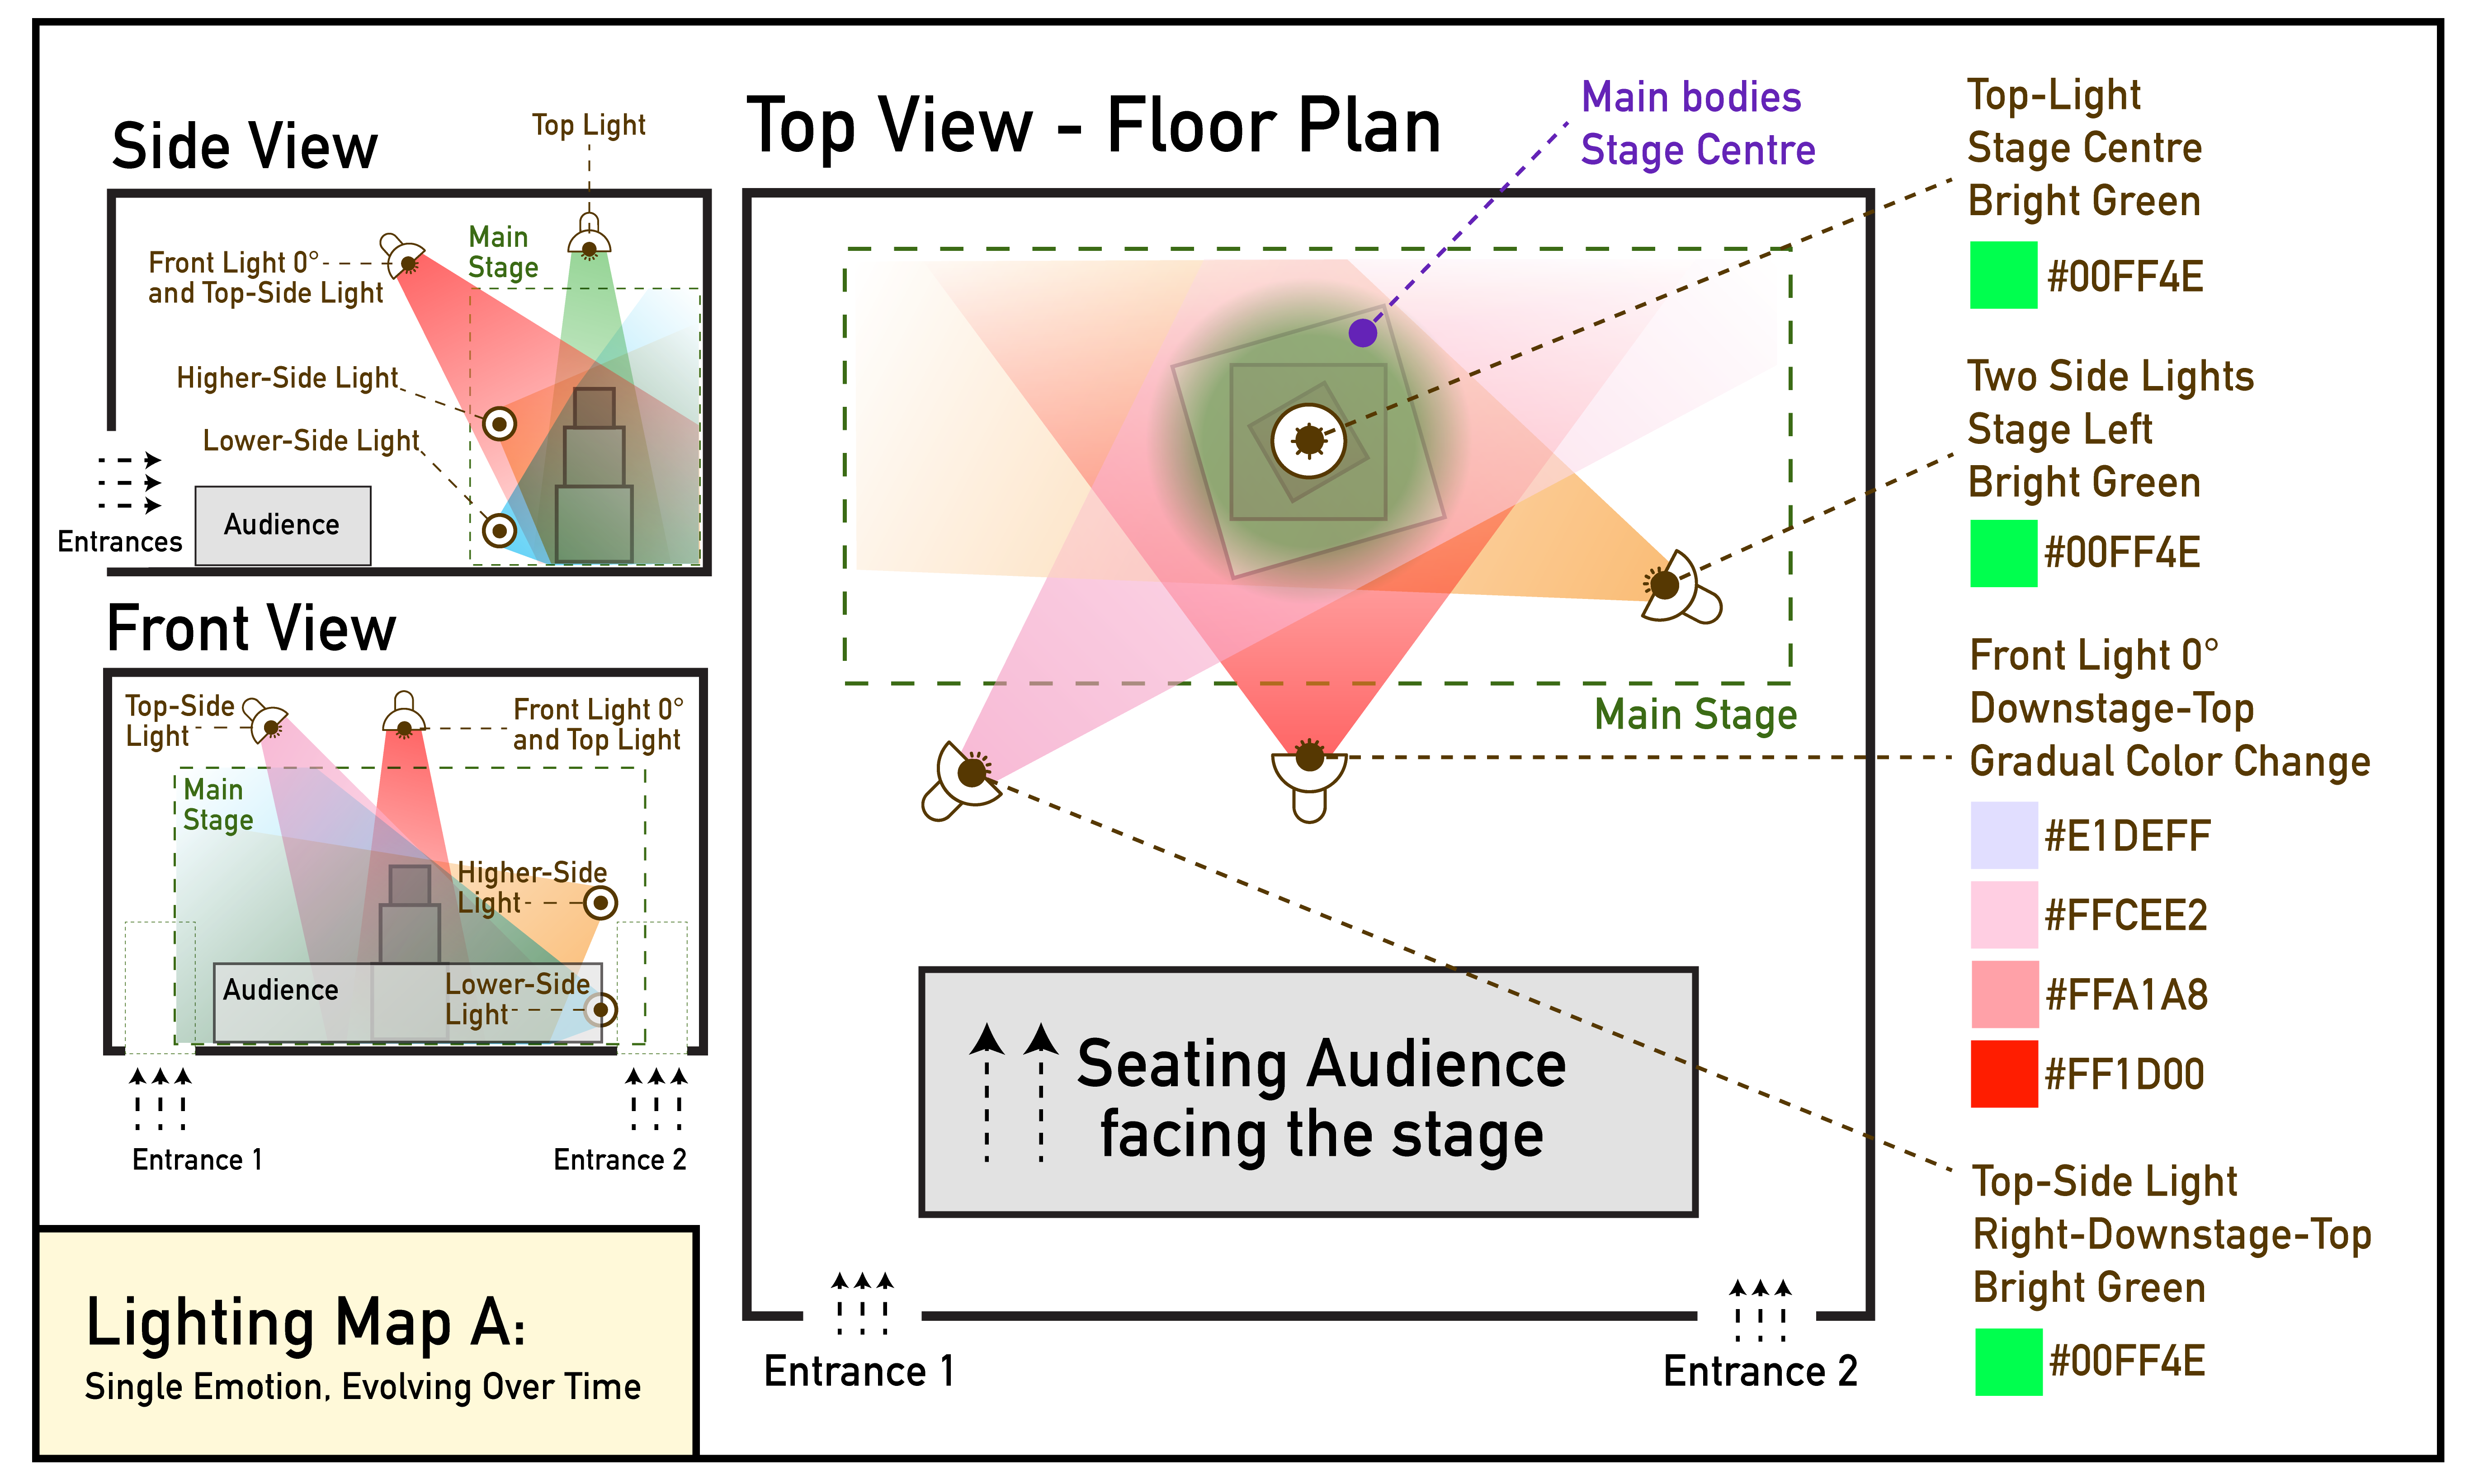
⚠️ Your drawing skill is not graded.
You are graded on clarity of lighting logic, use of vocabulary, and ability to communicate cues clearly.
Lighting Map Requirements
You are required to use the vocabulary from
Because you will be using multiple lights on each map, you must:
- indicate the range or spread of each light (cone, area, or wash)
- use a different colour to represent each light’s range (see examples above)
For each light shown in the map, clearly indicate:
- Type of light
(front, side, top, mirrored front, gobo, reflected) - Position
(where the light is placed in relation to the stage) - Colour
(red, blue, light green, bright pink, etc, or use Hexadecimal -hex)
[10 min] Cue Instructions (Written for a Technician)
Write a short cue list written as if you were giving instructions to a lighting technician.
- Include 3–5 cues maximum
- Write cues in order
- Describe changes, not emotions
- Use vocabulary from class (fade, snap, increase/decrease intensity, introduce/remove, shift dominance, etc.)
- Include:
- Type of light (front, side, top, mirrored front, gobo, reflected)
- Colour (red, blue, light green, bright pink, etc, or use Hexadecimal-hex)
- Intensity (low / mid / high, or 0% to 100%)
- What the light affects (objects, stage area, audience, background)
Example — Lighting Intention + Cue Sequence (Excerpt)
You are not copying the example — you are using it as a reference for how to clearly communicate lighting cues.

Lighting Intention:
This lighting sequence builds tension through gradual changes in front light intensity, colour, and range, followed by the introduction of a secondary light that increases contrast and sharpens shadows. The cues below represent the first three cues of a longer lighting sequence.
Cue 1
Fade in a front 0° light slowly at low intensity, starting with a wide range covering around half of the stage. Gradually shift colour from light violet (#E1DEFF) to a light, low-saturated pink (#FFCEE2), lighting the centre stage and main objects.
Cue 2
Gradually increase the range slightly of the front 0°. Increase colour saturation to a mid-saturated pink (#FFA1A8), keeping intensity low.
Cue 3
Increase the range of the front 0° light while shifting colour to bright red (#FF1D00) at mid intensity. Fade in a secondary front light in bright green at mid intensity, with a narrower range focused around the main objects, creating strong contrast and hard shadows.
[40 min] Lighting in Blender
Required Organization
Each Blender file must be organized using three collections:
- Geometry / Shapes
- Cameras
- Lights
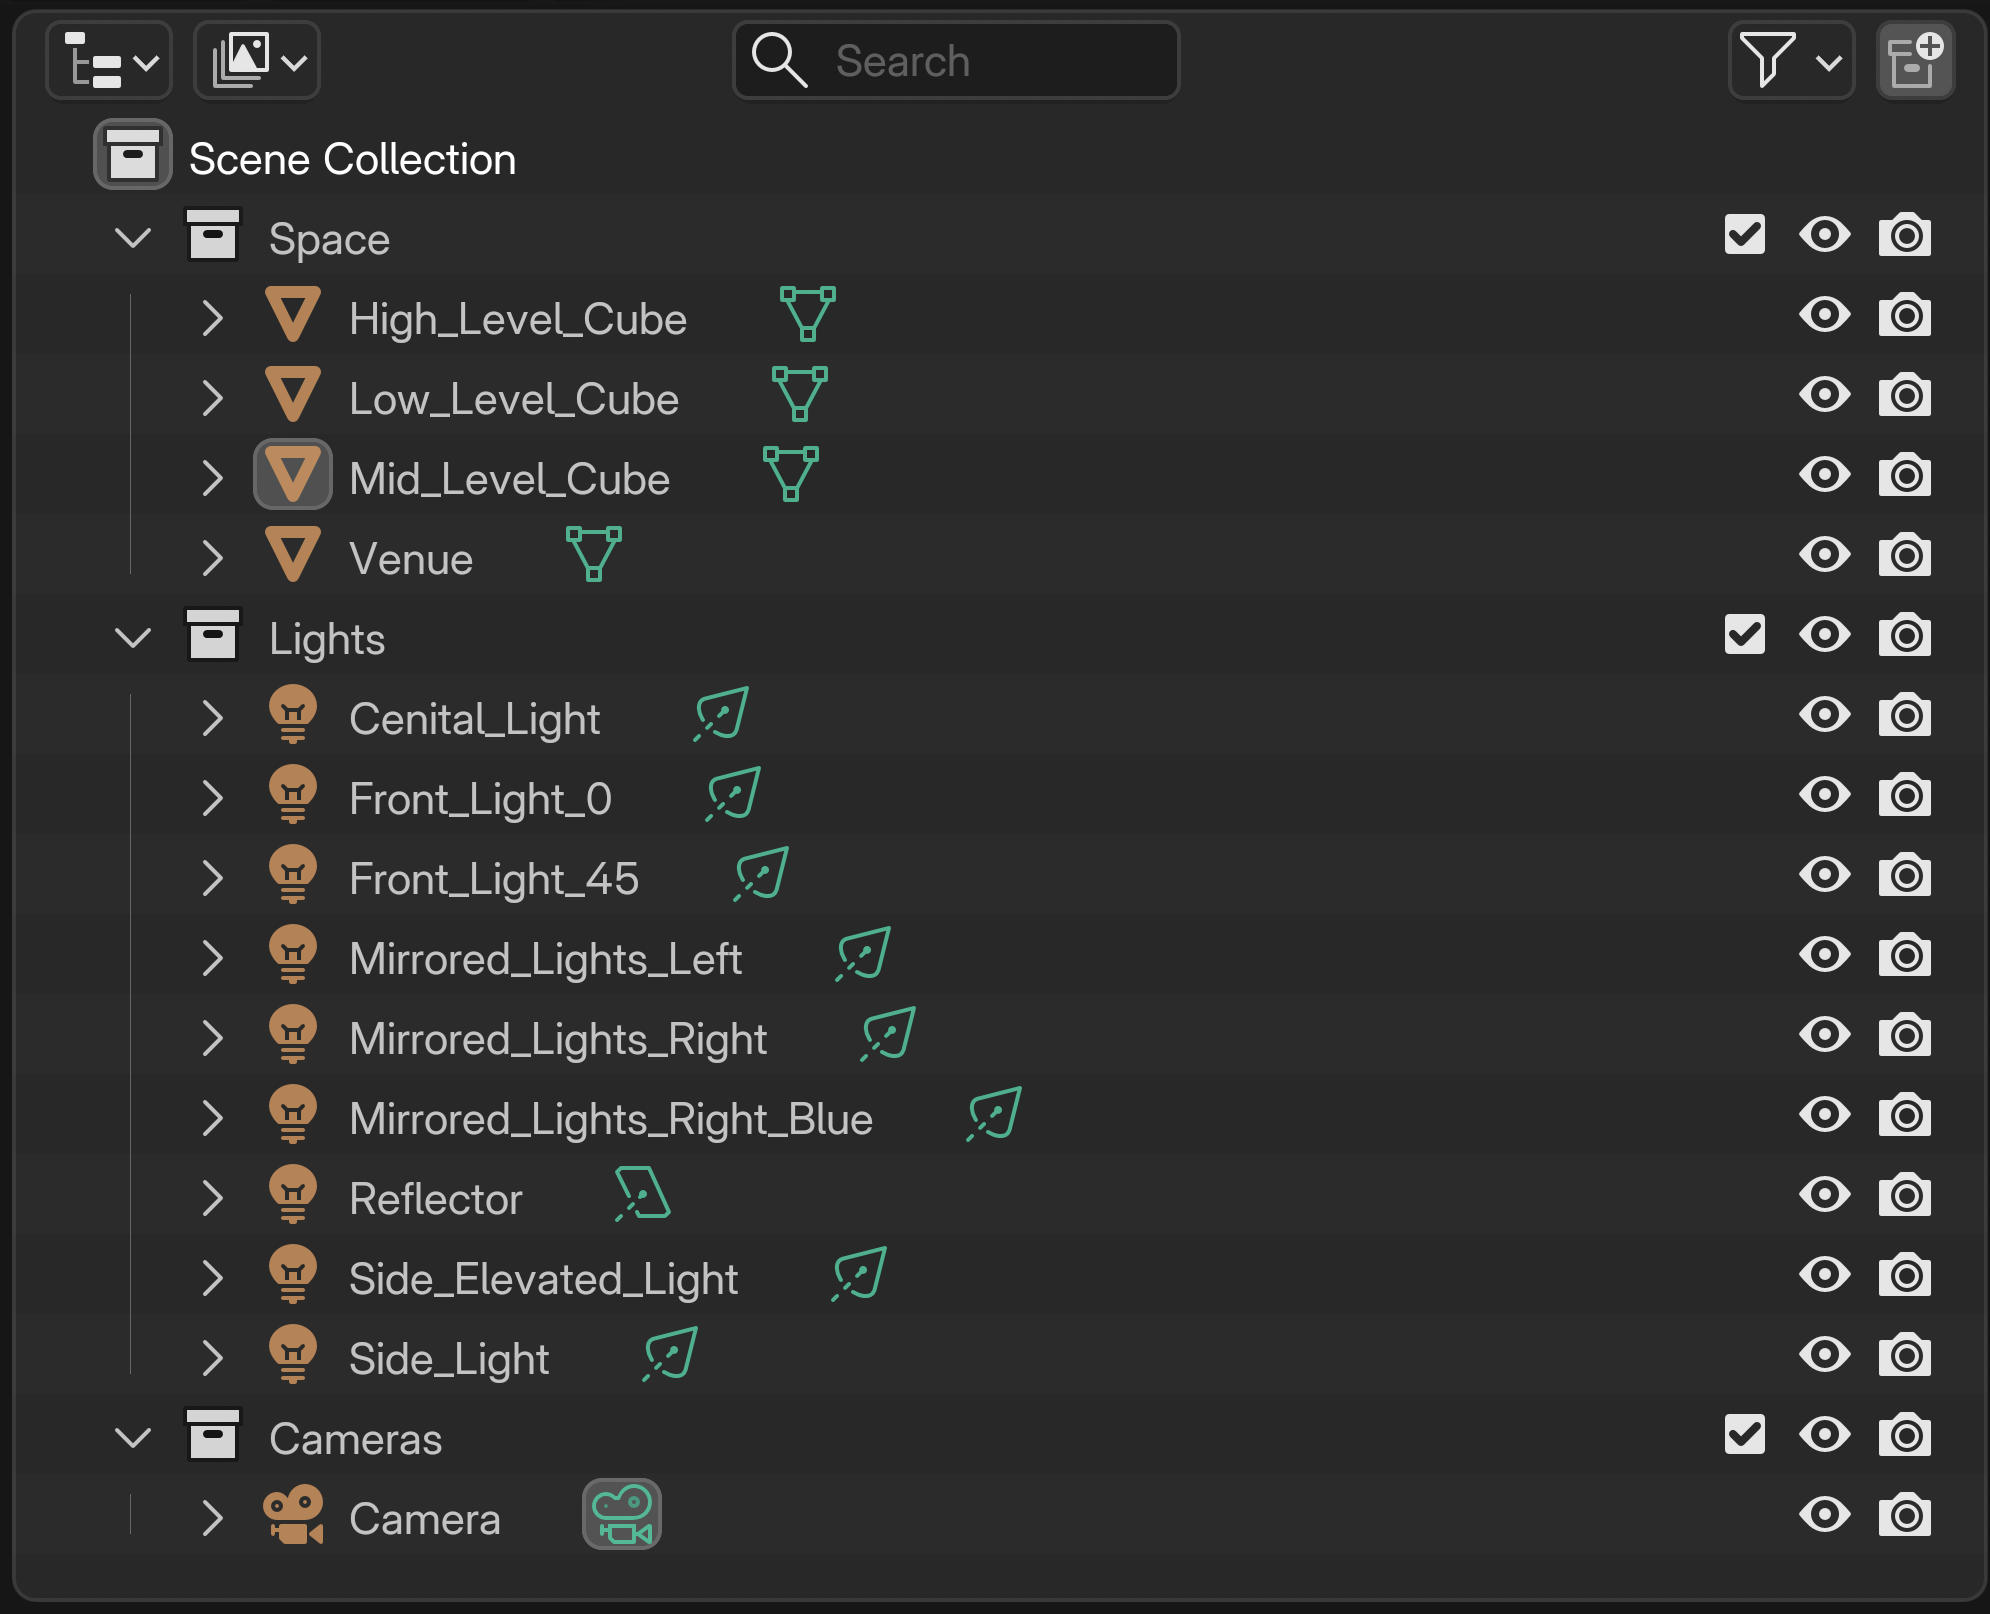
Organization Rules
- Do not move, modify, or rename geometry from W5
- Place all new lights in the Lights collection
- Rename lights clearly (e.g.,
Front_Light,Top_Light) - Correct naming protocol: do not leave spaces between words; use
_instead
⚠️ Important: Each Blender file will be checked for proper organization.
Lighting in Blender — Applying Your Cues
Using your 2D lighting maps and written cue list, apply your planned lighting changes in Blender.
You must follow your cues in order, translating each one into animated lighting changes.
- Animate the properties defined in your cues, including:
- colour
- intensity (power / exposure)
- radius / size
- influence and beam shape (angle & blend)
- Each lighting cue should occur approximately every 60–120 frames
- Total animation length must be no longer than 25 seconds
- This corresponds to a maximum of 300 frames
- ⚠️ Do not exceed 25 seconds / 300 frames
- Keep animations concise to avoid long render times on slower computers
- ❌ Do not animate light position or rotation
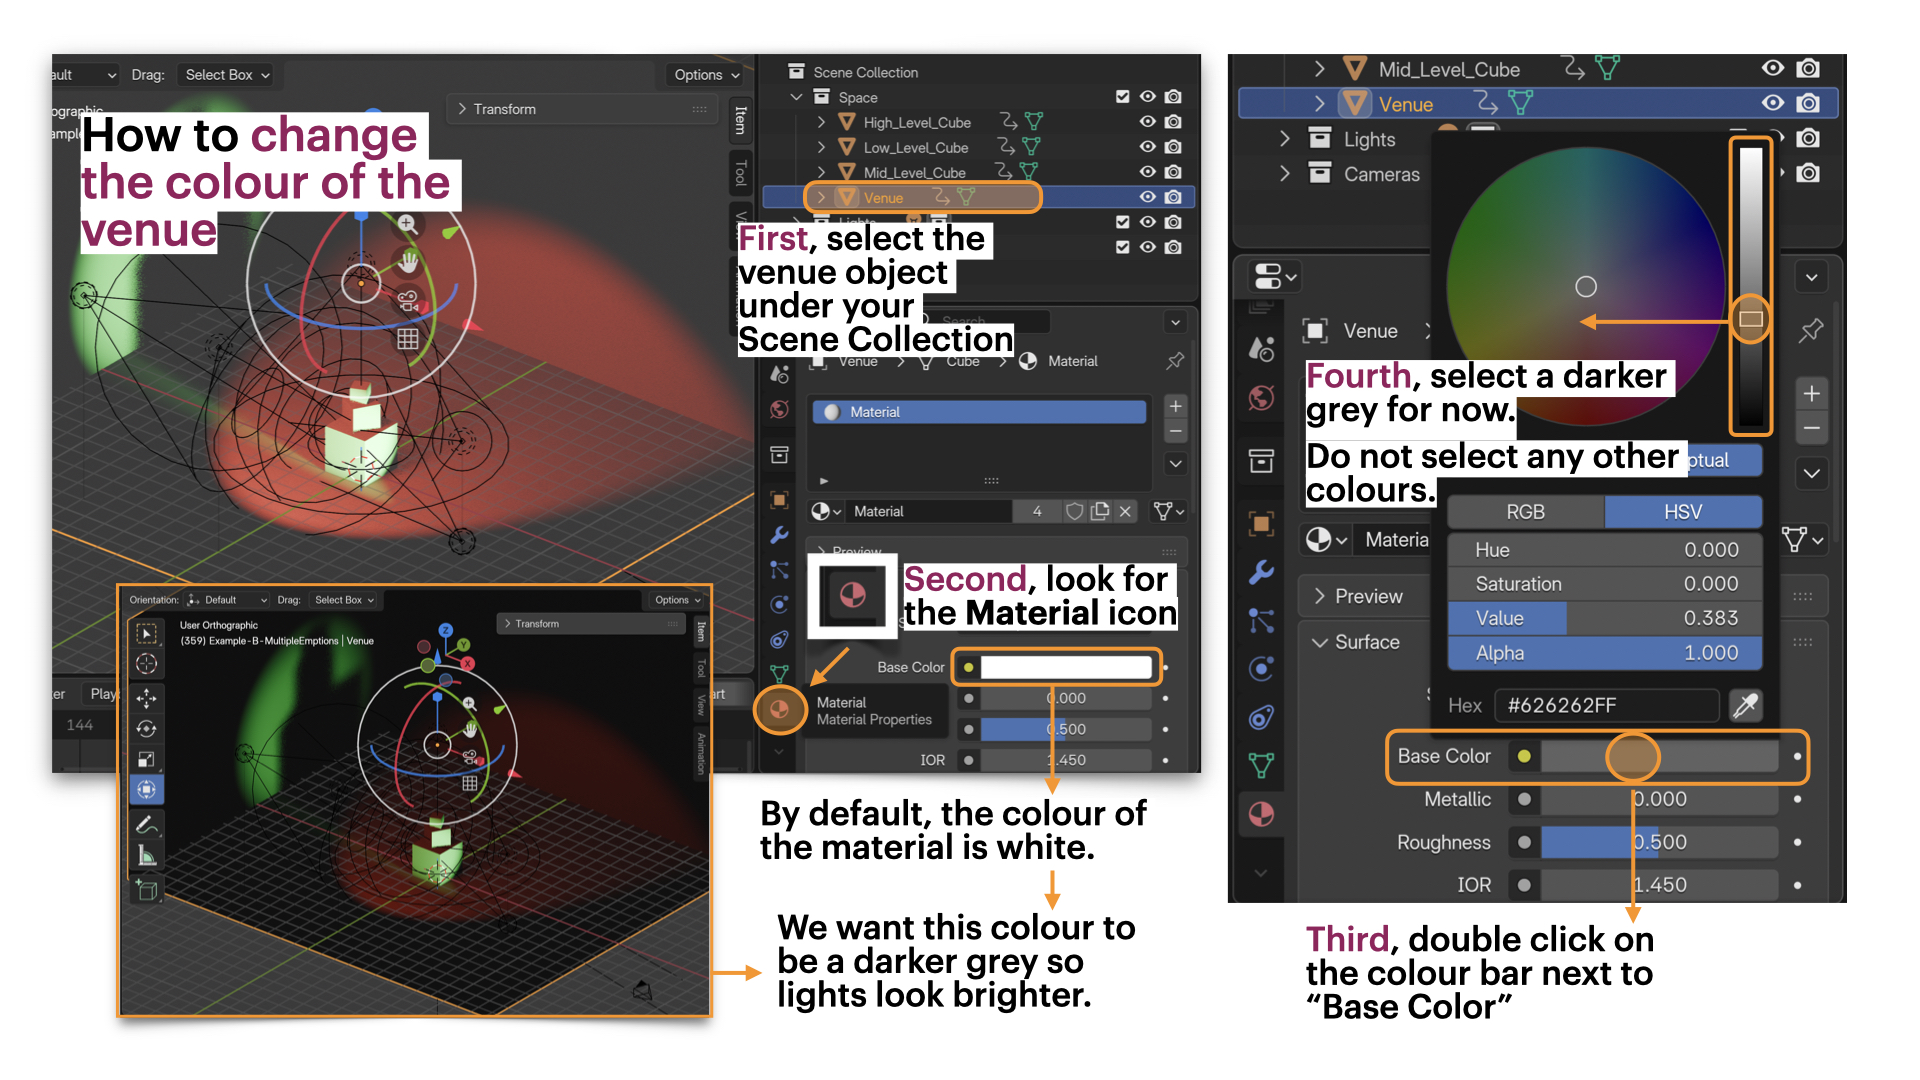
- Materials: You may follow the image-tutorial below to adjust the colour of the venue
❌ Do not use additional materials or textures
Tutorials
❗ Review this week’s slides for practical tips on animating lights, camera, and render video files in Blender.
BLENDER TUTORIAL : How to Animate LIGHTS (QUICK)
[20 min] Animate the Camera + Render Video and Image in Blender

Animate the camera to introduce intentional movement that supports your lighting cues.
You must apply:
- One continuous camera movement across the sequence
OR - One camera movement per lighting cue, aligned with your cue changes (as shown in the example above)
Camera movement should be subtle and purposeful, reinforcing shifts in attention, hierarchy, or spatial pressure rather than distracting from the lighting.
Follow this tutorial on
Camera Animation Basics
❗ Review this week’s slides for practical tips on animating lights, camera, and render video files in Blender.
Focus only on basic camera movement (position and/or rotation).
Do not add complex paths or effects.
Video Rendering Requirements
- Render one short video per lighting version
- Each video must:
- show the full lighting cue sequence
- include the camera movement
- remain within the 25-second / 300-frame limit
- Videos must be renders, not viewport screen recordings
➡️ Export as MP4, codec H.264
📄 Filename: Lastname-Firstname-W6-Lighting.mp4
How to Export Video in Blender: MP4 Video Format
❗ Review this week’s slides for practical tips on animating lights, camera, and render video files in Blender.
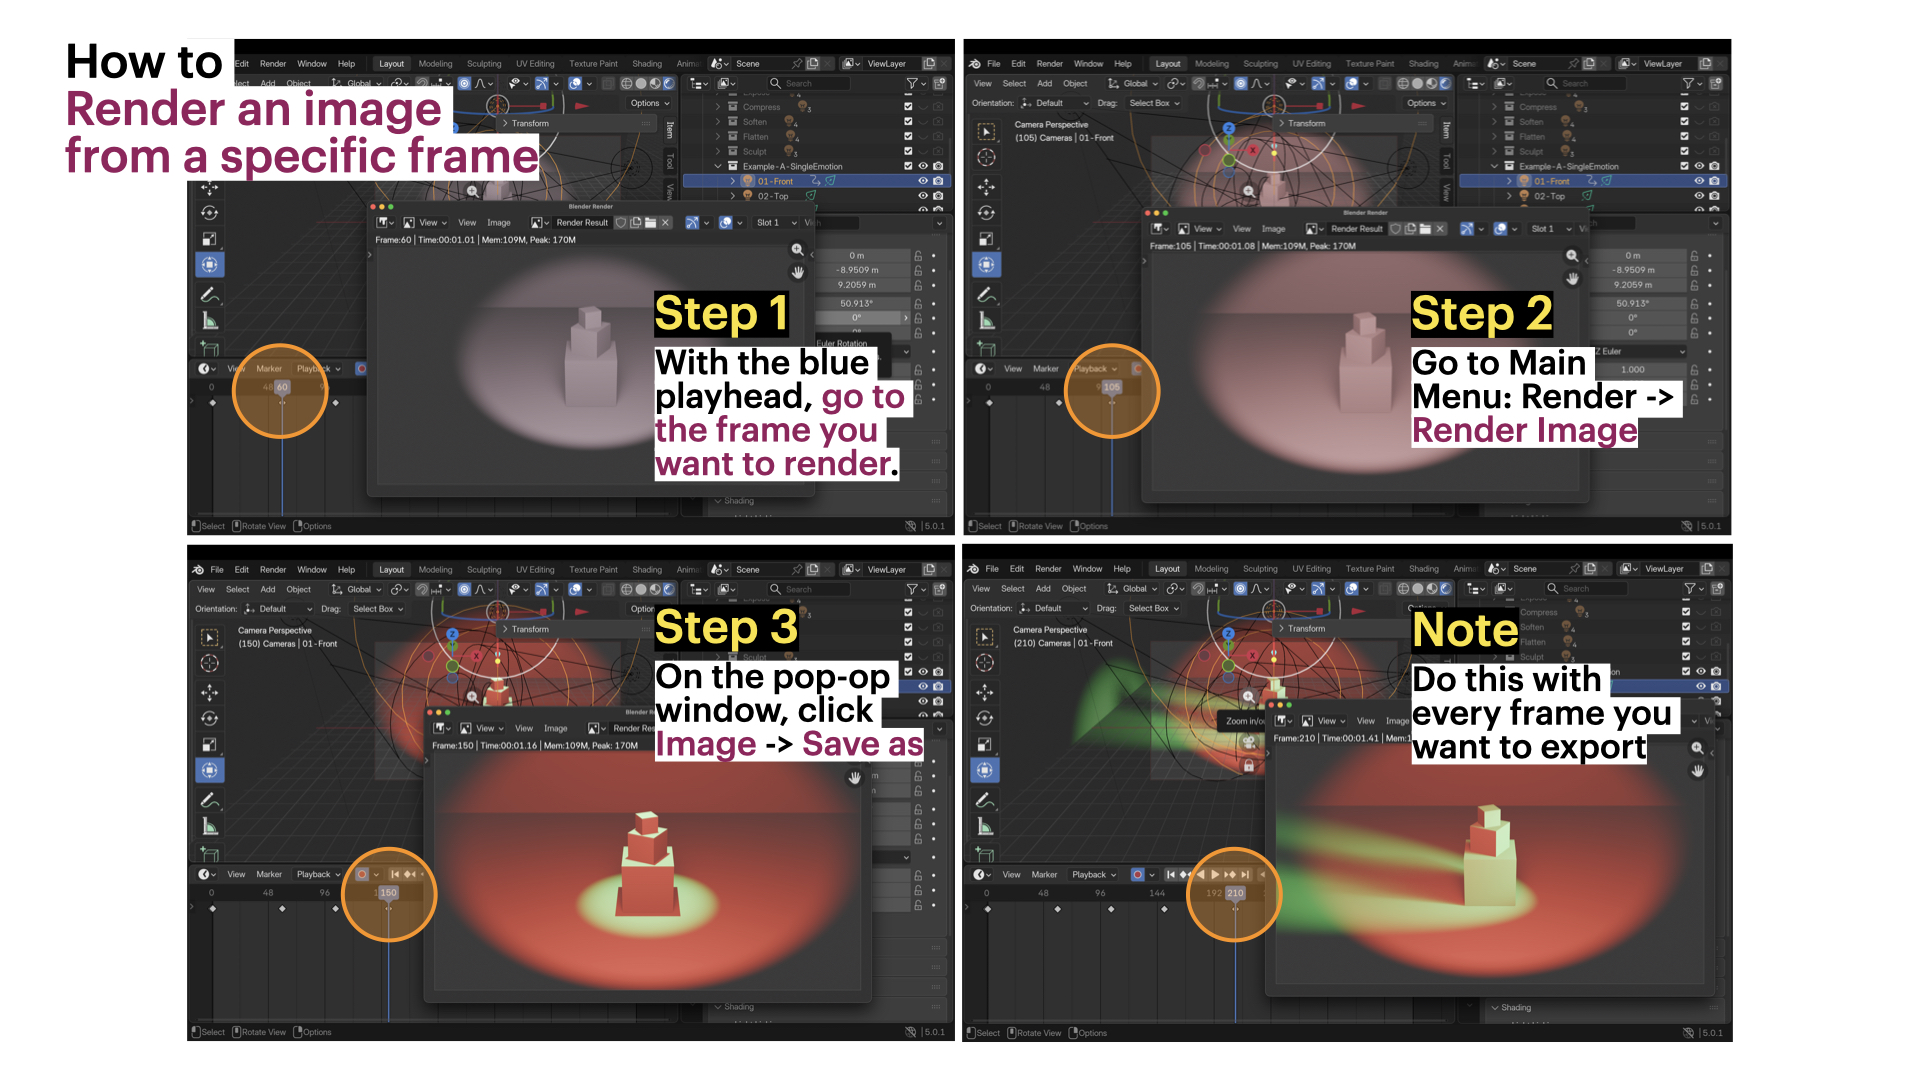
Image Rendering Requirements
For each cue, you must render one image that visualizes that moment and include it in your cue list.
Follow the image tutorial below to learn how to render specific frames:
Example — Cue Sequence with Visual Examples (Excerpt)
You are not copying the example — you are using it as a reference for how to combine your cue instructions with the rendered frames.
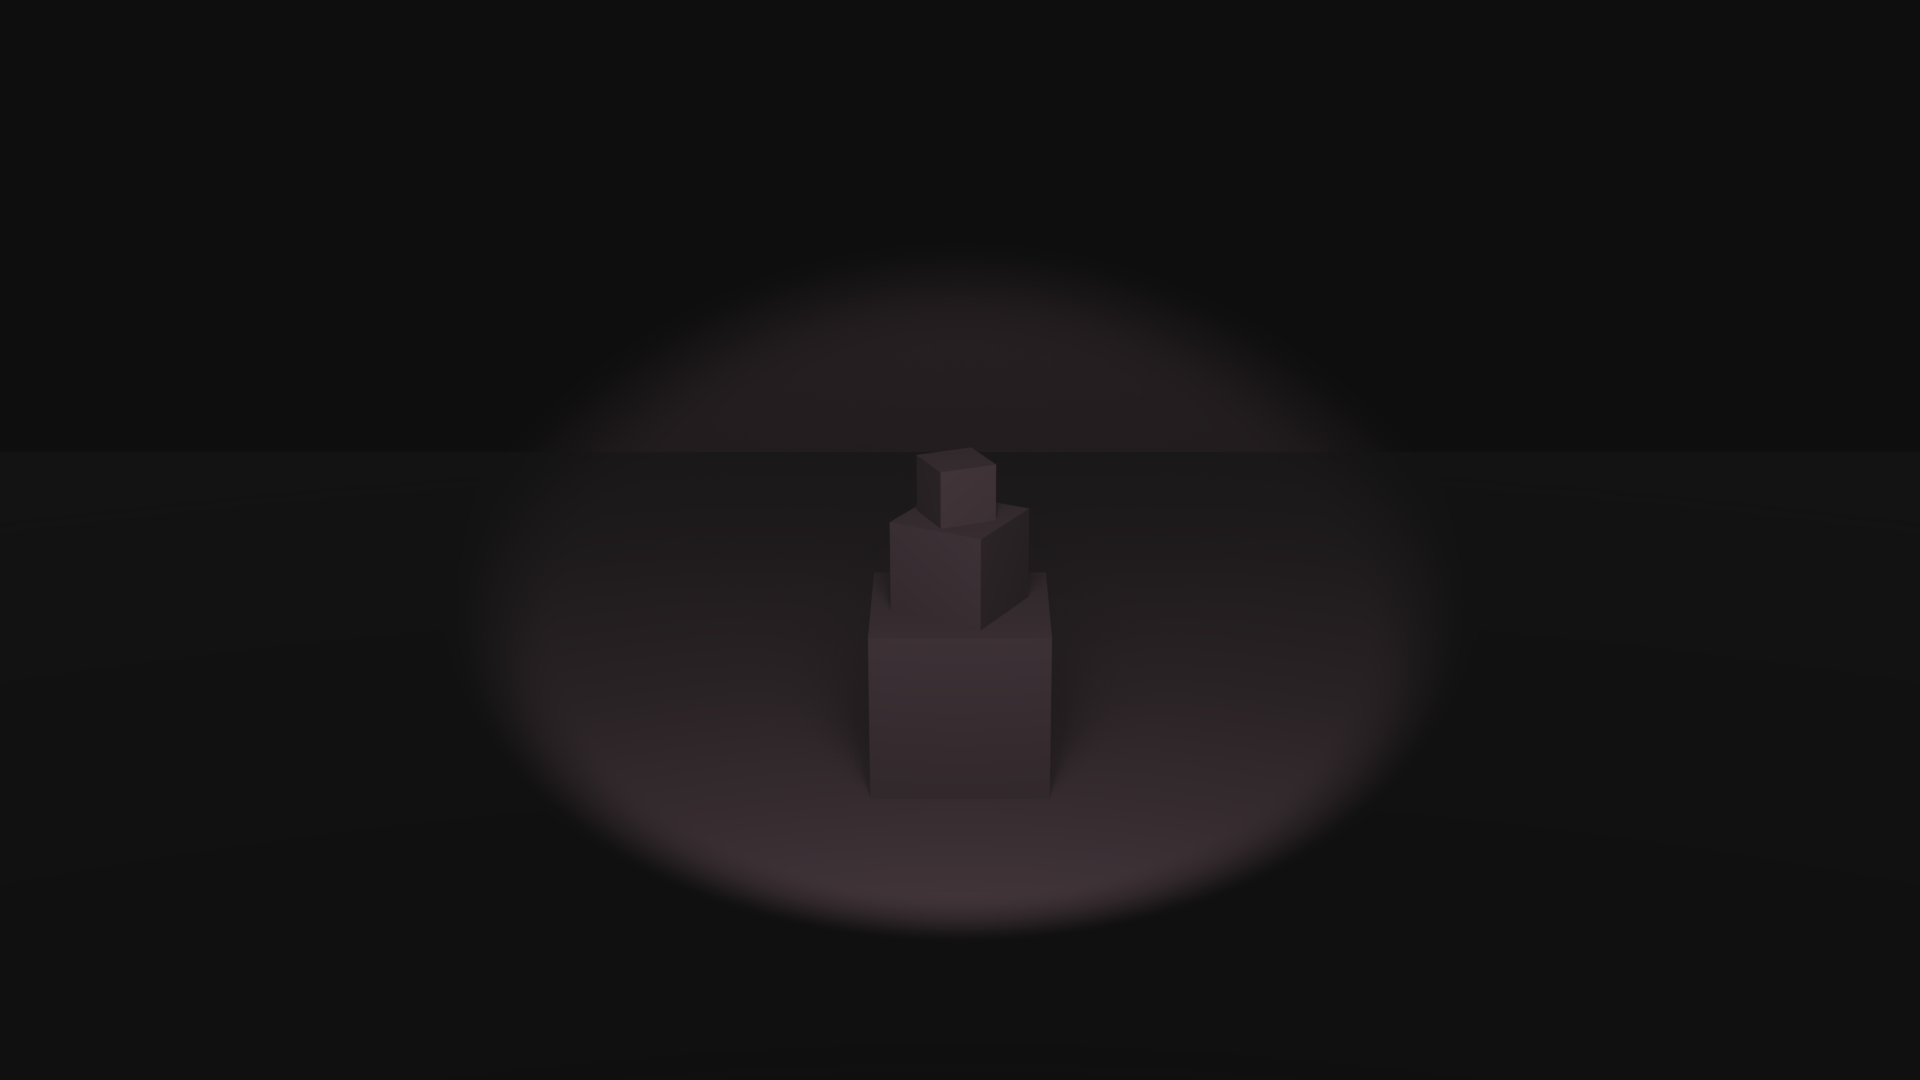
Fade in a front 0° light slowly at low intensity, starting with a wide range covering around half of the stage. Gradually shift colour from light violet (#E1DEFF) to a light, low-saturated pink (#FFCEE2), lighting the centre stage and main objects.
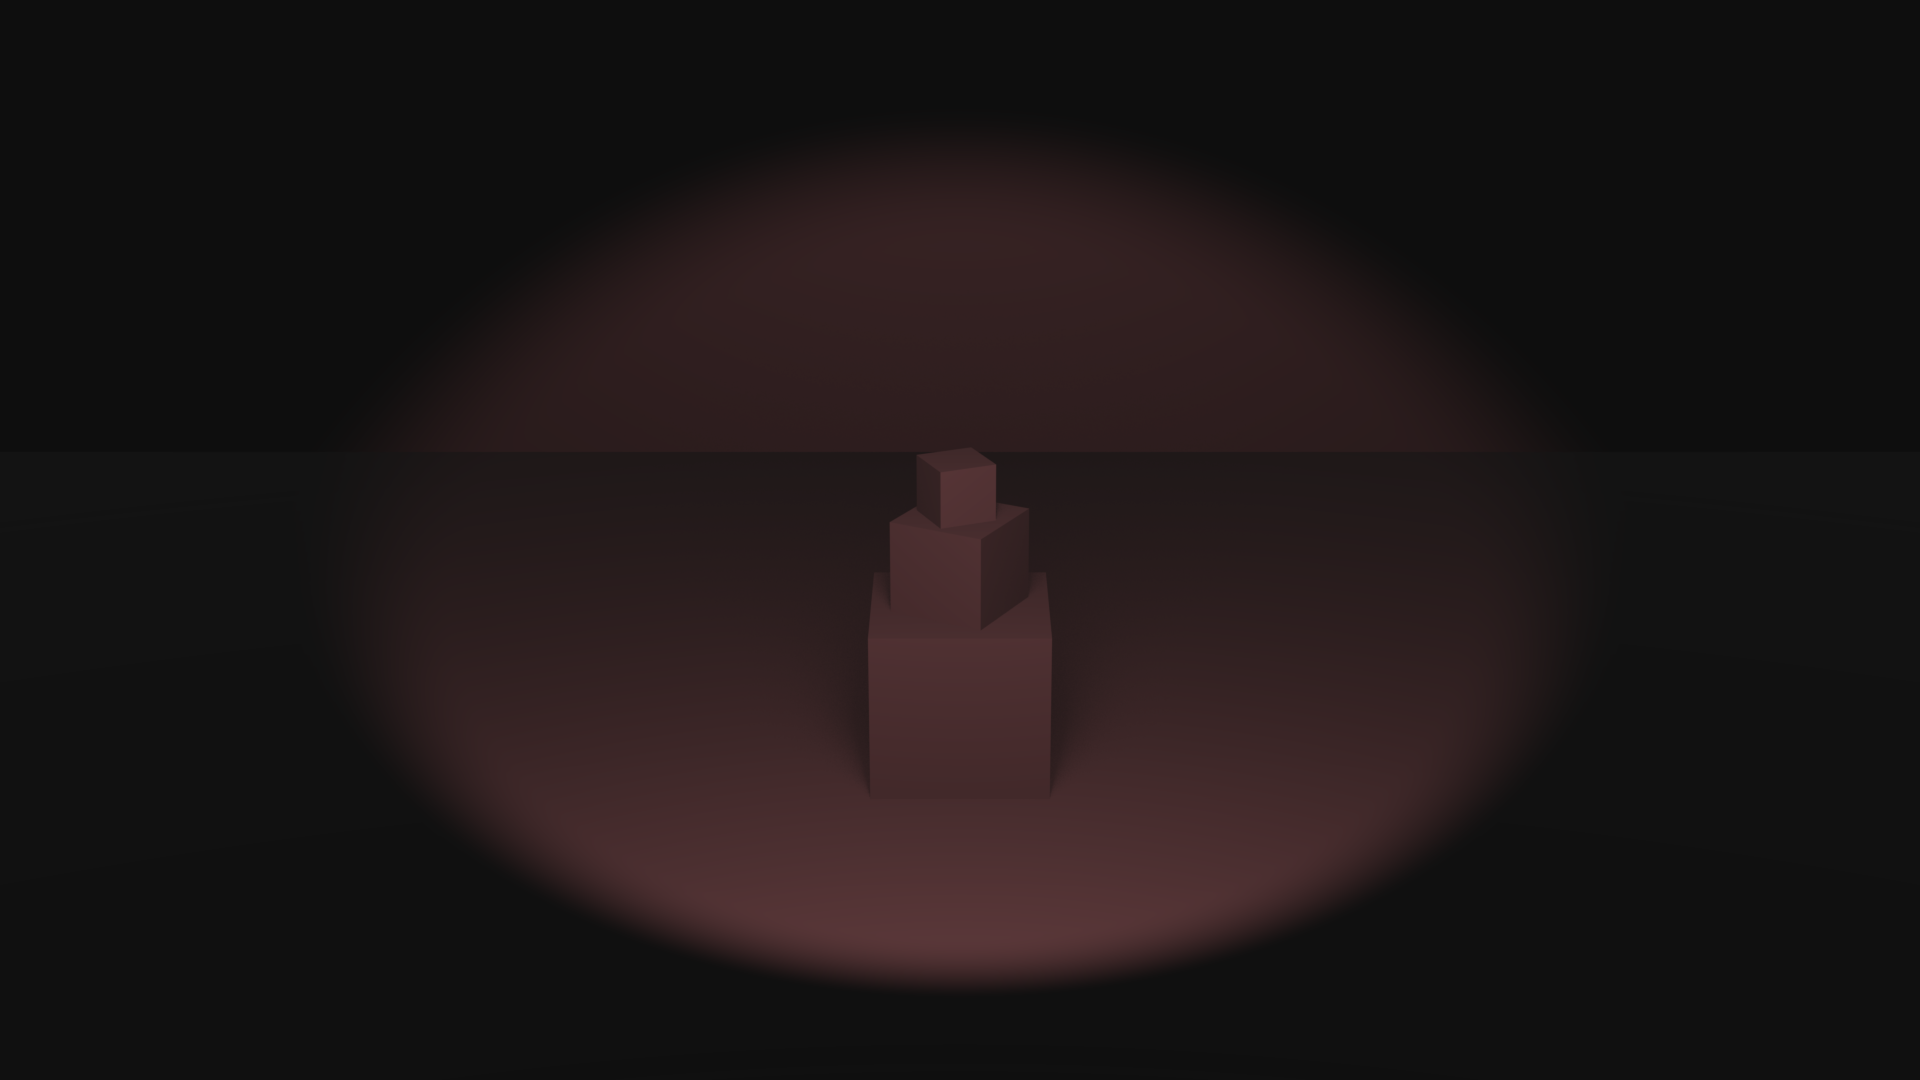
Gradually increase the range slightly of the front 0°. Increase colour saturation to a mid-saturated pink (#FFA1A8), keeping intensity low.
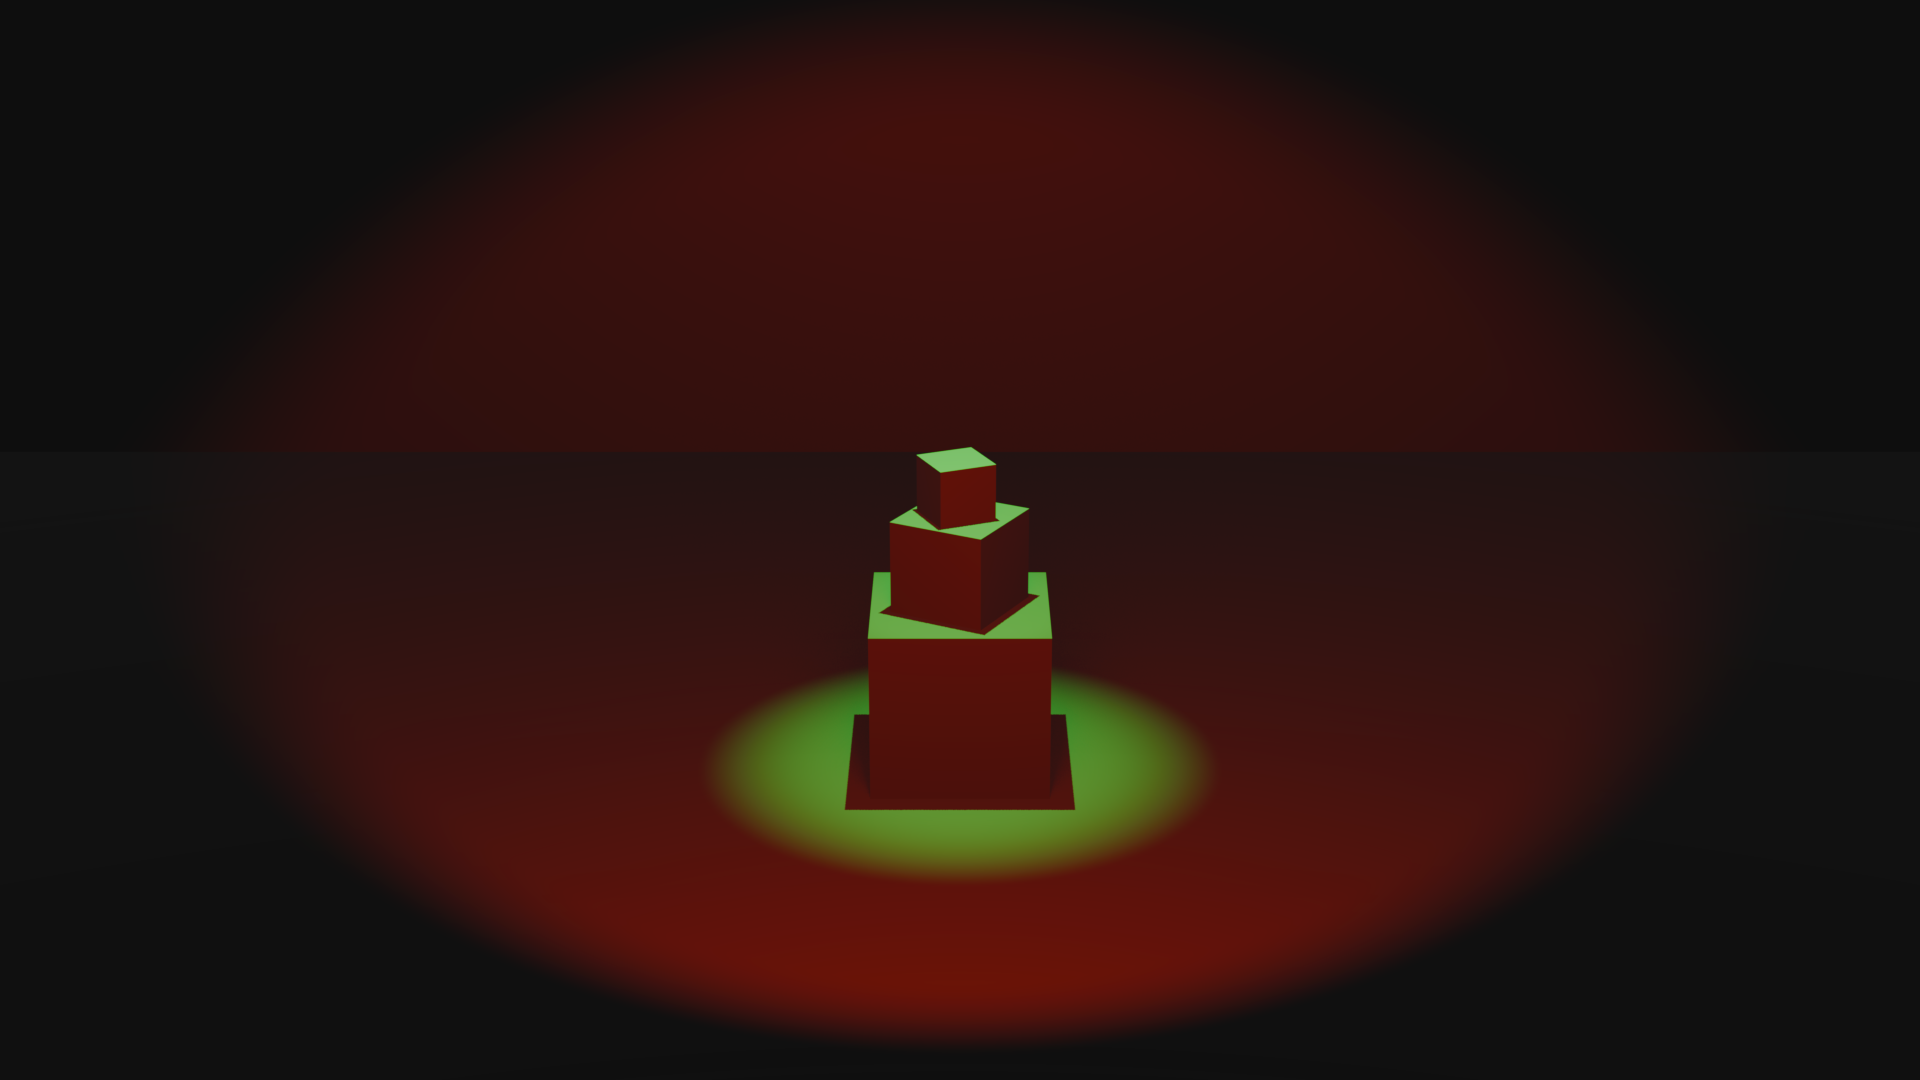
Increase the range of the front 0° light while shifting colour to bright red (#FF1D00) at mid intensity. Fade in a secondary front light in bright green at mid intensity, with a narrower range focused around the main objects, creating strong contrast and hard shadows.
Submission Documents
Create a single PDF:
- 3–4 sentence lighting intention description
- 2D Lighting Map
- Top view, side view, and front view
- Colour-coded lights with range indicated
- Cue list
- 3–5 cues, written in order as clear, technician-style instructions, using class vocabulary
- One rendered image per cue, showing the exact frame where the cue occurs
➡️ Export as PDF
📄 Filename: Lastname-Firstname-W6-Tutorial.pdf
| Component | File Name |
|---|---|
| Project document (PDF) | Lastname-Firstname-W6-Tutorial.pdf |
| Blender file | Lastname-Firstname-W6-Lighting.blend |
| Video file | Lastname-Firstname-W6-Lighting.mp4 |
⚠️ Follow submission protocols carefully. Incorrect submissions may result in lost points.
Assessment
This Week 6 activity is graded with higher expectations than previous weeks, as you are now expected to design and execute lighting cues over time with clear planning, accurate vocabulary, and controlled animation.
Your work will be assessed based on:
-
Lighting intention + cue clarity
Your 3–4 sentence intention clearly describes a temporal lighting trajectory (3–5 cues) using appropriate vocabulary (timing, change, dominance, spatial effect). -
2D lighting map communication
Your map clearly communicates lighting logic across top, side, and front views, including colour-coded light ranges/spreads and accurate labels for type of light, position, and colour. -
Technician-style cue instructions
Your cue list is written in order and describes actions and changes (not emotions), including: type of light, colour (name or hex), intensity (low/mid/high), timing language (fade/snap, slow/fast, gradual/sudden), and what the light affects (objects/stage/audience/background). -
Blender workflow and organization
Your Blender file is properly organized into Geometry / Cameras / Lights collections, uses correct naming conventions (with_), and follows constraints (no object/layout changes, no extra textures/materials, no animating light position/rotation). -
Animation timing + technical execution
Lighting changes are keyframed clearly and follow cue pacing (approximately every 60–120 frames) within the 25-second / 300-frame limit, demonstrating control of intensity, colour, range/beam, and dominance.
Core Vocabulary
For full reference, review the slides from this week.
Timing
Fade in / Fade Out
Light gradually appears or disappears over time.

Snap
Light changes instantly with no transition
Slow / Fast
Describes the speed = how long the lighting change takes.
Gradual / Sudden
Describes how the change feels while it happens.
General Changes
Increase / Decrease intensity
Light becomes brighter or dimmer.
Warm → Cool / Cool → Warm
Light shifts in colour temperature.
Introduce / Remove
A light is added to or taken out of the scene.
Shift dominance
One light becomes more visually important than others.
Spatial Effect
Isolate
Separates a subject from its surroundings.
Expose
Makes details clearly visible.
Compress
Flattens and reduces spatial separation.

Soften
Reduces contrast and hard edges.
Flatten
Minimizes shadows and depth cues.
Sculpt
Emphasizes volume, form, and dimensionality.
Credits: Jessica A. Rodríguez
AI Disclosure:
AI Disclosure: ChatGPT was used for editing and clarity only. No original course content was generated using AI.