MediaArtTutorials
W5 — Lighting as Spatial Transformation
Objective
You will apply three different lighting versions to the same W4 scene, learning how lighting alone can change visibility, depth, hierarchy, and atmosphere.
This activity focuses on how lighting position, direction, intensity, and colour reshape space without moving objects, the audience, or the stage layout.
Materials Required
- Computer (laptop or desktop)
- Blender (free software)
👉 Download: https://www.blender.org/download/ - Computer mouse (recommended)
- Your Week 4 Blender file (.blend)
- Paper + pen (preferred) or digital drawing tool
Lights Overview
For full reference, review the slides from this week.
Front Light

Establishes a clear, legible baseline by maximizing visibility and minimizing shadows.
Top / Zenithal Light
Balance visibility and depth, producing a controlled, sculpted three-dimensional look.
Mirrored Front Lights

Reveals texture and form through contrast, introducing asymmetry and directional shadows.
Side Lights
Emphasizes vertical hierarchy, creating pressure and strong shadows beneath forms.
Reflected Light
Softens the scene by diffusing light, gently filling shadows while preserving volume.
Activities
Complete the following in order. Ask your professor or TA for help as needed.
[20 min] 2D Lighting Maps — Start Here
Using your Week 4 scene layout, create three (3) lighting maps, each representing a different lighting version of the same space.
⚠️ You must NOT change object placement, stage position, audience placement, or entrances. Only add the lighting changes.
Hand-drawn (preferred) or digital.
Each lighting map must include:
- a Top View
- a Side View
- a Front View
- a perspective view of the main objects on stage
Example
You are not copying the example — you are using it as a reference for how to communicate lighting decisions clearly.
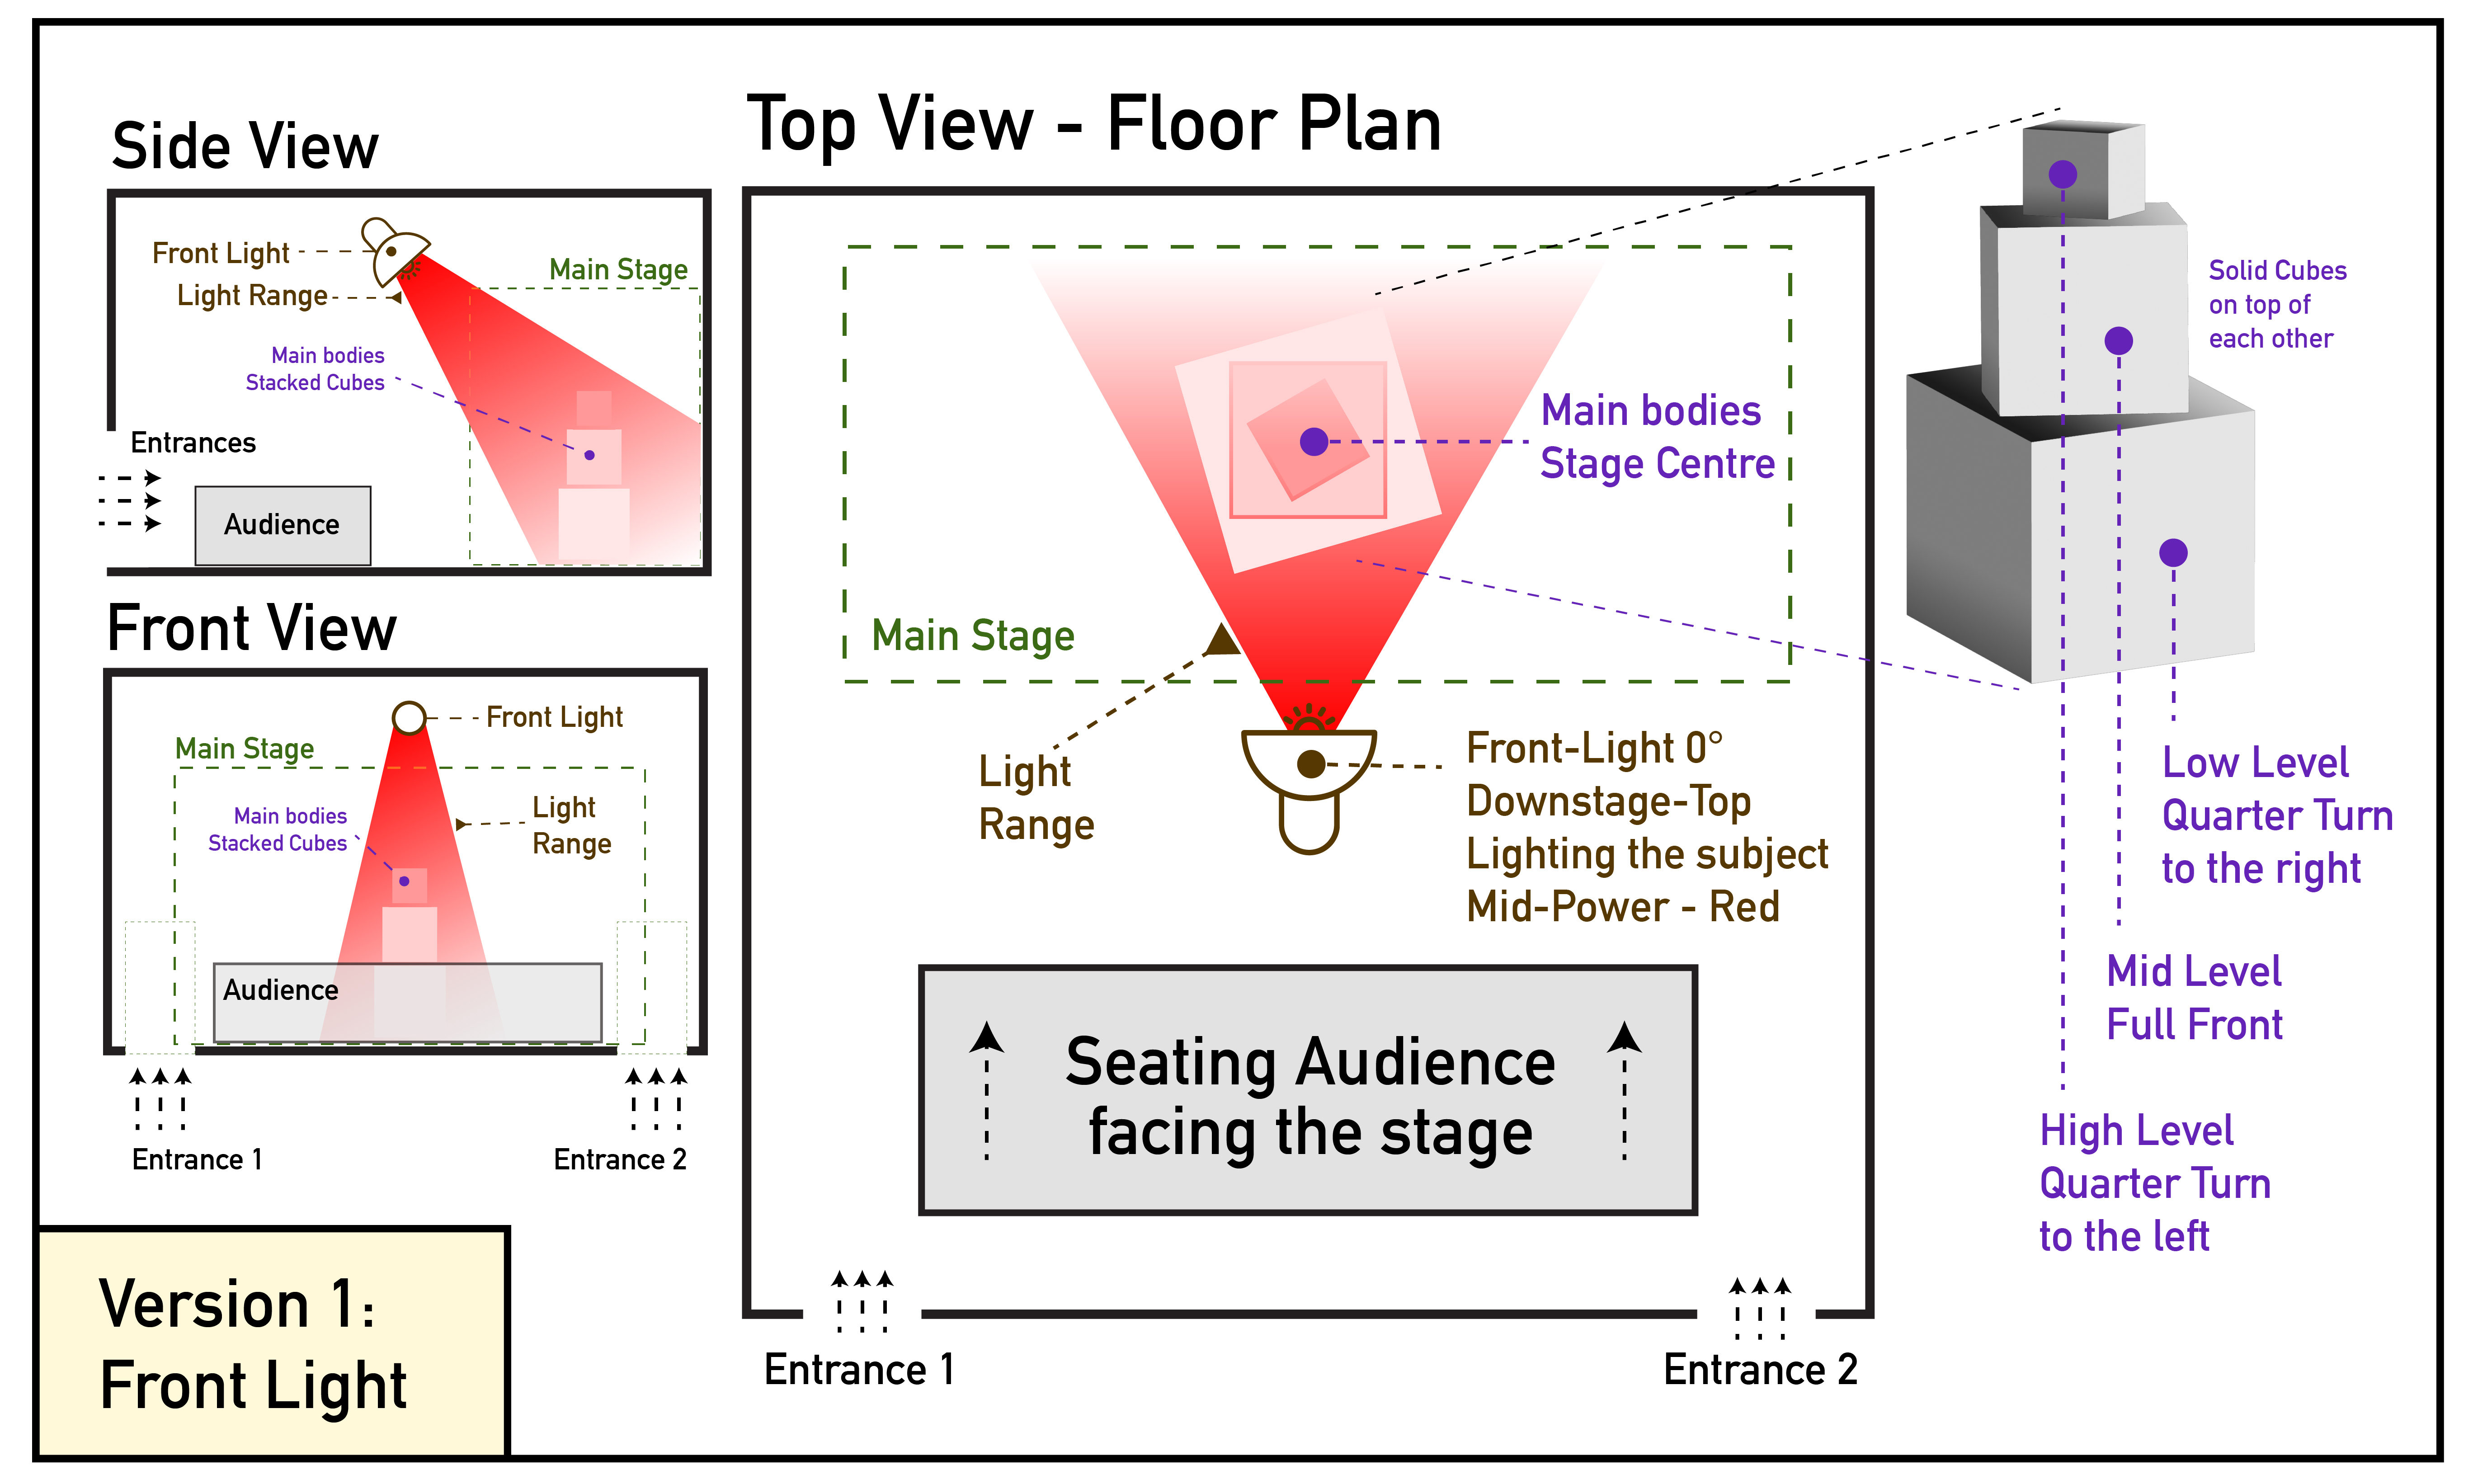
Lighting Map Requirements
You are required to use the vocabulary from
Week 1
and from this week when labeling your maps and writing your descriptions.
For each lighting version, indicate:
- Type of light
(front, side, top/zenithal, mirrored front, reflected) - Light position
(where the light is placed in relation to the stage) - Light direction
(arrow) - Rotation
(angled vs straight, if relevant) - Light colour
- Light intensity
(low / mid / high) - What the light affects
(objects, stage area, audience, background)
Each version may use ONE or TWO lights maximum.
[60 min] Lighting in Blender — Three Versions
Required Organization
Use the same Blender file from Week 4 and organize it using three collections:
- Geometry / Shapes
- Cameras
- Lights
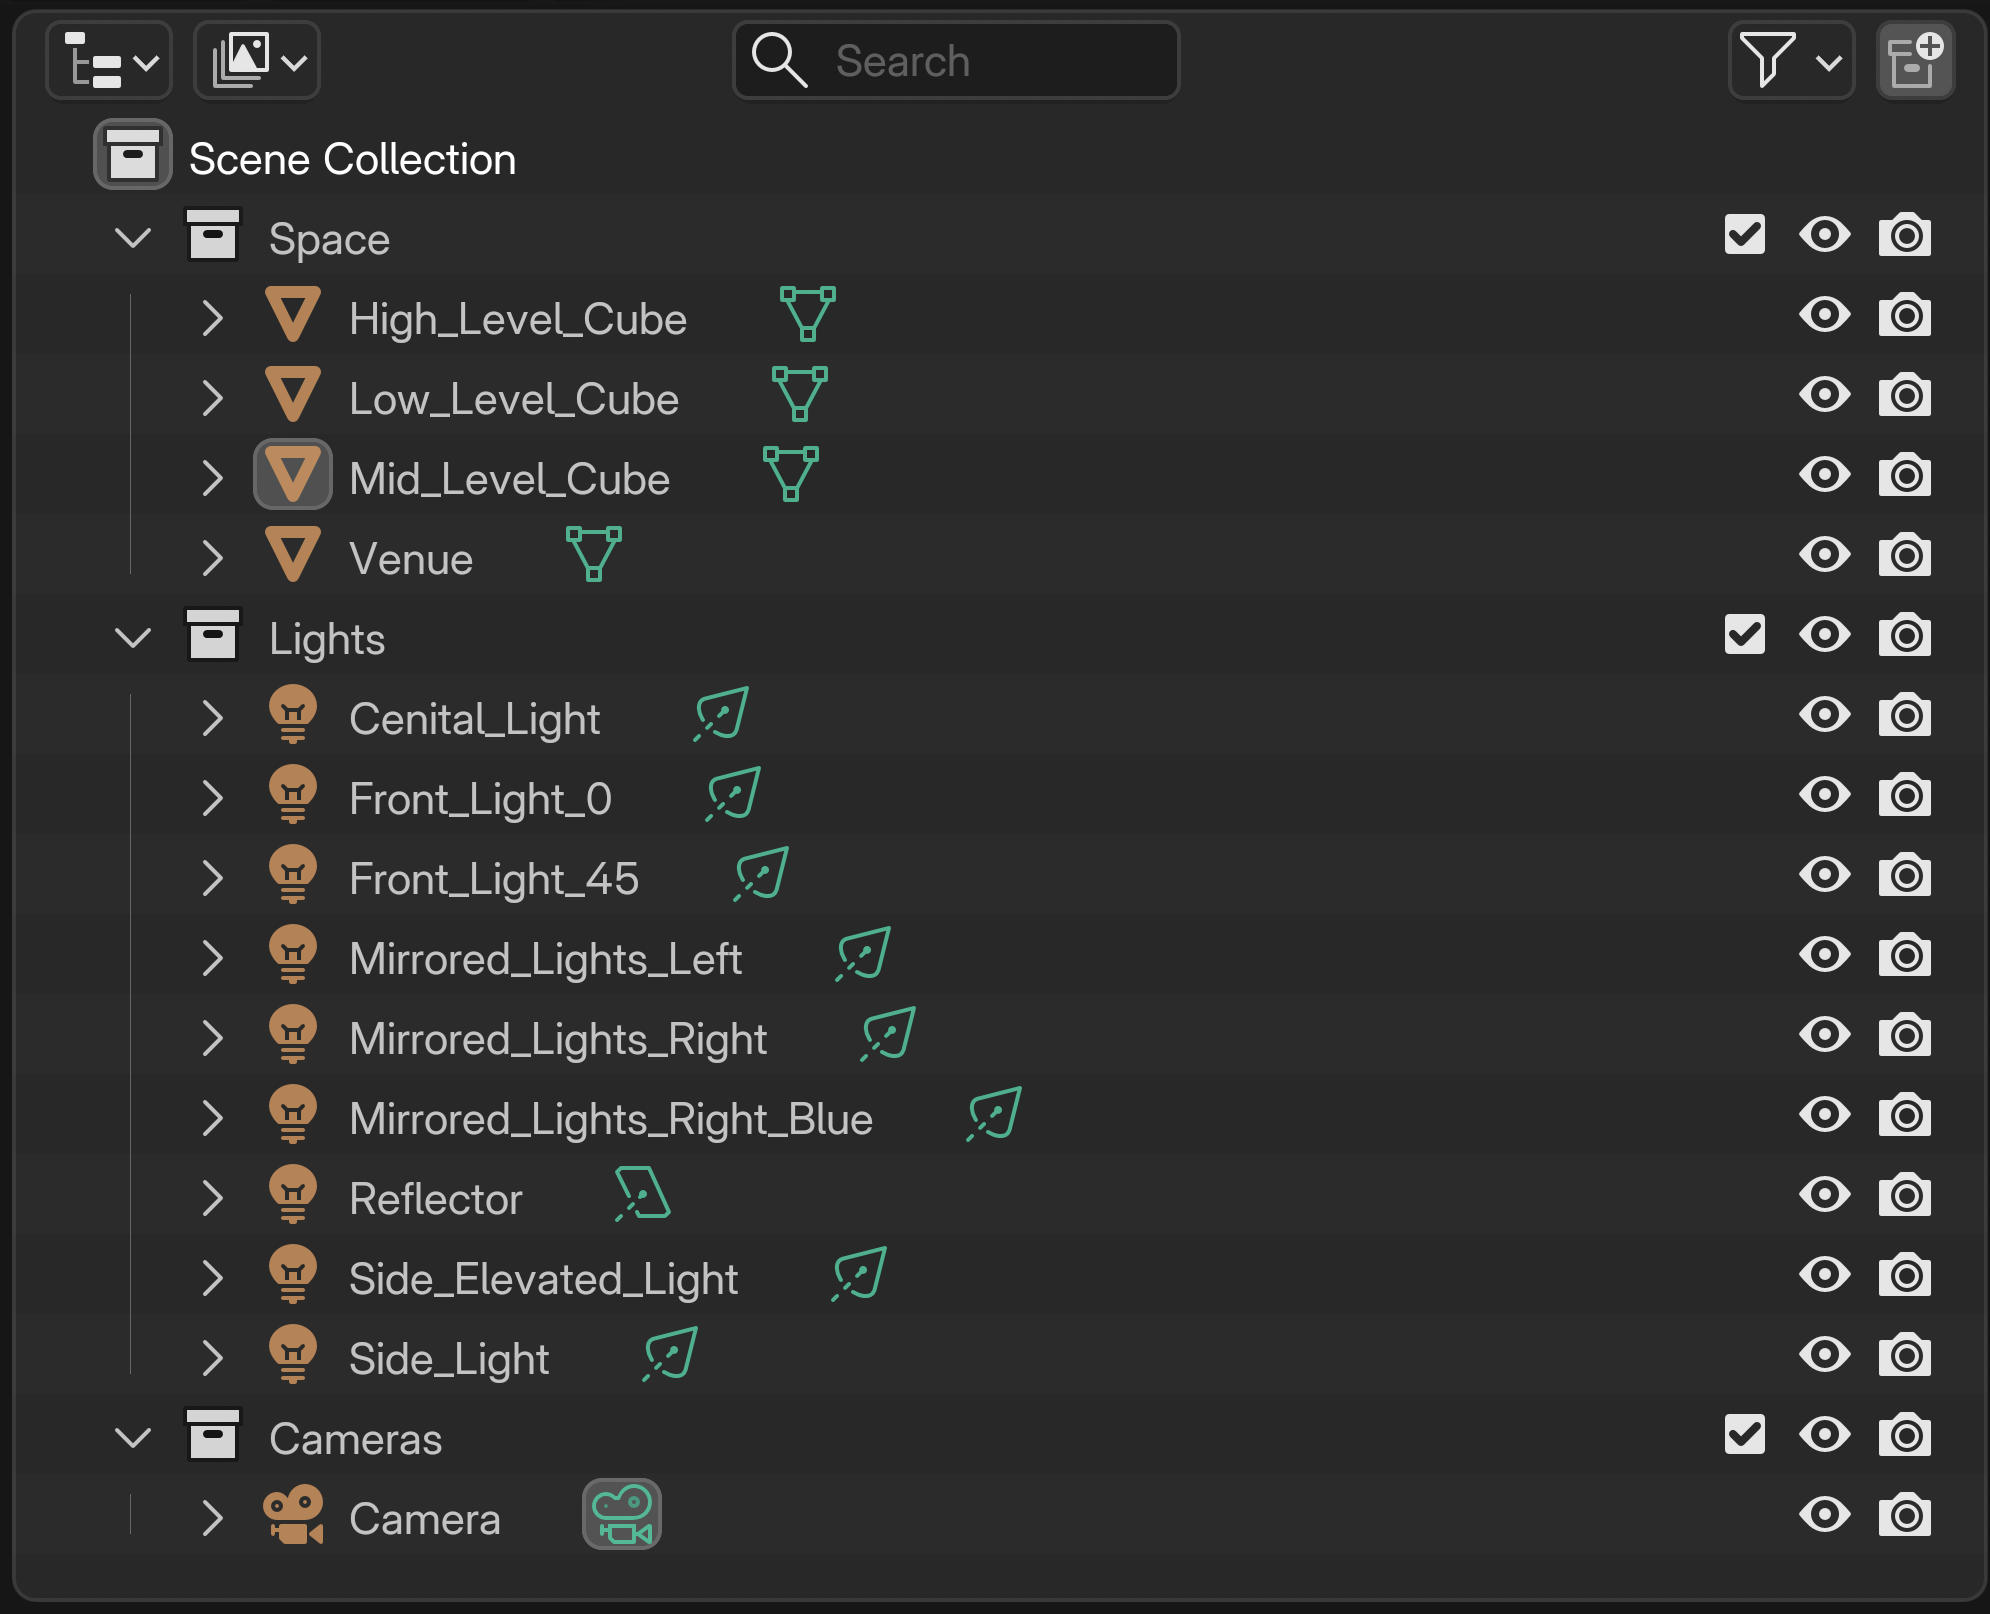
Organization Rules
- Do not move or rename geometry from W4
- Place all lights in the Lights collection
- Rename lights clearly (e.g.,
Front_Light,Top_Light) - Correct naming protocol: don’t leave spaces in-between words, always fill with
_
⚠️ Important: Your Blender file will be checked for organization and continuity from Week 4.
Lighting in Blender — Three Versions
Follow this tutorial on Lighting
Focus only on lighting
Check the shortcuts provided!
❗ Review the slides from this week for practical tips on organizing scenes and working with lights in Blender.
Lighting Constraints
- ❌ Delete the default Sun light
- ✅ Use only:
- Spot Lights
- Area Lights (for reflected light)
- ❌ No materials or textures
For each lighting version:
- Add and position lights according to your 2D map
- Adjust:
- position & rotation
- colour
- intensity (power)
- radius / size
- influence and beam shape
Each version should feel distinct, even though the space remains the same.
Rendering Requirements
- Render 2–3 images of each lighting version / lighting map
- Each render must be from a different camera angle
- Images must be renders, not screenshots
➡️ Save all rendered images for submission.
[15 min] Lighting Intentions — End Here
For each lighting version, write 4–6 sentences describing:
- Technical choices:
- light position and direction
- colour and intensity
- type of light used
- Spatial and expressive intention:
- What changes in visibility, depth, or atmosphere?
- How does this lighting reshape the space?
Submission Documents
Create a single PDF with 3 pages total:
Page 1 — Lighting Version 1
- 2D Lighting Map
- Rendered images (2–3)
- 4–6 sentence description
Page 2 — Lighting Version 2
- 2D Lighting Map
- Rendered images (2–3)
- 4–6 sentence description
Page 3 — Lighting Version 3
- 2D Lighting Map
- Rendered images (2–3)
- 4–6 sentence description
➡️ Export as PDF
📄 Filename: Lastname-Firstname-W5-Tutorial.pdf
Save Blender File
➡️ Save as .blend
📄 Filename: Lastname-Firstname-W5-Lighting.blend
Your Blender file must include:
- Geometry unchanged from Week 4
- Properly named lights
- Correct collection structure
📤 Submission
| Component | File Name |
|---|---|
| Project document | Lastname-Firstname-W4-Tutorial.pdf |
| Blender file | Lastname-Firstname-W4-Lighting.blend |
⚠️ Follow submission protocols carefully. Incorrect submissions may result in lost points.
Assessment
This Week 4 activity is graded with higher expectations than previous weeks, as you are now expected to apply both conceptual and technical skills more intentionally.
Your work will be assessed based on:
-
Continuity from Week 4
Same scene, same layout, same cameras. -
Lighting vocabulary and clarity
Accurate and intentional use of lighting terms in maps and writing. -
Lighting design logic
Each version demonstrates a clear and distinct spatial effect. -
Blender workflow and organization
Proper collections, naming, and lighting-only changes. -
Rendered output
Renders clearly communicate lighting differences from multiple viewpoints.
This is still an exploratory exercise, but at this stage, intentional lighting decisions and technical clarity matter more than experimentation alone.
Credits: Jessica A. Rodríguez
AI Disclosure:
AI Disclosure: ChatGPT was used for editing and clarity only. No original course content was generated using AI.