MediaArtTutorials
W9 - Rough Cut
Assemble your footage and sound materials into a complete sequence that reflects your pre-production plan while allowing room for revision.
⚠️ Reminder: During the last hour of tutorial, the Instructor/TAs will begin the in-person grading check.
- You must have your project folder properly organized and be ready to show your files and temporary renders.
- Check: W9: In-Person Grading
❗ Attendance and engagement are part of the rubric.
You are expected to work actively during class time and participate in all in-class activities.
Activities
Complete the following in order. Ask the professor or TAs for support or feedback.
- Activity 1: Build Rough Assembly [50m]
- Activity 2: Rhythm Refinement [40m]
- Activity 3: Basic Colour Correction [30m]
- Activity 4: Basic Sound Integration [30m]
- Final Changes and Rough Cut Export
- 📤 Submission
Activity 1: Build Rough Assembly [50m]
In this activity, you will build your first DRAFT Assembly of the film.
- The goal is simply to place your selected shots in sequence following your storyboard and script.
- Your draft assembly should be no longer than 2 minutes.
- Do not worry about rhythm, trimming, or transitions yet.
Step 1 — Create the Project
- Open Adobe Premiere Pro.
- Create a new project using the correct naming protocol:
ProjectName.prproj. - Save the project inside: 📁
00_ProjectFiles. - Import all files from: 📁
01_RawFootage.
‼️ Save your project regularly before starting work and throughout the editing process.
Step 2 — Import, Review, and Select Footage
➡️ Follow the tutorial on how to review and mark footage in Premiere Pro and see tips for Reviewing Footage
Review your footage in the Source Monitor.
As you review, identify usable takes.
Do not delete any footage, but avoid using clips with:
- Severe focus problems
- Unusable exposure
- Major camera shake
- Recording errors
Choose the best takes that correspond to your storyboard shots. Focus on:
- Clear focus
- Stable framing
- Usable performance/action
- Correct shot type
You may have multiple takes per shot — select the strongest one.
Step 3 — Build the Draft Assembly
➡️ Follow the tutorial on how to create your sequence in Premiere Pro and review tips for Building the Draft Assembly
First, create a sequence with the following settings:
- Set your sequence to 24 fps.
- Use the following frame sizes depending on the aspect ratio you choose for your final project:
16:9 → 1920 × 1080
4:3 → 1440 × 1080
1.85:1 → 1920 × 1038
2.35:1 → 1920 × 817
These dimensions maintain the correct proportions while working with footage recorded at 1920 × 1080.
Then, begin placing your selected clips in order. For this stage:
- Place one shot after another
- Follow the story order
- Do not worry about precise trimming yet
- Do not add transitions
- Do not add effects
Your goal is simply to see the entire film in sequence.
This first assembly should be no longer than 2 minutes.
Step 4 — Watch + Notes
➡️ Follow the tutorial on Exporting Temporary Sequences
Export a temporary version of your sequence.
- Save it as
ProjectName_DraftAssembly.mp4inside folder: 📁03_Renders.
Watch the video from beginning to end without stopping.
- While watching, focus on clarity, shot order, and basic pacing.
Write down three issues you notice in your edit that you will address in the next activity.
Examples of issues:
- A shot stays on screen too long.
- A shot ends too abruptly.
- Two shots feel repetitive or unnecessary.
- The sequence feels slow in a specific moment.
- The action does not flow clearly between shots.
- A moment in the story feels unclear.
⚠️ Do not begin editing yet.
First identify the problems. In the next activity, you will address those issues.
Activity 2: Rhythm Refinement [40m]
➡️ Review the tips and examples on Pacing & Rhythm to help guide how you structure and time your shots.
In this activity, you will refine your Draft Assembly, focusing on rhythm and clarity by trimming shots, removing unnecessary moments, and adjusting the sequence order.
At the end of this step, your sequence should be approximately 1 minute long.
A small margin is acceptable at this stage (no more than 1:10).
Step 1 — Address Identified Issues
Correct the problems you noted during previous the Watch + Notes step.
This may involve:
- Trimming shots that stay on screen too long
- Extending shots that end too abruptly
- Removing repetitive shots
- Reordering shots for clearer action
- Improving the flow between shots
You may also begin adding basic transitions if necessary.
Avoid overusing transitions. In most cases, straight cuts work best.
Step 2 — Refine Rhythm
Focus on the temporal rhythm of the sequence.
Ask yourself:
- Does each shot stay on screen for the right amount of time?
- Does the action flow clearly from one shot to the next?
- Are any shots unnecessary?
Your sequence should now feel clearer and more intentional than the draft assembly.
Step 3 — Watch + Notes + Adjustments
➡️ Follow the tutorial on Exporting Temporary Sequences
Export a temporary version of your sequence.
- Save it as
ProjectName_RhythmPass.mp4inside folder: 📁03_Renders.
Watch the video from beginning to end without stopping.
- While watching, focus specifically on rhythm and shot duration.
Identify three rhythm issues that still need improvement. Examples may include:
- A shot staying on screen slightly too long
- A cut that feels too abrupt
- A transition between two shots that feels awkward
- A moment where the sequence slows down unnecessarily
After identifying these issues, return to your sequence and make quick adjustments to improve the rhythm.
⚠️ Do NOT over-edit. Focus only on small timing corrections.
Activity 3: Basic Colour Correction [30m]
➡️ Review the tips and examples on Basic Colour Correction to help guide how you balance colour, exposure, and contrast across your sequence.
In this activity, you will correct basic exposure and colour consistency issues in your sequence.
Focus only on technical corrections, not artistic colour grading.
Step 1 — Watch + Notes
Re-watch your file ProjectName_RhythmPass.mp4. This time, focus specifically on colour and exposure.
Write down 2–3 issues you notice that affect visual consistency.
Examples may include:
- A shot that appears too dark (underexposed)
- A shot that appears too bright (overexposed)
- A shot that has a different colour temperature than the surrounding shots
- A noticeable brightness jump between two shots
Step 2 — Apply Basic Corrections
Apply simple corrections using the Lumetri Color panel.
Focus only on:
- Exposure adjustments
- Highlight and shadow balance
- Basic white balance
- Matching brightness between shots
Your goal is to make the sequence feel visually consistent.
⚠️ Do NOT apply stylized looks, heavy colour grading, LUTs, dramatic contrast or colour effects.
The full colour grading will be developed in a later stage.
Activity 4: Basic Sound Integration [30m]
➡️ Review the tips and examples on Basic Sound Integration to help guide how you balance production sound and maintain consistent audio levels across your sequence.
At this stage, your visual edit and colour corrections should already be stable.
Now you will integrate the basic production sound into your sequence.
The goal is not full sound design, but creating a clean audio foundation.
Step 1 — Send the Sequence to Adobe Audition
Follow the tutorial on Premiere Pro → Adobe Audition Workflow: Basic Audio Editing
This workflow allows you to edit audio using a proper Digital Audio Workstation (DAW) while keeping the sequence linked to Premiere.
Step 2 — Add Room Tone
Place room tone underneath the entire sequence to create a consistent background sound.
Room tone helps:
- smooth cuts between shots
- avoid unnatural silence
- maintain sonic continuity
Step 3 — Integrate On-Scene Sounds
Add production sounds recorded during filming.
Examples may include:
- footsteps
- object interaction
- fabric movement
- doors or environmental sounds
Align sounds carefully with the visual action.
⚠️ Do NOT add music, sound effects, or foley yet.
These elements will be developed in the Sound Design stage of the project.
Step 4 — Apply Match Clip Loudness to All Sound Clips
- Select all of your audio clips
- Right click to open the menu
- Click Match Clip Loudness
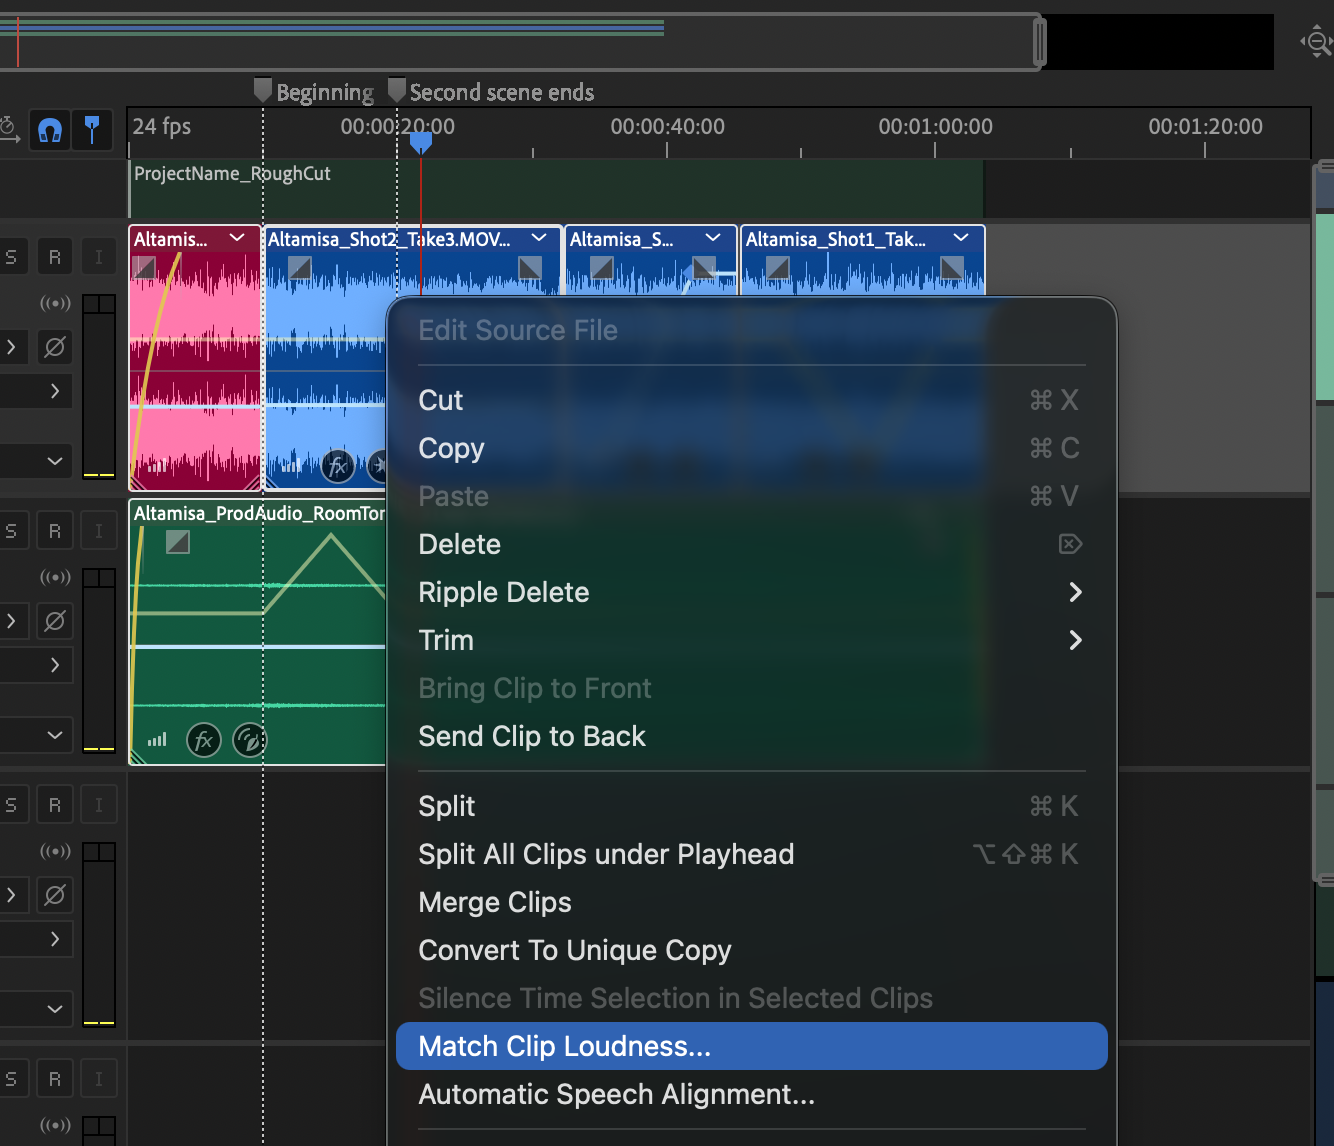
This tool automatically normalizes the loudness of multiple audio clips so they play at a more consistent level. It analyzes the clips and adjusts their gain to match a target loudness value.
Step 5 — Export Back to Premiere
Once you finish editing and balancing your audio, export the session back to Premiere Pro.
Follow the tutorial for Premiere Pro → Adobe Audition Workflow: Basic Audio Editing
Step 6 — Export
➡️ Follow the tutorial on Exporting Temporary Sequences
Export a temporary version of your sequence.
Save it as ProjectName_RoughPreview.mp4 inside folder: 📁 03_Renders.
Final Changes and Rough Cut Export
Review your ProjectName_RoughPreview.mp4 and make final notes before exporting.
While watching, check for:
- Rhythm issues — shots that remain on screen too long or cuts that feel too abrupt.
- Visual consistency — noticeable changes in brightness, colour temperature, or contrast between shots.
Make any final adjustments in your sequence.
Your Rough Cut should present a clear and complete version of the film, including the final shot order, basic rhythm, and integrated on-scene sound.
The story and visual flow should be understandable, even though fine sound design, detailed colour grading, and final polishing will be completed in a later.
Export Rough Cut
➡️ Follow the tutorial on Exporting A Submission Sequence
Export your final rough cut as: ProjectName_RoughCut.mp4.
Save the file inside: 📁 04_Exports
Format: MP4 (H.264)
Frame Rate: 24 fps
Resolution must match your sequence aspect ratio:
- 16:9 → 1920 × 1080
- 4:3 → 1440 × 1080
- 1.85:1 → 1920 × 1038
- 2.35:1 → 1920 × 817
📤 Submission
| Item | Required Filename |
|---|---|
| Rough Cut Export (MP4) | Lastname_Firstname_RoughCut.mp4 |
| Rough Cut Information Sheet (PDF) | Lastname_Firstname_RoughCut.pdf |
| Organization | In-Person Grading |
⚠️ Follow the submission protocols carefully.
⚠️⚠️ Incorrect submissions will result in a 2-point deduction over final grade ❗❗
Deliverables — 📦 Rough Cut Package
1. Rough Cut Export (MP4)
- Full sequence assembled (approximately 1 minute)
- All selected shots included
- Basic audio integrated (clean levels, no clipping)
- Basic colour correction applied
Export settings:
MP4 (H.264); 24 fps
Resolution must match your chosen aspect ratio:
- 16:9 → 1920 × 1080
- 4:3 → 1440 × 1080
- 1.85:1 → 1920 × 1038
- 2.35:1 → 1920 × 817
File name:
Lastname_Firstname_RoughCut.mp4
2. Rough Cut Information Sheet (PDF)
Include the following information:
- Title
- Aspect Ratio
- Duration.
- Author / Director
- Logline (revise or update the logline you created in the pre-production package)
- Working Credits (if other people were involved in the production process)
File name:
Lastname_Firstname_RoughCut.pdf
In-Person Grading
Thursday Production - End-Of-The-Day Check-In
Students must have their project folder and be ready to show the following:
📁 00_ProjectFiles
- Premiere Pro:
ProjectName.prproj - Autosaves
📁 03_Renders
ProjectName_DraftAssembly.mp4ProjectName_RhythmPass.mp4ProjectName_RoughPreview.mp4
📁 04_Exports
- Empty for now, but later to be included:
Lastname_Firstname_RoughCut.mp4
Credits: Jessica A. Rodríguez
AI Disclosure:
AI Disclosure: ChatGPT was used for editing and clarity only. No original course content was generated using AI.