MediaArtTutorials
W9 — Rough Cut Framework
From Raw Footage to a Coherent Sequence
This document supports the W9 - Rough Cut by outlining editorial principles and best practices when assembling your first edit.
Sections
- Reviewing Footage
- Building the Rough Assembly
- Exporting Temporary Sequences
- Pacing & Rhythm
- Visual Consistency (Basic Colour Correction)
- Basic Sound Integration
- Final Rough Cut Export
Reviewing Footage
Before assembling your sequence, take time to review all your footage carefully.
Professional editors rarely begin editing immediately — they first watch, evaluate, and select usable material.
Do not delete any footage. Simply identify what you will use and what you will avoid.
How to Select Footage in Premiere Pro
There are several ways to mark usable sections of your footage in Premiere Pro.
Watch the following tutorial.
You will also find a written summary of the key steps below.
Method 1 — In/Out Points (Recommended)
Open the clip in the Source Monitor.
- Play the clip.
- Press I to mark the In point (where the usable part begins).
- Press O to mark the Out point (where it ends).
- Insert this section into your timeline.
This allows you to use only the usable portion of the clip.
Method 2 — Clip Markers
You can place markers on good moments in the footage.
- Play the clip.
- Press M to place a marker.
- Use markers to indicate:
- Good takes
- Strong performances
- Clean technical moments
Markers help you navigate quickly between good sections of a clip.
Method 3 — Label Colors
Editors often use color labels to organize material.
For example:
- Green → good takes
- Yellow → possible alternatives
- Red → unusable footage
This makes it easier to visually identify material in the project panel.
How Editors Choose Between Similar Shots
Often you will have multiple takes of the same shot.
Choosing between them involves both technical and storytelling decisions.
Editors usually evaluate:
Technical quality
- Is the shot in focus?
- Is the exposure correct?
- Is the camera stable?
- Is the framing clean?
Performance and timing
- Does the action feel natural?
- Does the movement start and end clearly?
- Does the shot connect well with the next shot?
Sometimes a technically imperfect shot is chosen if it supports the rhythm or emotion of the sequence better.
Building the Draft Assembly
The assembly edit is the first stage of editing where selected shots are placed in sequence to create the basic structure of the film.
The goal is simply to see the material together as a continuous sequence for the first time.
The assembly edit is often longer than the final film.
Extra seconds before and after actions are normal at this stage.
Creating the Sequence in Premiere Pro
Assembly Rules
For this first sequence, follow these rules:
- Do not trim shots yet.
- Place one shot after the other in the timeline.
- Do not add transitions.
- Do not adjust timing for rhythm yet.
- Do not add music or sound effects.
Your goal is simply to construct the first continuous version of the film.
Think of this step as building the skeleton of the sequence.
The assembly should help you verify:
- The order of the shots
- The clarity of the action
- The overall structure of the scene
In the next stage, you will begin refining rhythm, pacing, and shot duration.
Exporting Temporary Sequences
Exporting allows you to watch the film outside the editing timeline, which makes pacing issues, sound problems, and visual inconsistencies easier to notice.
Premiere Pro → Media Encoder Workflow
This workflow allows you to continue editing in Premiere while your file exports in the background, which is especially useful when working with multiple revisions or temporary renders.
Media Encoder also manages export jobs in a queue, making it easier to export several versions of a sequence without interrupting your editing workflow.
- Select your sequence in Premiere Pro
- Go to File → Export → Media
- Format: H.264
- Confirm that your resolution and frame rate match your sequence settings
- Click Queue instead of Export
Premiere will send the sequence to Media Encoder, where the export will process.
Pacing & Rhythm
Once your assembly sequence is built, the next step is refining pacing and rhythm.
Pacing refers to how long shots remain on screen.
Rhythm refers to how the duration of shots changes across the sequence.
Together, they determine how the viewer experiences time and movement in the film.
At this stage you will begin:
- Trimming shots
- Removing unnecessary moments
- Refining shot order
- Adjusting transitions between shots
The goal is to create a sequence that feels clear, intentional, and readable.
Trimming Shots
Trimming is the primary tool editors use to control pacing.
When trimming shots:
- Cut after the important information is understood.
- Remove unnecessary pauses before or after actions.
- Avoid leaving shots longer than needed.
Types of Pacing
Different stories require different pacing styles.
Slow Pacing
Shots remain on screen for a longer duration before the next cut.
This gives the viewer more time to observe the scene and absorb the atmosphere.
Slow pacing is often used to create:
- tension
- contemplation
- emotional weight
- atmospheric immersion
In editing, slow pacing usually means:
- fewer cuts
- longer shot durations
- subtle character movement or minimal action
- ambient sound or slow music that supports the mood
Example: In the short film 2 AM Coffee by Forrain, the pacing remains slow throughout the sequence. The film follows a person going out for coffee late at night. Many shots are held longer than usual, allowing the viewer to sit with the quiet atmosphere of the empty streets and the city mart. Even when the character discovers that their bike has been stolen, the reaction unfolds slowly rather than through rapid cuts. This pacing reinforces the feeling of isolation and late-night stillness.
Fast Pacing
Shots change quickly.
Often used to create:
- urgency
- action
- intensity
- energetic movement
In editing, fast pacing often includes:
- short shot durations
- frequent cuts
- strong camera movement
- rapid shifts in perspective or location
- music or sound with a strong rhythm
Example: In the short film Kick Me by the Jefferies Brothers, the pacing is noticeably fast. The film follows a character being bullied through a series of escalating situations. Within one minute, the sequence moves through multiple locations in an office environment using quick cuts, dynamic camera movements, and changing perspectives. These visual shifts are reinforced by fast-paced circus-style music, which intensifies the chaotic and comedic tone of the sequence.
Variable Rhythm
Most films combine longer and shorter shots to create rhythm.
For example: Long shot → medium shot → quick cut → longer pause.
This variation creates visual rhythm, similar to rhythm in music.
Avoid sequences where all shots have the same duration, as this often feels mechanical.
Example: In the short film The Wait by Morphine starts with a low pace matching the storytelling following the life of a person during the covid-19 pandemic and not being able to leave their apartment. It also matches the mundane and boring activity of waiting for the microwave to sound and not having anything to do. This is pair with long shots, long zoom ins, static shots that they shift into a more dynamic environment when the main character starts drumming to be transported into a drumming set, pair with multiple shots, fast cuts, a lot of energy coming from the drum sound to later soon we hear the microwave and the ending comes sharp into the slow environment of his reality.
Evaluating Your Rhythm
When reviewing your sequence, ask yourself:
- Does any shot stay on screen too long?
- Do any cuts feel too abrupt?
- Does the action flow clearly from one shot to the next?
- Are there repetitive or unnecessary shots?
Small timing adjustments — even a few frames — can significantly improve rhythm.
Editing is often about subtle timing decisions rather than large structural changes.
Visual Consistency (Basic Colour Correction)
During production, shots are often recorded under slightly different lighting conditions, camera angles, or exposure settings. As a result, two shots that occur in the same scene may appear visually different.
Basic colour correction helps reduce these differences so the sequence feels visually coherent.
It is important to distinguish between two different processes:
Colour Correction
- technical adjustments
- fixes white balance and exposure
- creates consistency between shots
Colour Grading
- creative styling
- adds a cinematic look or visual mood
- usually done near the final stage of editing
At the Rough Cut stage, the goal is not creative colour grading, but visual consistency between shots.
Key Colour Correction Principles
When colour correcting your sequence, focus on these basic ideas:
Neutral whites
White or neutral areas in the image should appear natural rather than tinted toward blue, orange, green, or magenta.
Balanced exposure
Shots should not appear dramatically brighter or darker than neighboring shots unless intentionally motivated by the scene.
Consistent contrast
The balance between shadows, midtones, and highlights should feel similar across clips.
Creating Depth. A common approach in basic correction is to slightly deepen shadows and brighten highlights. This increases contrast and can help create a sense of visual depth.
Avoid extreme adjustments. Subtle corrections usually produce the most natural results.
Recommended Tools
For this stage of editing, focus on the following tools in the Lumetri Color panel from Premiere Pro:
- Basic Correction (Temperature, Exposure, Saturation)
- Curves (for contrast and tonal balance)
- Color Wheels & Match (for balancing shadows, midtones, and highlights)
These tools provide enough control to correct most visual inconsistencies in your sequence.
Basic Sound Integration
Once the visual rhythm of your sequence is established, you should integrate basic production sound.
At this stage, the goal is not full sound design, but creating a clean and readable audio foundation.
You will work with:
- Room tone
- On-scene sounds you recorded during production
Do not add music, sound effects, or foley yet.
Those elements will be developed later.
Why Use Premiere → Audition Workflow?
While Premiere Pro allows basic audio editing, Audition provides more precise tools for:
- cleaning audio
- adjusting levels
- reducing noise
- balancing multiple sound layers
Editors often send audio to Audition when they need greater control over sound editing.
The workflow allows you to edit audio without damaging the original files and automatically updates your sequence in Premiere.
Sending Audio (Sequence) to Audition
- Select the sequence
- Main Menu → Edit → Edit in Adobe Audition
- In the Pop-Op Window, Select the correct folder to save new documents and enable Open in Adobe Audition.
- Click OK
Premiere Pro → Adobe Audition Workflow: Basic Audio Editing
Reopening the Audition Session for Further Editing
If you need to continue editing your audio later, you can reopen the Audition session file that was created during the Premiere → Audition workflow.
Locate the session file (.sesx) inside the folder: 📁 Adobe Audition Interchange
This folder is automatically created inside the same directory where your Premiere project is saved.
Open the .sesx file in Adobe Audition, make any additional changes, and then export again to Premiere Pro following the same Export to Adobe Premiere Pro workflow.
Sending Audio (Clip) to Audition
- Select the audio clip(s) in your Premiere timeline.
- Right-click the clip.
- Choose Edit Clip in Adobe Audition.
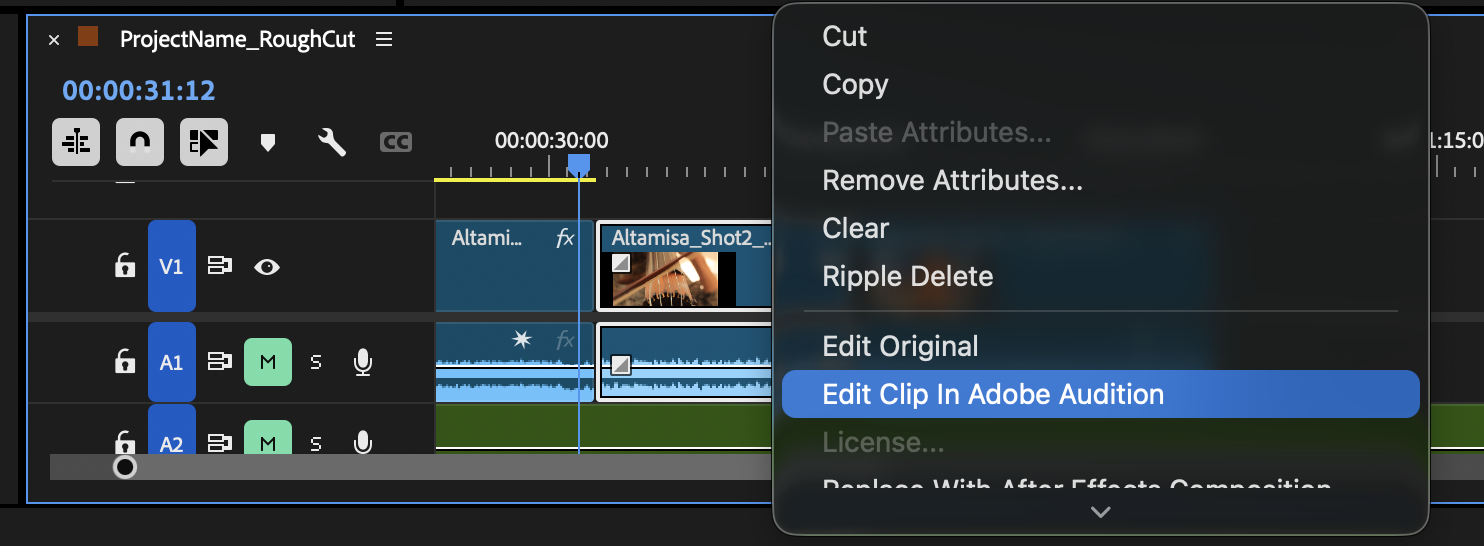
Premiere will create a linked audio file and open it in Audition.
Any changes saved in Audition will automatically update inside Premiere.
Final Rough Cut Export
With your sequence open in the timeline:
- Go to Export
- Save on: 04_Exports inside project’s folder.
- Preset: Match Source – Adaptive High Bitrate
- Format: H.264
- Dissable Effects
- Click Export
Credits: Jessica A. Rodríguez
AI Disclosure:
AI tools (ChatGPT) was used for editing and clarity only. AI is not used to generate original course content.