MediaArtTutorials
Live Foley (Groups of 4)
For this assignment, you will create a 30-second live Foley performance using multiple cameras and audio recording devices. The focus is on capturing both subtle and louder live Foley sounds from different perspectives.
During post-production, the goal is to work with Premiere Pro and Reaper to professionally edit multiple camera angles and microphone recordings into a single dynamic audiovisual piece. You will use picture-in-picture to visualize the provided video clip corresponding to your live Foley performance.
❗ Attendance and engagement are part of the rubric.
You are expected to work actively during class time and participate in all in-class activities.
Project Overview
- Format: 30-second multi-camera video
- Cameras: Manual (M) Mode / Video / Three-camera setup / Cameras on tripod
- Lenses: Use available lenses at your discretion
- Audio: Recorded separately using multiple Zoom H4n handheld recorders and microphones
- Location: Assigned workstations in Togo Salmon Hall / McMaster U
- Collaboration:
- 3 groups per station for technical setup and support
- Submit in groups of 4 students (each group submits their own project)
Examples
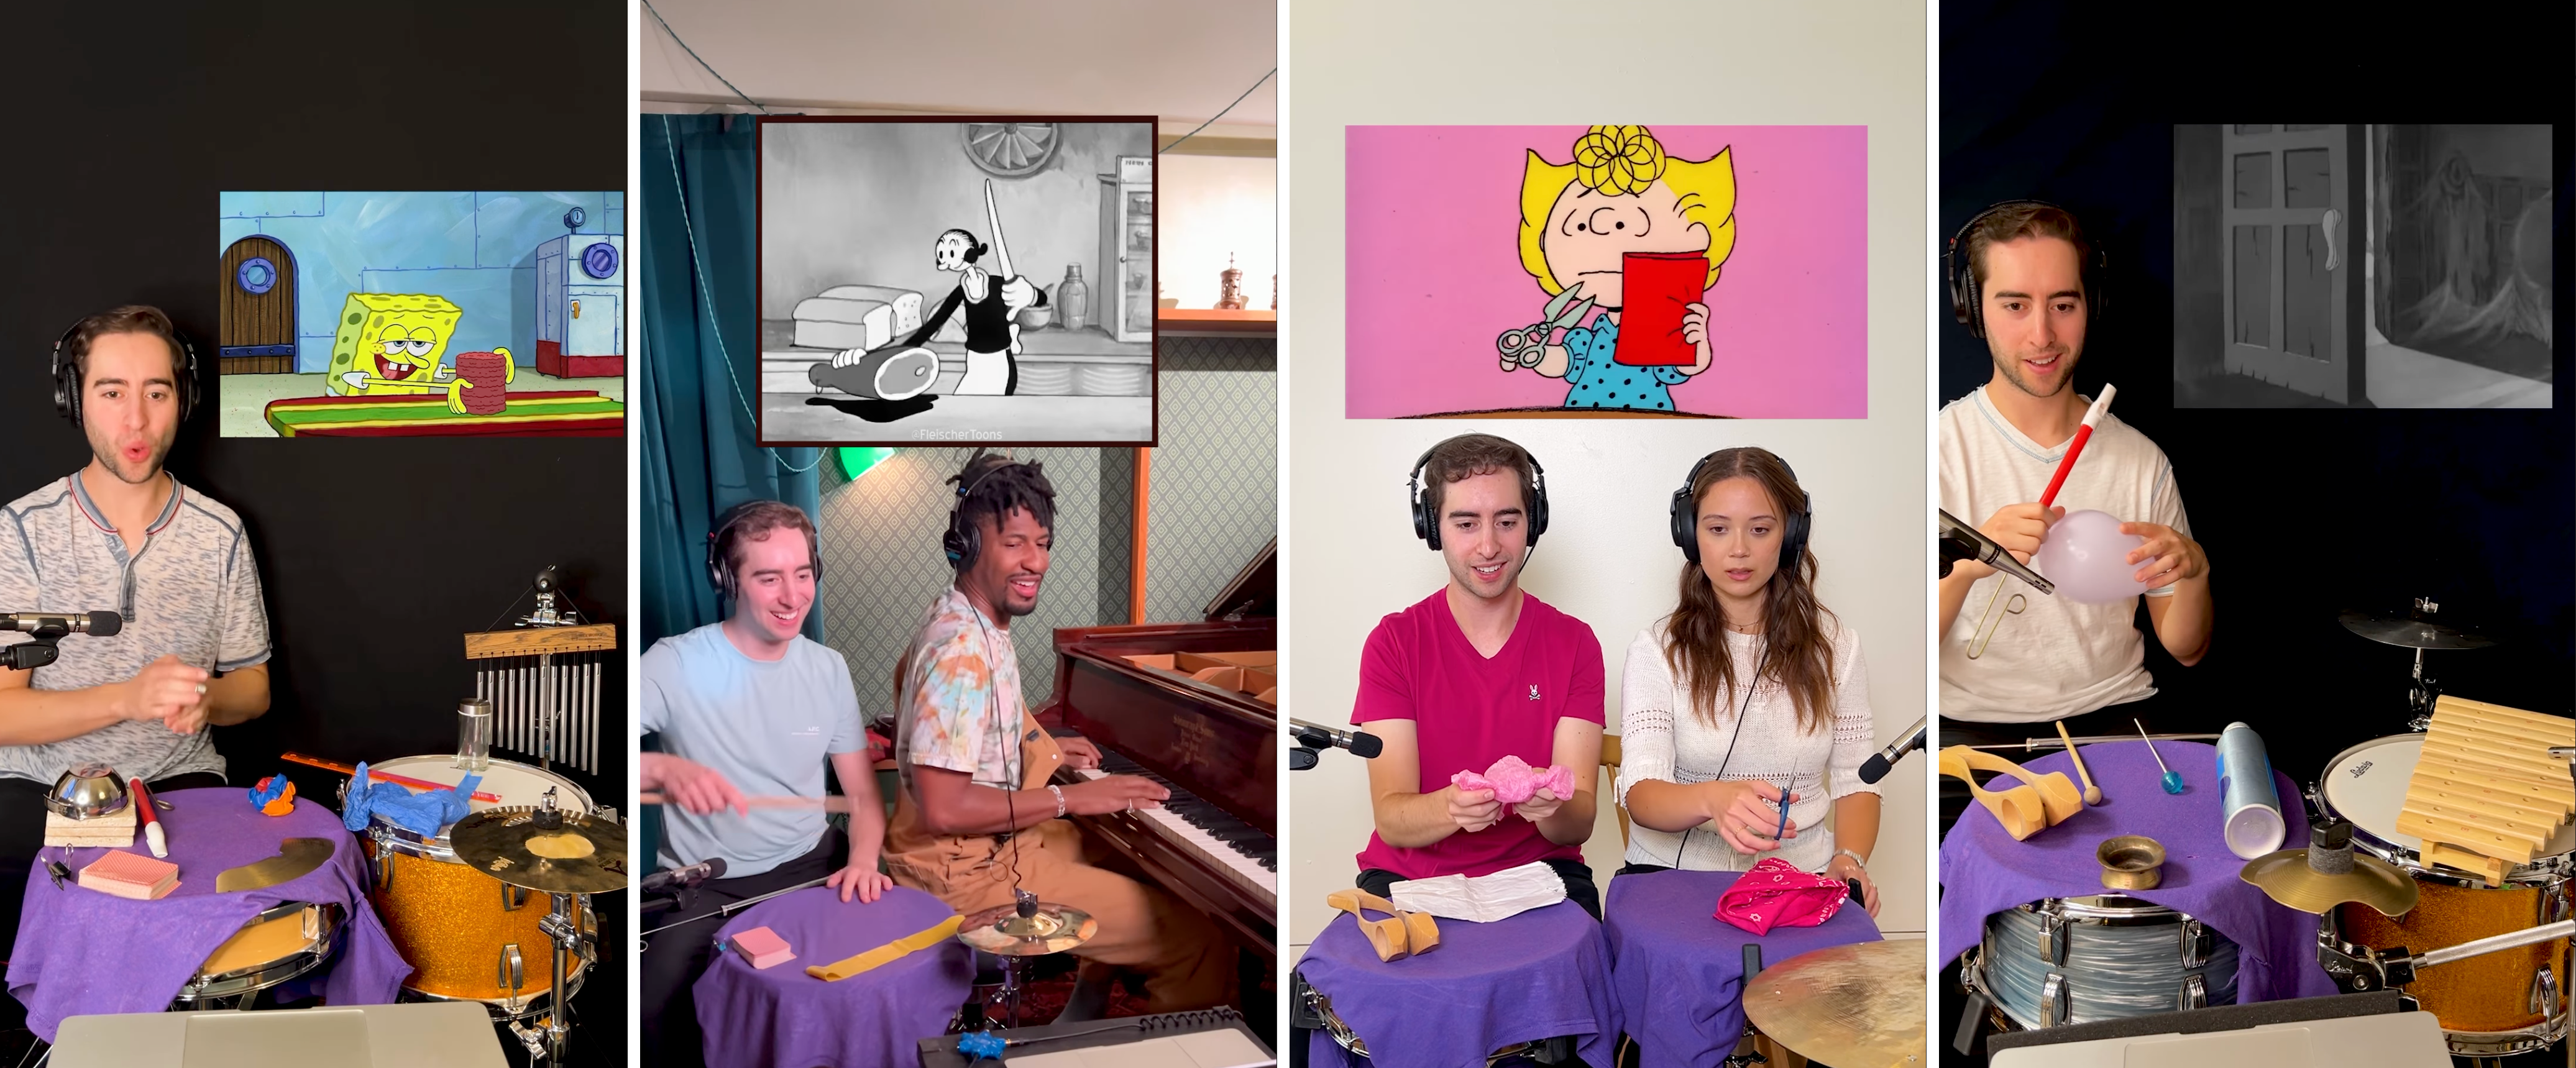
Live Foleys by Josh Harmon
→ Popular content creator and musician known for his viral sound effects videos, where he uses drums and other instruments to recreate cartoon and cinematic sounds.
🌐 Instagram
Live Foley Example by Paul Graves
→ Live Foley example for theatre: a live human performance where sound effects are created and performed in real time.
▶️ Video
Activities
Complete the following in order. Ask the professor or TAs for support or feedback.
- 1. Planning - **Complete before class**
- 2. Group Organization & Setup
- 3. ❗ Station Check-In ❗
- 4. Recording
- 5. Equipment Wrap-Up
- 6. Post-Production: Assemble in Premiere Pro
1. Planning [before Thursday]
❗ You must arrive prepared on Thursday, with your planning completed and the objects you will use for your live Foley.
Video You Will Foley
You will be given a royalty-free clip from an old silent film.
- The videos are early silent films by Georges Méliès, sourced from the Internet Archive
- All available clips for this assignment can be found here (Dropbox)
- Download the file named with your group number (as listed in the self-enrollment on Avenue to Learn)
- Watch the full video as a group
- Select a 30-second time frame from the clip that you will use for your live Foley performance
Planning
Before Thursday, your group must define your creative and technical approach, including clear roles for each one:
- Three students performing live Foley sounds on set (each producing different sounds)
- One student monitoring the cameras and sound recorders
You must practice individually and collectively before Thursday so that your group is ready to perform the scene 2–3 times efficiently during the production session.
You may use any objects or instruments, but all sound must be produced live.
No added sound is allowed in post-production.
All objects or instruments used should be created, assembled, or adapted by your group.
For inspiration, you may watch the example below to explore different approaches and objects commonly used in Foley work.
Brainstorming Document
Create a planning document outlining the objects and/or instruments you need to bring and the specific sounds you will create based on the provided video clip.
This document does not have a fixed format; use whatever structure helps your group plan clearly and effectively.
You can use the questions below to guide your preparation:
Creative & Sound Design
- What types of sounds does the clip require (footsteps, fabric, impacts, ambience, textures)?
- What objects or instruments can you use to re-create each of these sounds?
- Will you buy and/or how will you create, modify, or adapt these objects?
- Which sounds need to be subtle, and which need to be louder and more prominent?
- How will you vary rhythm, timing, and intensity to match the on-screen action?
- How will you avoid overlapping or masking each other’s sounds?
Roles & Technical Approach
- Who is responsible for each sound?
- Who will get each of the objects or instruments you must bring?
- Who is monitoring cameras and audio levels, and how will they communicate issues during recording?
- How many times can your group realistically perform the scene without stopping?
Submission
- ➡️ Export as PDF
- 📄 Filename:
Group-#-Brainstorming.pdf
2. Group Organization & Setup [40m]
You will be assigned to a station (3 groups per station).
All equipment required for each station will be pre-arranged in the designated space.
Each station will also include a printed spreadsheet listing all equipment assigned to that station.
Before beginning setup, your station group must:
- Locate all equipment listed on the spreadsheet
- Double-check that every item is present
- Write down the equipment number for each item you receive
Each group is responsible for:
- Setting up cameras, lights, and audio together following the W5 – Tech Walkthrough
Checking the photos and notes you recorded during lecture time
Station locations and group assignments will be:
- Posted on Avenue to Learn
- Printed and posted in the space
- Shown on slides in class
Space Configuration
Follow the W5 – Tech Walkthrough to set up your station.
-
Define and set up a main working area to place all objects and instruments.
You may be seated with a table in front of you, working on the floor, or using another configuration.
Decide this collectively, ensuring that all groups are comfortable with the overall setup. -
Set up audio using mic stands and Zoom H4n recorders on tripods, following the Tech Walkthrough.
You may reposition microphones as needed for each group’s performance. - Set up three cameras on tripods and adjust positions as needed:
- Front / wide
- Side / wide
- Back or overhead angle
-
Set up lighting using one, two, or all three lights.
Each group may adjust intensity and colour temperature as needed. - Set the video monitor so you all can see the video while you do the live foley.
This monitor must be positioned within clear view of all performers, as it will serve as your live visual reference.
Connect the video monitor to a computer.
⚠️ Handle all equipment with care.
Divide tasks evenly and support one another during setup.
Camera Settings
- All cameras on tripods
- Set the camera to Video Mode
- Set the Aspect Ratio to 16:9
- Set the Resolution to 1920 × 1080
- Set the Frame Rate to 30 fps
- Activate the Grid
- Set the lens to Manual Focus (MF)
- Set up Custom White Balance
Tip: Use a balance card set or a white sheet of paper
- Use Evaluative / Matrix Metering
- Image Stabilization OFF
- Continue working in Manual Mode (M)
Each group may set its own aperture, shutter speed, and ISO
3. ❗ Station Check-In ❗
Before moving on to the next stage, call the TA or instructor assigned to your station.
They will verify that everything has been set up correctly before you continue to the recording step.
4. Recording [2h]
Each group records two to three full takes.
- Organize a clear recording order within your station
- Time per group: 30 minutes
- Each group is responsible for self-managing time throughout the activity
- ❗ Each group (4 students) is responsible for the quality of its own recording.
While other groups are recording, your group must remain in the space and support the recording group.
Before pressing record, confirm that:
- All microphones are connected and powered
- Each recorder has enough battery and storage
- Audio levels are checked on every device
- Cameras are recording and framed correctly
- Lights are stable and not overheating
- Foley objects are prepared and within reach
Recording & Syncing Footage
- When ready:
- Press record on all cameras
- Perform a single loud hand clap
- Wait 2–3 seconds, then begin speaking
- Do not stop recording on any camera until the end of the take
-
Record the full live Foley performance as one continuous clip on all cameras and audio recording devices
- Repeat the same process for the second and third takes
4. Equipment Wrap-Up [20m]
When all groups have finished:
- Power off all equipment
- Use the equipment list provided at your station to confirm that all items are present
- Store cameras, lenses, lights, and audio gear properly in their assigned bags
For each piece of equipment, ensure that all associated components are returned to the correct numbered bag All components (e.g., batteries, SD cards, cables, mounts, adapters) are engraved or labeled with the same equipment number
- Leave all equipment at the station for the instructor to collect
⚠️ Handle all equipment with care.
Divide tasks evenly and support one another during wrap-up.
5. Post-Production: Assemble in Premiere Pro and Work final Audio in Reaper [Begin in Class]
Check: W5 - Tutorials - Live Foley: Multi-Camera Video & Live Sound Workflow
Specifications for Premiere Pro
- Sequence Resolution: 1920 × 1080
- Import footage from all three cameras
- Synchronize the audio from all three cameras so you can begin editing your sequence
Keep only the audio from the camera that recorded sound with the shotgun microphone
At this stage, use shotgun camera audio only. You will complete final audio work in Reaper. - Use cuts to create visual rhythm
- Total duration: 30 seconds
- Allowed transition: Jump cuts only
- Use picture-in-picture to add the video footage from the clip you are sonorizing.
This inset video should be placed in one of the corners of the frame (top-left, top-right, bottom-left, or bottom-right).
- Add Title and Credits
Edit your audio on Reaper
A small set of Reaper tutorials is provided for this assignment, focusing specifically on importing video, syncing multiple audio sources, level balancing, normalization, and export.
These tutorials are meant as a refresher, not a full introduction to Reaper. You are expected to primarily rely on your previous knowledge of Reaper developed in the Audio course with Dr. Ogborn.
If needed, review the tutorials and notes from that course before seeking additional resources.
- Follow the tutorials to import your edited video into Reaper
- Import and synchronize the audio from the video with the two additional audio recordings from the Zoom H4n recorders
- Adjust audio levels so that all sounds are clearly audible
No sound should be overwhelming or disproportionately louder or quieter than the others
- Follow the tutorials to normalize audio and set an appropriate dynamic range, ensuring the work clearly conveys its multiple sonic layers
- Check final export levels, then export your final video from Reaper
- 🚫 No added music or external (non-live) sound effects
Submission
- ➡️ Export as MP4, codec 264
- 📄 Filename:
Group-#-LiveFoley.mp4
Project Info PDF
Create a one–two page document including:
- One representative still image
- Title
- Year
- Authors
- Live Foley Approach (2–3 sentences):
Briefly describe your overall approach to live Foley for this project (e.g., performance strategy, coordination, sound priorities, or relationship between image and sound).
- Objects & Sound List:
A short list of the objects and/or instruments used, clearly indicating which sound each object produced and how it was performed (e.g., action, gesture, pressure, rhythm).
Submission
- ➡️ Export as PDF
- 📄 Filename:
Group-#-LiveFoley.pdf
📤 Submission (in pairs)
| Item | Required Filename |
|---|---|
| Brainstorming PDF | Group-#-Brainstorming.pdf |
| Final LiveFoley MP4 | Group-#-LiveFoley.mp4 |
| Project Description PDF | Group-#-LiveFoley.pdf |
⚠️ Follow the submission protocols carefully. Incorrect submissions may result in lost points.
Credits: Jessica A. Rodríguez
AI Disclosure:
AI Disclosure: AI tools (Microsoft Copilot and ChatGPT) were used for editing and clarity only. No original course content was generated using AI.