MediaArtTutorials
W12 - Final Cut
Refine and finalize picture, sound, and colour for your one-minute short, and prepare professional documentation for final submission and public screening.
❗ Attendance and engagement are part of the rubric.
You are expected to work actively during class time and participate in all in-class activities.
Activities
Complete the following in order. Ask the professor or TAs for support or feedback.
- Activity 1: Final Assembly [1h]
- Activity 2: Final Sound Design in Audition [2h]
- Activity 3: Final Colour Correction in Premiere [1h]
- Final Package Assemblage [30m]
- 📤 Submission
Activity 1: Final Assembly [1h]
Before anything else, finalize your sequence and confirm picture lock.
Picture lock means: no more changes to timing, shot order, or duration.
Step 1 — Review Your Rough Cut
Watch your latest sequence from beginning to end.
Focus on:
- clarity of the sequence
- pacing and rhythm
- shot necessity (remove anything redundant)
- transitions (keep them minimal and intentional)
Step 2 — Apply Final Adjustments
Make final corrections:
- trim or extend shots slightly
- remove unnecessary shots
- refine transitions (prefer cuts or simple crossfades)
- confirm total duration is 1 minute (without titles)
Step 3 — Add Titles
Add opening and closing titles to your sequence.
Guidelines:
- Titles include: film title, author name, and credits
- Titles must be clear, readable, and simple
- Avoid excessive animation or distracting effects
⚠️ Titles can extend the total duration of your project by up to 10 seconds maximum.
(Final runtime: 1:00 + up to 10s for titles)
Do NOT include the name of this class in your titles.
Step 4 — Confirm Picture Lock
Once complete:
- Do NOT change shot timing after this point
- Lock your sequence visually (excluding titles if minor adjustments are needed)
⚠️ All sound design and colour grading must now adapt to this locked sequence.
Step 5 — Export Temporary Version
Export a temporary version of your sequence for identifying corrections.
- Save it as
ProjectName_PictureLock.mp4inside folder: 📁03_Renders.
⚠️ Temporary versions will be checked for grading at the end of the class.
- Review the export and make any final corrections before moving into Activity 2.
Activity 2: Final Sound Design & Mix in Audition [2h]
In this activity, you will build your full sound design, combining all layers:
- ambience
- Foley
- sound effects (SFX)
- music (optional)
➡️ Review:
- W10 Tutorials — Sound Design Production Framework for sound design guidelines and examples.
- W10 Tutorials — Cleaning and Preparing Audio in Adobe Audition for step-by-step guidance on cleaning, adjusting, and exporting your audio files.
➡️ Check the W12 Tutorials — Sound Design for Film & Sound Production in Adobe Audition for guidance and tips.
Step 1 — Send Sequence to Audition
Follow the workflow:
Premiere Pro → Adobe Audition
Step 2 — Build Sound Layers
Add and organize:
- Ambience / room tone → continuous base
- Foley → actions (footsteps, objects, movement)
- SFX → accents and enhancements
- Music → emotional support (if used)
⚠️ Music should support, not dominate.
Step 3 — Synchronization & Balance
Ensure:
- sounds match actions precisely
- no noticeable delays or mismatches
- layers do not compete with each other
Step 4 — Clean & Mix
Apply:
- noise reduction (subtle)
- compression (light)
- Match Clip Loudness
Balance levels so:
- no clipping
- no sound overpowering others
- dialogue-free clarity is maintained
Step 5 — Export Back to Premiere
Return your final sound mix to Premiere.
Step 6 — Export Temporary Version
In Premiere, export a temporary version of your sequence for analysis and identifying corrections.
- Save it as
ProjectName_AudioCheck.mp4inside folder: 📁03_Renders.⚠️ Temporary versions will be checked for grading at the end of the class.
- Review the export and make any final corrections before moving into Activity 3.
Activity 3: Final Colour Correction in Premiere [1h]
In this activity, you will move from colour correction to colour grading.
Colour grading is the process of shaping the visual tone and mood of a film after technical corrections are complete.
➡️ Check the W12 Tutorials — Colour in Film & Colour Grading (Premiere Pro) for guidance and tips.
Step 1 — Check Base Corrections
Before grading, confirm:
- exposure is consistent
- white balance is corrected
- no major brightness shifts
Step 2 — Apply Colour Grading
Now refine the visual tone:
- adjust contrast using curves
- refine highlights and shadows
- unify colour palette across shots
- apply subtle stylistic choices (if appropriate)
Check:
- consistency between shots
- visual continuity
- balance between brightness and contrast
⚠️ Avoid over-grading.
Step 6 — Export Temporary Version
Export a temporary version of your sequence for analysis and identifying corrections.
- Save it as
EchoColourCheck.mp4inside folder: 📁03_Renders.⚠️ Temporary versions will be checked for grading at the end of the class.
- Review the export and make any final corrections before moving into Final Package Assemblage.
Final Package Assemblage [30m]
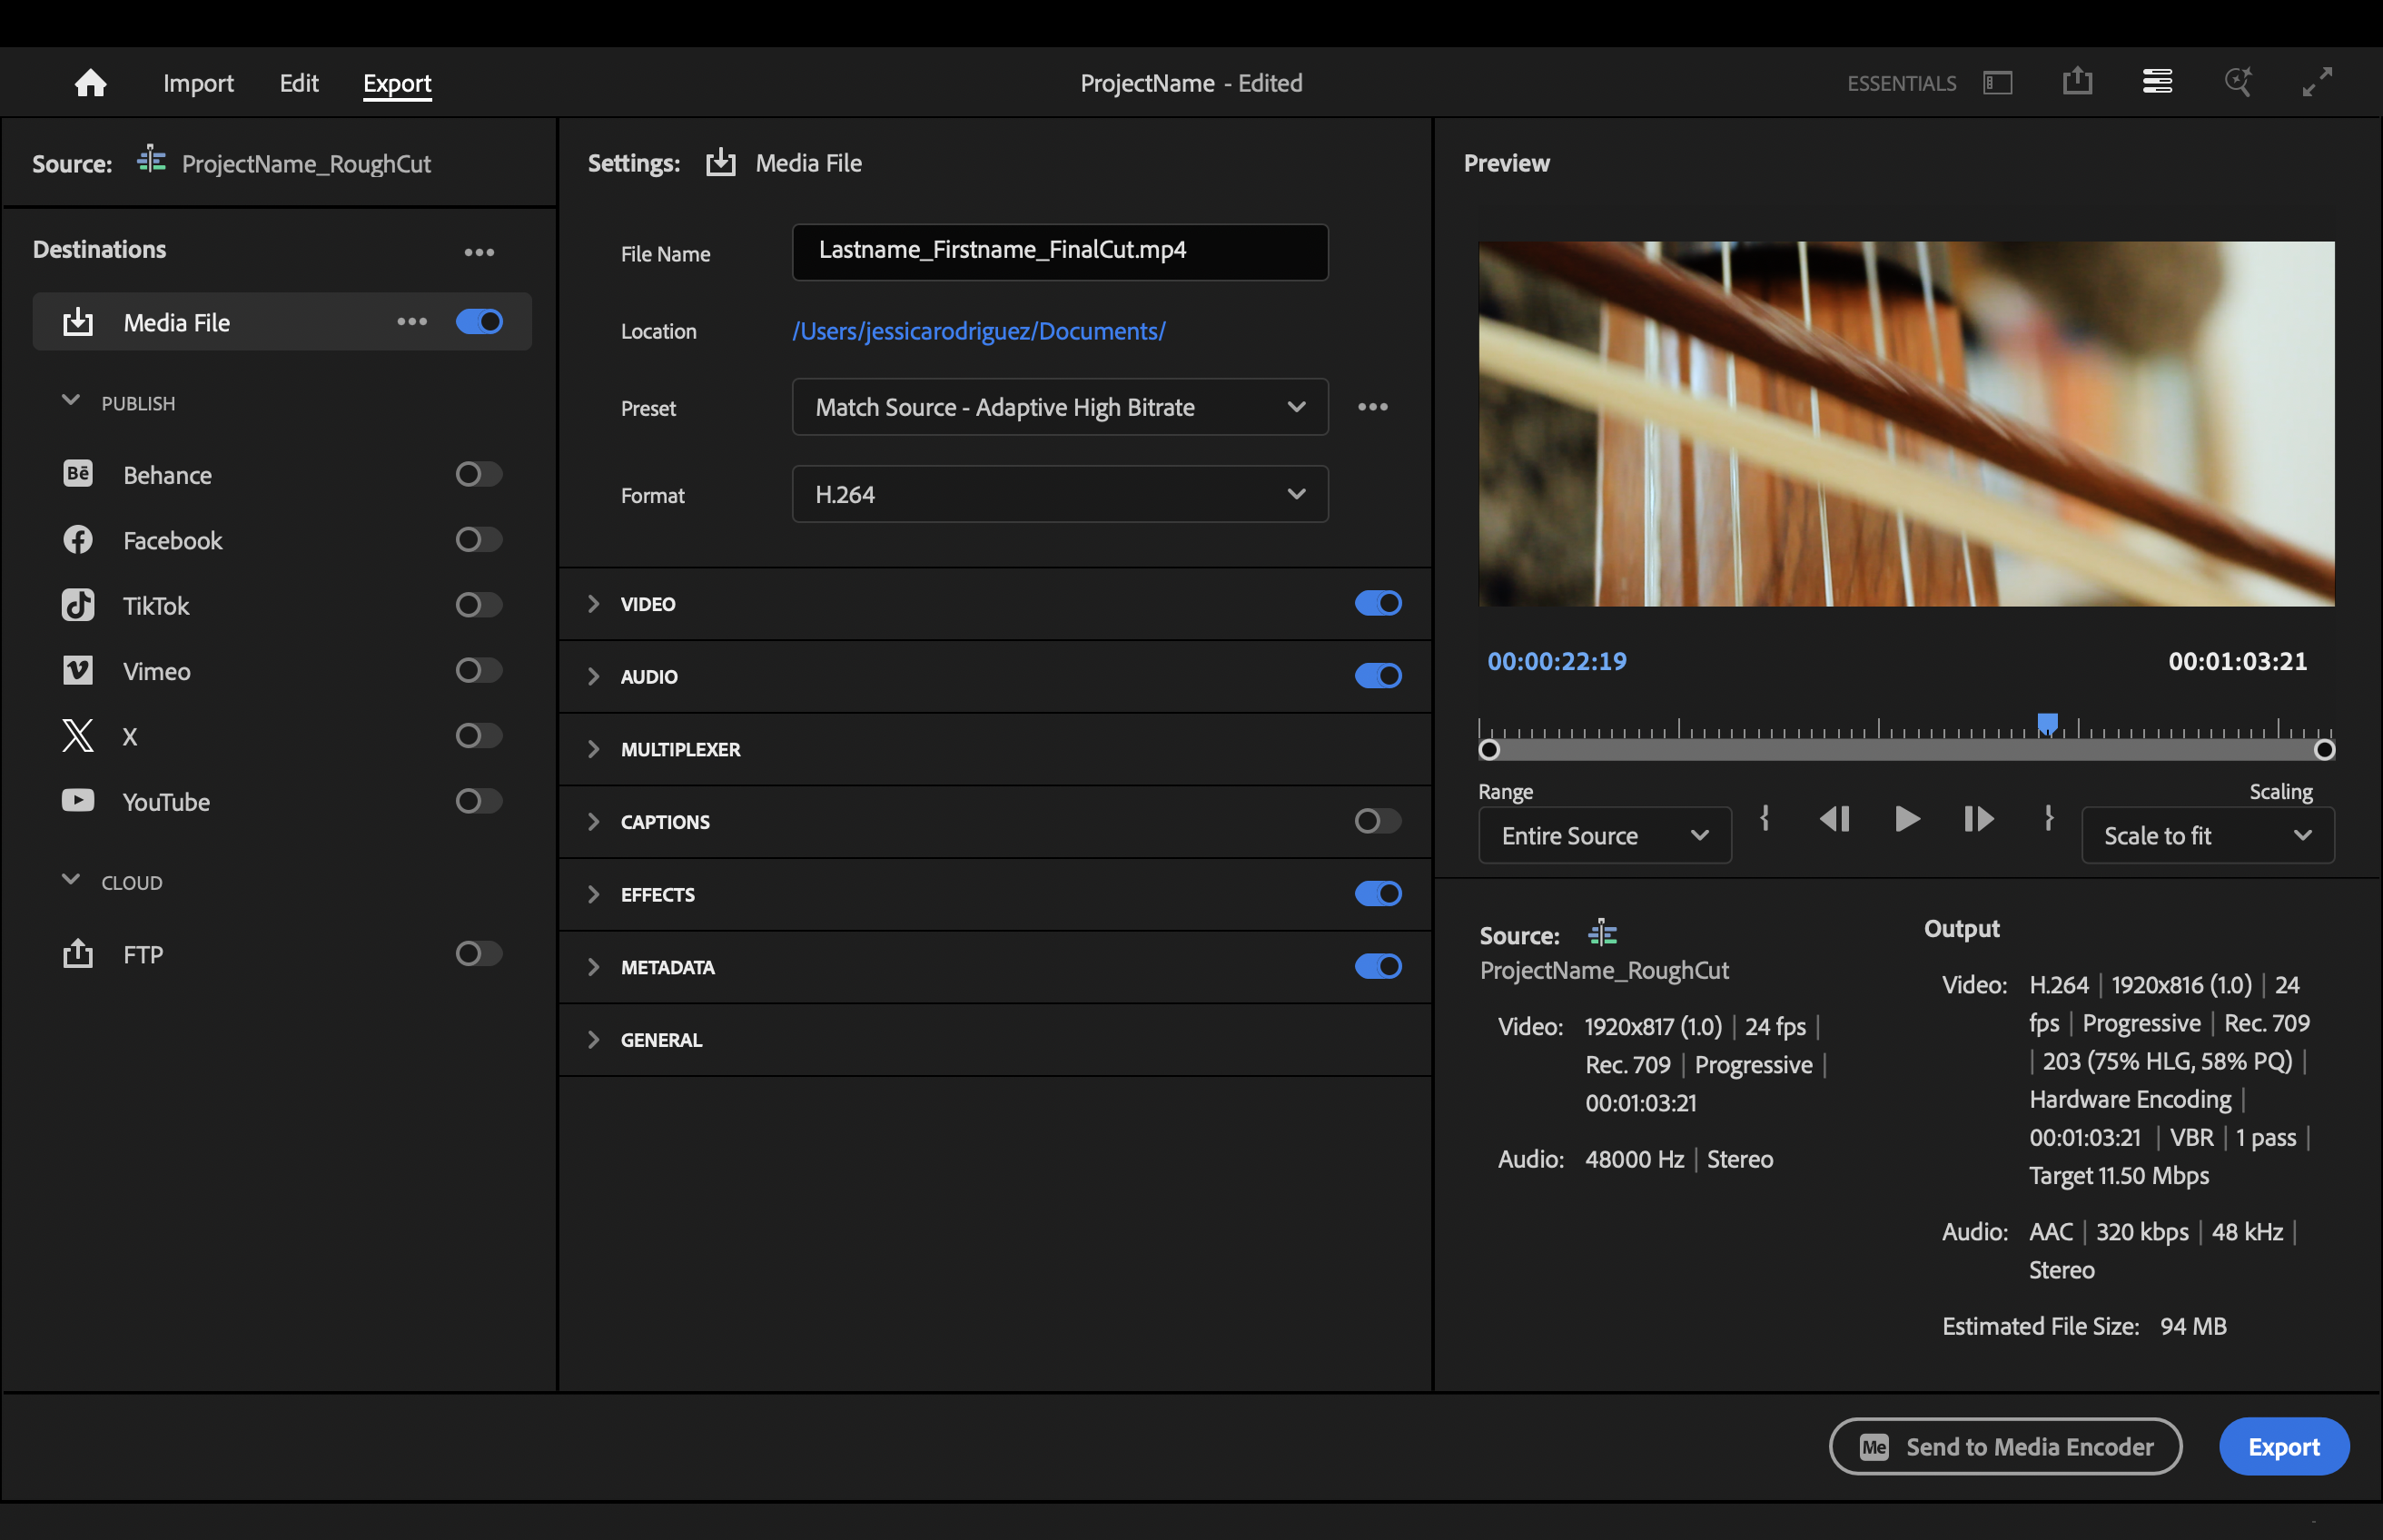
Step 1 — Final Export
Go to the Export tab and use the following settings:
- File name:
Lastname_Firstname_FinalCut.mp4 - Preset: Match Source - Adaptative High Bitrate
- Format: H.264
- Audio Format: ACC
- Enable Effects
- Range: Entire Source
- Export (either directly or through Media Encoder)
Step 2 — Final Check
Before submitting, confirm:
- no black frames
- audio is balanced
- no missing sound layers
- no abrupt cuts or errors
Re-export if need it.
Step 3 — Export Three Representative Stills
➡️ Check the Representative Stills Tips and Tutorial on how to export stills using Premiere Pro.
Select 2–3 strong frames from your final sequence that clearly represent your film.
- Format: PNG
- File name:
Lastname_Firstname_Still_01.pngLastname_Firstname_Still_02.pngLastname_Firstname_Still_03.png
Step 4 — Prepare Documentation
➡️ Check the W12 — Final Cut Framework for guidance.
Complete your Final Information Sheet (PDF):
- One representative still
- Film Information (Title, Director, Country, Year of Completion, Runtime)
- Logline
- Short Synopsis (100–150 words)
- Credits
📤 Submission
| Item | Required Filename |
|---|---|
| Final Cut Package | Lastname_Firstname_FinalPackage.zip |
| Organization | In-Person Grading |
⚠️ Follow the submission protocols carefully.
⚠️⚠️⚠️ Incorrect submissions will result in exclusion from the screening, which will affect your grade importantly❗❗❗
Deliverables — 📦 Final Cut Package (ZIP Submission)
File name:
Lastname_Firstname_FinalPackage.zip
1. Final Cut Export (MP4)
- One representative still
- Full sequence assembled
- Final sound mix integrated
- Final colour correction applied
- Titles and credits included
Export settings:
MP4 (H.264); 1920x1080; 24 fps
File name:
Lastname_Firstname_FinalCut.mp4
2. Final Information Sheet (PDF)
- Film Information (Title, Director, Country, Year of Completion, Runtime)
- Logline (1–2 sentences)
- Short Synopsis (100–150 words)
- Credits
File name:
Lastname_Firstname_InfoSheet.pdf
3. 2–3 High Resolution Stills
Representative still frames from the final film.
File names:
Lastname_Firstname_Still_01.png
Lastname_Firstname_Still_02.png
Lastname_Firstname_Still_03.png
In-Person Grading
Thursday Production - End-Of-The-Day Check-In
Students must have their project folder and be ready to show the following:
📁 00_ProjectFiles
- Premiere Pro:
ProjectName.prproj - Adobe Audition:
ProjectName.sesx - Autosaves
📁 03_Renders
- Temporary render naming protocol:
ProjectName_RenderType
Examples:
Echo_PictureLock.mp4
Echo_AudioCheck.mp4
EchoColourCheck.mp4
📁 04_Exports
- Later to be included:
Lastname_Firstname_FinalCut.mp4
Credits: Jessica A. Rodríguez
AI Disclosure:
AI Disclosure: ChatGPT was used for editing and clarity only. No original course content was generated using AI.