MediaArtTutorials
W4 — Spatial Design in a Black Box Venue
Objective
Create a scene in a black box venue (with OBJ provided) by designing both the spatial layout and the conditions of presentation.
You will:
- Place the audience, entrances, and stage area
- Design a scene on stage using basic geometric forms
- Create a 2D floor plan that includes:
- top view
- side view
- front view
- a detailed perspective view of the main objects on stage
- Translate this spatial plan into a 3D scene in Blender
This week emphasizes how space, orientation, and point of view work together before introducing lighting strategies. You will use this scene for the W5 work/submission.
Materials Required
- Computer (laptop or desktop)
- Blender (free software)
👉 Download: https://www.blender.org/download/ - Computer mouse (recommended)
- Paper + pen (preferred) or digital drawing tool
Activities
Complete the following in order. Ask your professor or TA for help as needed.
[15 min] Artistic Intention — Start Here
Before drawing or opening Blender, write 3–4 sentences describing the type of presentation that would take place in this space.
This could be, for example:
- a performance
- an installation
- a presentation
- a ritual
- an abstract or speculative event
Remember that this takes place in a black box setting.
What is a Black Box?
A black box is a flexible performance space, usually square or rectangular, with black walls and no fixed stage or seating. It allows artists to reconfigure the relationship between audience, performers, objects, and space.
Guiding Questions
- What kind of event is happening in this space?
- How close or distant is the audience from the action?
- Is the audience observing, surrounding, or sharing the space?
This text should guide your design decisions in both the 2D floor plan and the 3D scene.
➡️ Save this text for submission.
[25 min] 2D Floor Plan + Views
You are required to use the vocabulary from Week 1 when labeling your maps.
Using the black box setting (square, low ceiling) - check example above, design your scene and clearly indicate it in all required views:
- Top view: A view from directly above that shows the floor plan, spatial layout, and relationships between objects, stage, and audience.
- Side view: A view from the side that shows height, levels, and vertical relationships between objects and the stage.
- Front view: A view from the front that shows how the scene is presented from a frontal viewing position.
- Perspective view (main objects): A three-dimensional view that shows the main objects on stage as they would appear from a human point of view, conveying depth and spatial relationships.
Example
You are not copying the example — you are using it as a reference for how to communicate spatial decisions.
Required Elements (in all views)
- Main stage / performance area
This can be placed anywhere in the space.
- Objects on stage
- Place 3–4 objects (basic geometric forms only)
- Objects must be close together and/or stacked on top of each other
- Use Week 1 vocabulary: blocking, levels, orientation
- Audience position(s)
Options include: in front, on one side, surrounding the stage, on two sides, etc.
- Entrance(s)
Where audiences enter the space.
[60 min] 3D Scene in Blender
Create your scene based on your 2D floor plan. Before you begin, read the sections below.
Scene Setup (Venue OBJ)
You will use/import this .OBJ file of a black box venue.
An OBJ file is a common 3D file format used to share geometry between software.
How to Import the OBJ File
- Download the provided
.objfile. - Go to the main menu: File → Import → Wavefront (.obj).
- Select the file you downloaded (
W4-Venue.obj). - Click Import Wavefront OBJ.
- The 3D venue will appear at the centre of your scene.
The venue has no ceiling and no front wall —this allows easier camera movement and navigation.
Required Organization
When working on your scene, you must organize it using three collections:
- Geometry / Shapes
- Cameras
- Lights
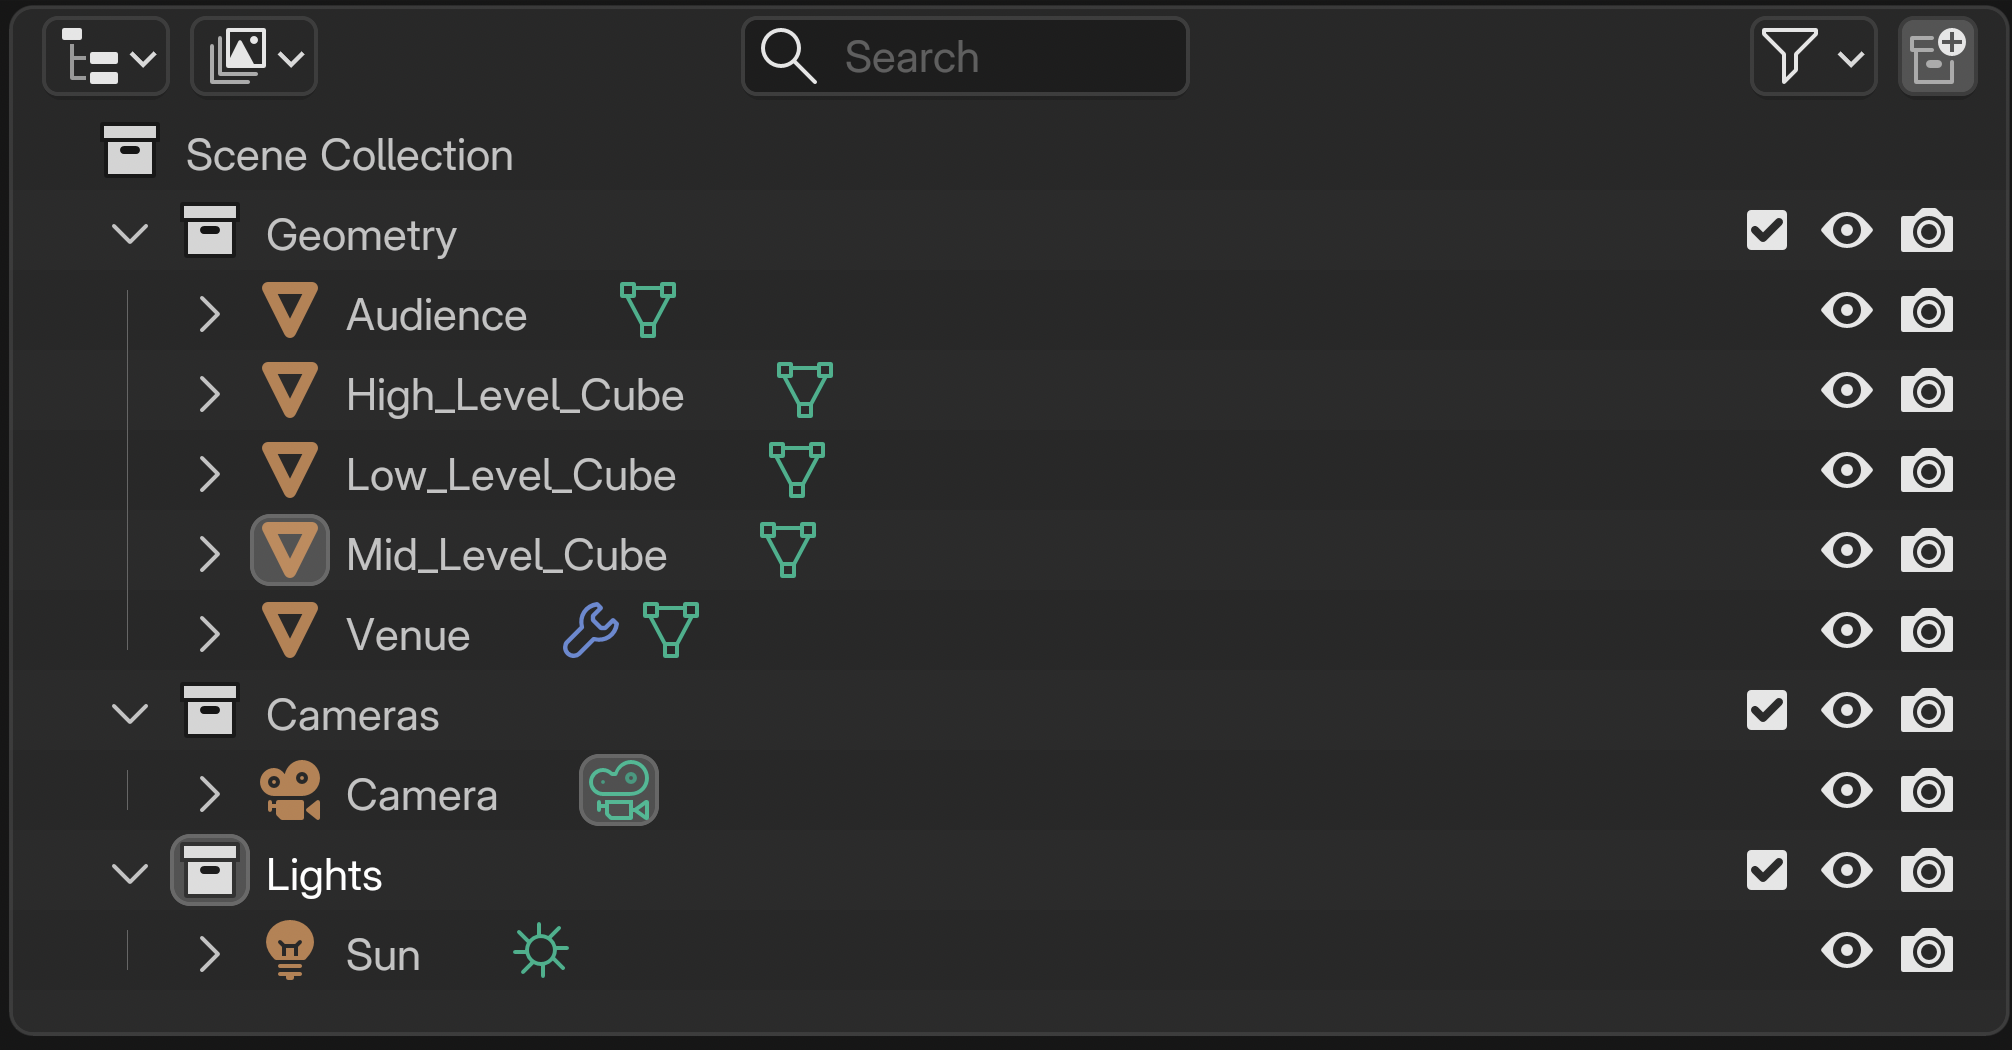
Organization Rules
- Rename all shapes clearly (no default names)
- Place each object in the correct collection
- Rename objects clearly (e.g.,
Low-Level-Cube,Mid_Level_Cube) - Correct naming protocol: don’t leave spaces in-between words, always fill with
_
⚠️ Important: Your Blender file will be checked for proper organization.
Rendering Requirements
- Render 2-3 images
- Each render must be from a different camera angle
- Images must be renders, not screenshots
➡️ Save all rendered images for submission.
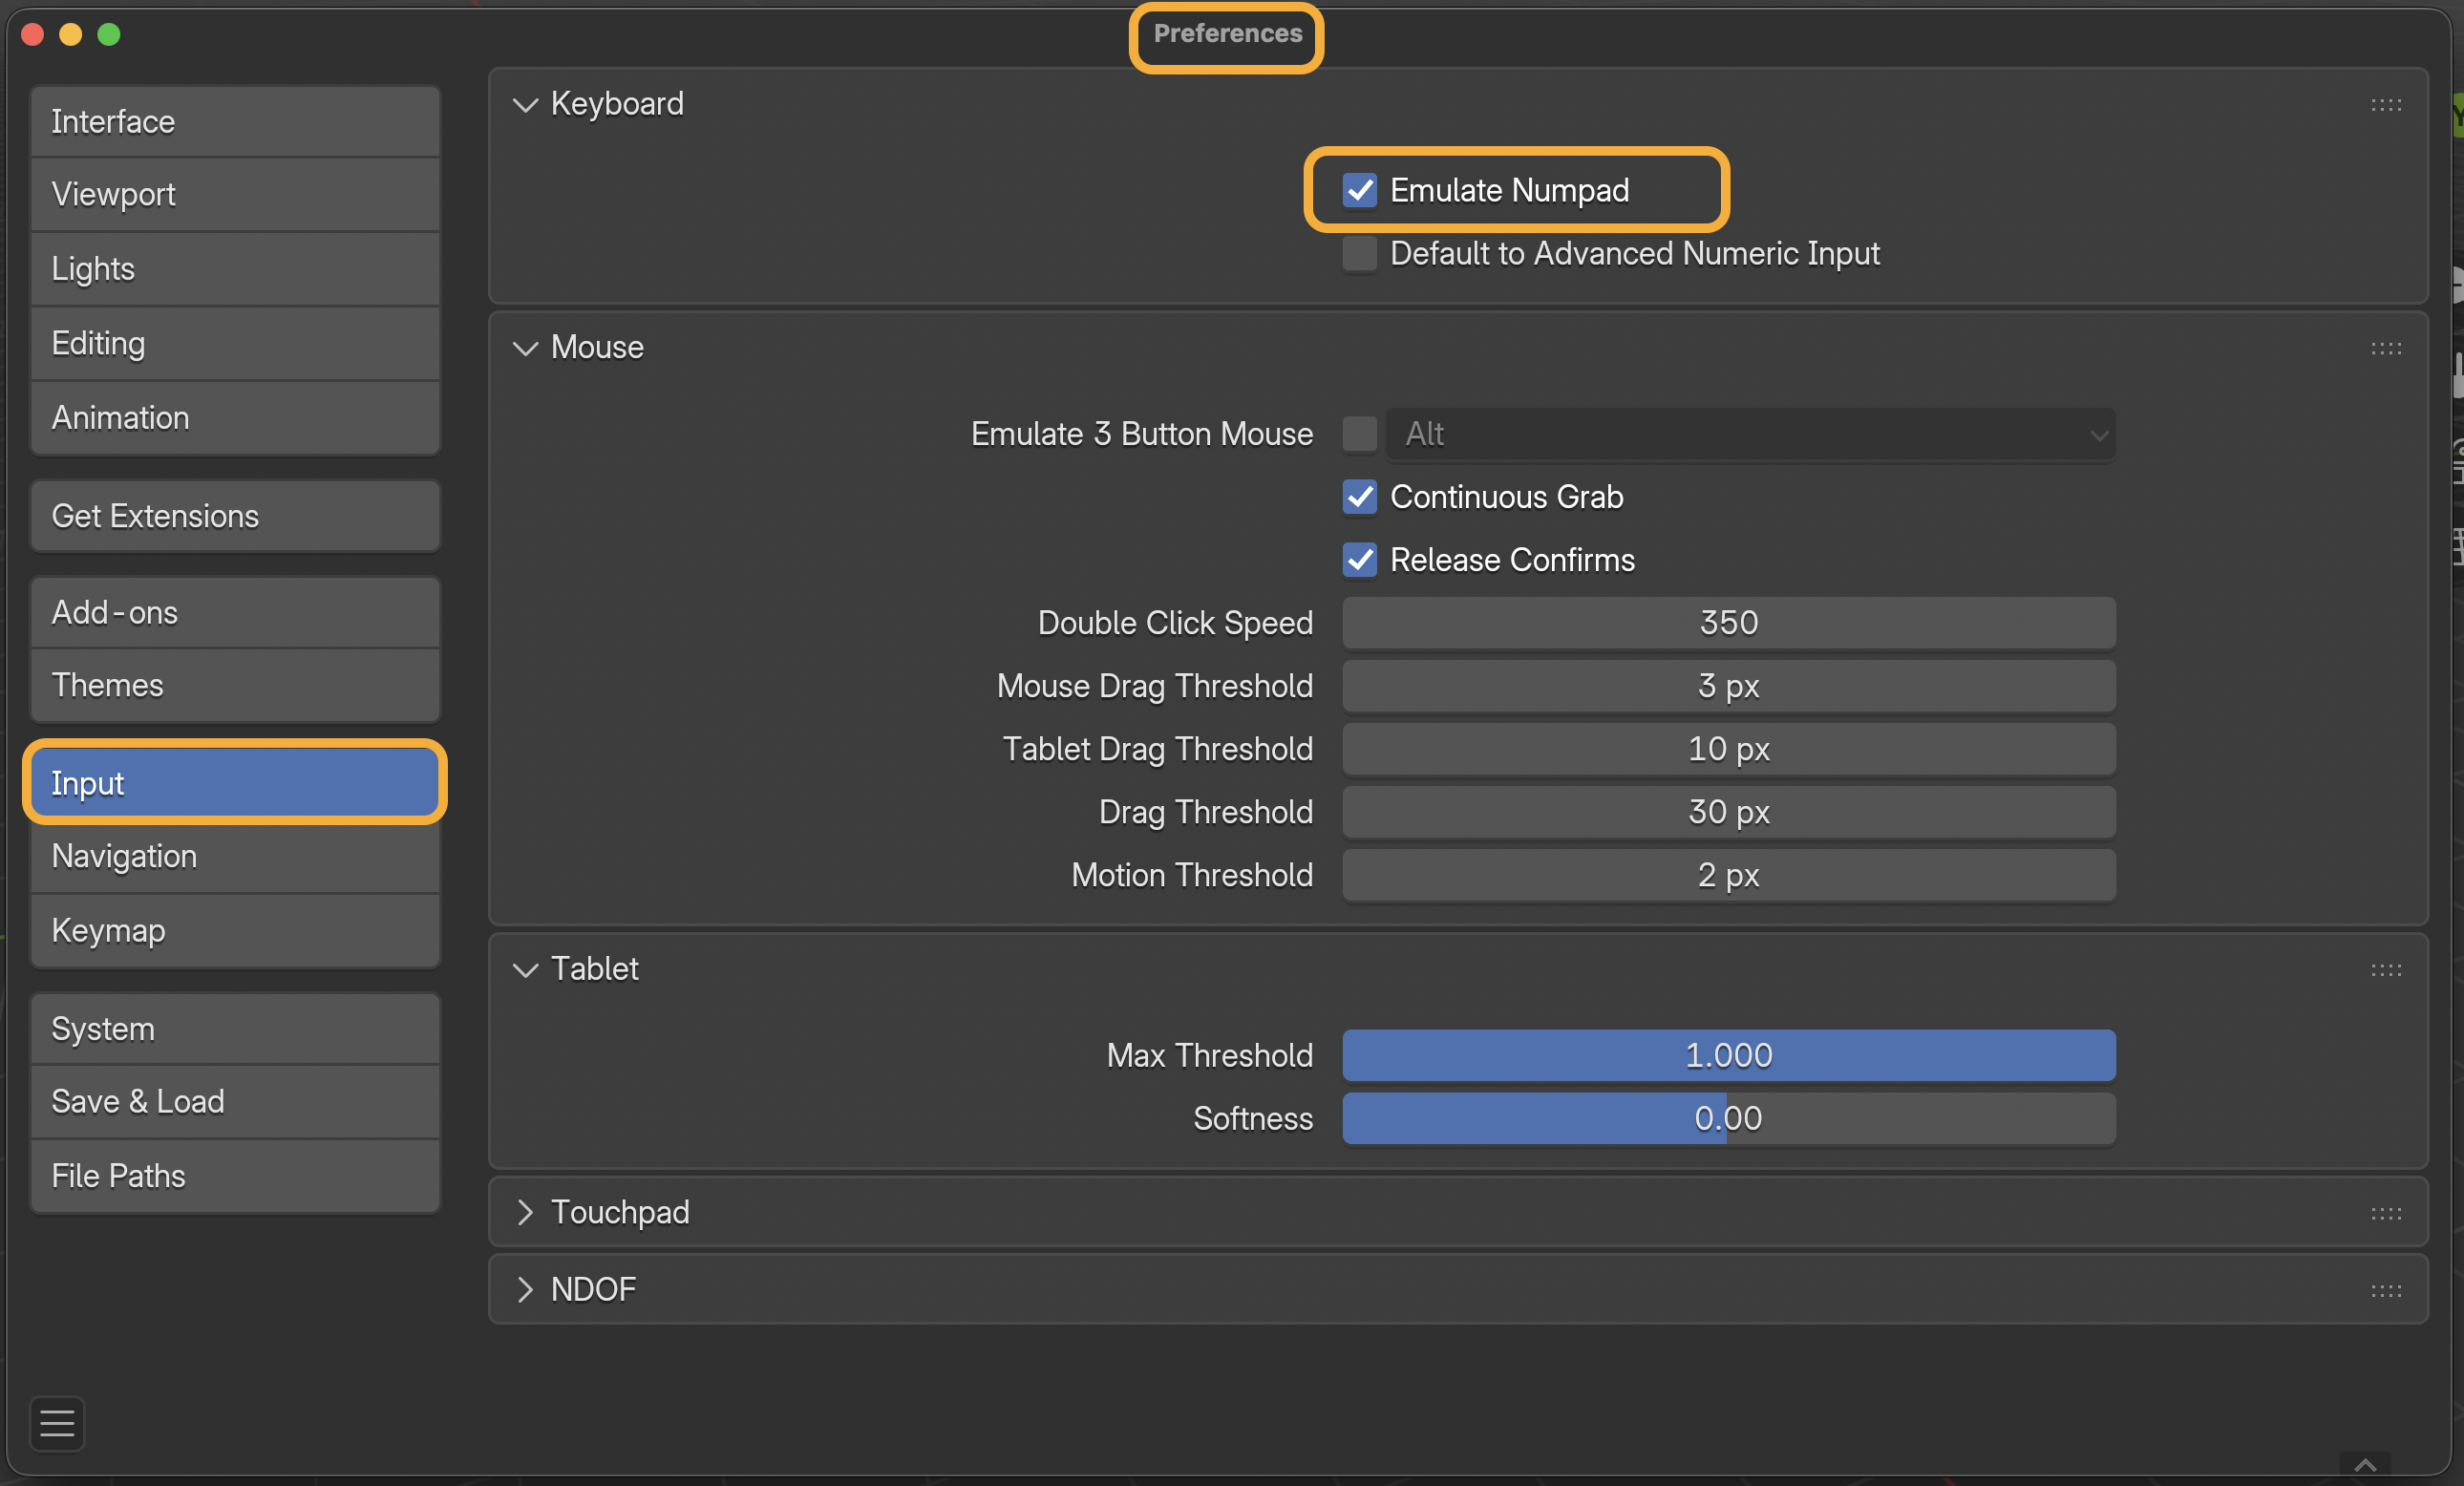
“0” not working to toggle Camera View?
Go to the main menu Edit → Preferences.
Open the Input tab and enable Emulate Numpad.
The Camera View is mapped to Numpad 0 by default.
Many laptops don’t have a numpad (or separate number keys on the right).
Enabling Emulate Numpad allows you to use the 0 key on your laptop keyboard instead.
Submission Documents
Create a single PDF with the following sections:
- General Information
Full name, student number, and tutorial number.
- Artistic / Camera Intention
3–4 sentences describing the type of presentation and spatial intention.
- 2D Floor Plan + Views
Include top, side, front, and perspective views.
Your 2D plan must take up at least half a page. - Rendered Images (2–3 total)
Each image must be a render, not a screenshot.
Each image must take up at least half a page.
➡️ Export as PDF
📄 Filename: Lastname-Firstname-W4-Tutorial.pdf
📤 Submission
| Component | File Name |
|---|---|
| Project document | Lastname-Firstname-W4-Tutorial.pdf |
| Blender file | Lastname-Firstname-W4-Space.blend |
⚠️ Follow submission protocols carefully. Incorrect submissions may result in lost points.
Assessment
This Week 4 activity is graded with higher expectations than previous weeks, as you are now expected to apply both conceptual and technical skills more intentionally.
Your work will be assessed based on:
-
Completion and effort
All required components are present and submitted correctly. -
Use of vocabulary and conceptual clarity
Accurate and intentional use of spatial vocabulary (blocking, levels, orientation) and presentation logic. -
Spatial design logic
Clear relationship between audience, stage, objects, and entrances. -
Blender organization and workflow
Proper use of collections, clear naming, and scene structure. -
Rendered output
Renders clearly communicate spatial relationships and camera viewpoints.
This is still an exploratory exercise, but at this stage, intentional spatial decisions and technical clarity matter more than experimentation alone.
Credits: Jessica A. Rodríguez
AI Disclosure:
AI Disclosure: ChatGPT was used for editing and clarity only. No original course content was generated using AI.