MediaArtTutorials
| MOCAP Tutorials | Home |
🌀 Re-targeting Movements in Blender
Using Motion Capture Data from Perception Neuron 3 (.bvh)
📌 What is MOCAP and Retargeting?
Motion Capture (MOCAP) is a technique for recording human movement and translating it to a digital character. In this guide, we use .bvh files captured with Perception Neuron 3 (PN3) and apply that movement to a custom 3D model in Blender.
Retargeting refers to the process of mapping motion data from one skeleton (e.g., a BVH armature) onto another (e.g., your character model), allowing different rigs or body types to perform the same animation.
Index
- Option 1: Manual Retargeting (No Armature on Import)
- Option 2: Retargeting with Auto-Rig Pro – Smart + Remap
- Option 3: Retargeting with Auto-Rig Pro – Existing Rig + Remap
Option 1: Manual Retargeting (No Armature on Import)
This method works best when you want to manually align BVH motion to a static mesh model without pre-existing rig constraints.
💡 Tips
- Make sure your character is in T-pose or A-pose before rigging
- Avoid scaling bones in Edit Mode — this can break animation playback
- Use orthographic views (
Numpad 1/3/7) to check alignment - You can clean up or simplify keyframes using the Graph Editor
Step-by-Step Instructions
First, create a new Blender project and save the file as Character-with-MOCAP-1.blend.
Then, follow these steps:
1. Import Your Character Mesh
- In Blender, go to
File → Import → OBJ/FBX(or whatever format your model is in) - Make sure your model does not include an armature
2. Import Your BVH File
- Go to
File → Import → Motion Capture (.bvh) - Select your
.bvhfile - Before importing: In the Transform panel on the right, set the Scale to
0.1 - Click Import BVH
- This will create a BVH armature with baked motion keyframes
3. Align BVH Scale with Character
- Your mocap character may appear larger/smaller than your mesh
- Use
S(scale) on the BVH armature only (Object Mode) - Do not scale the armature in Edit Mode or using non-uniform transforms
4. Match Bone Positions
- Select the BVH armature
- Enter Edit Mode
- Move and adjust bones so they visually align with your character’s mesh
- Focus on key joints like the shoulders, hips, knees, and feet for accurate alignment
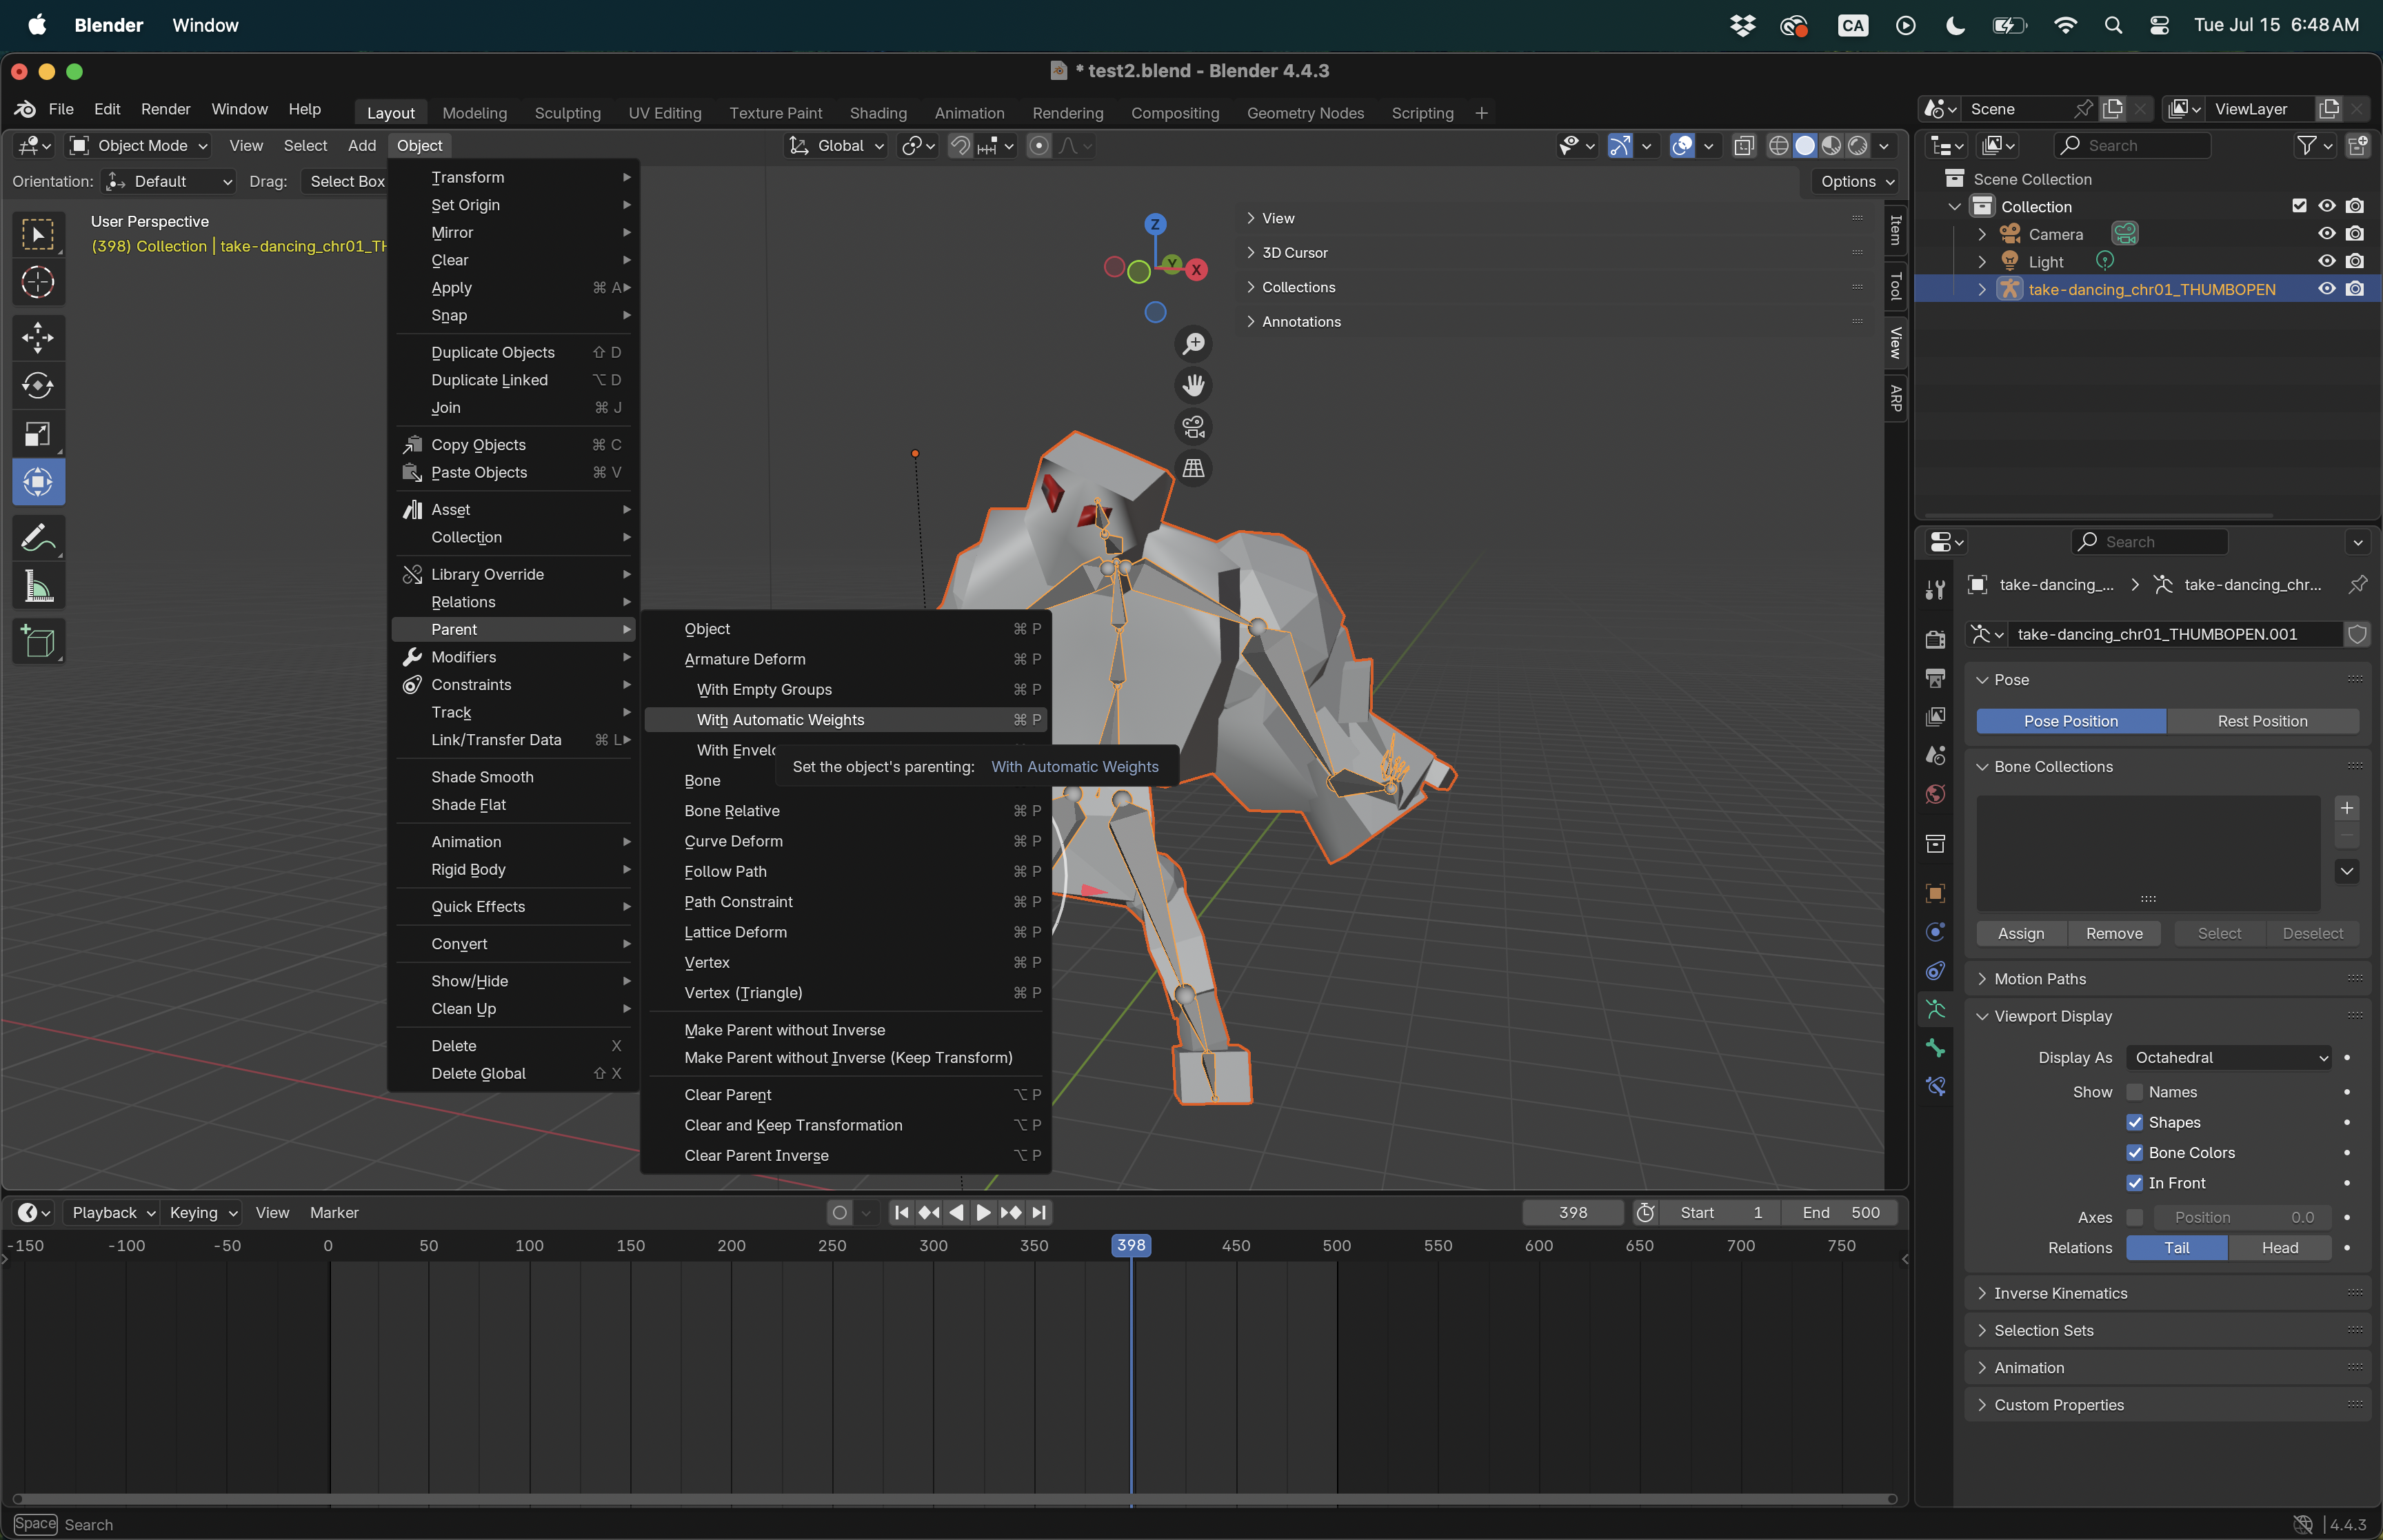
5. Parent the Mesh
- To apply the BVH armature to your mesh, select the mesh first, then Shift+click the armature
- Press
Ctrl+Pand choose With Automatic Weights - Note: This works best if your mesh is roughly aligned with the armature
- Tip: Use Weight Paint mode to fine-tune how bones influence the mesh if deformations look incorrect
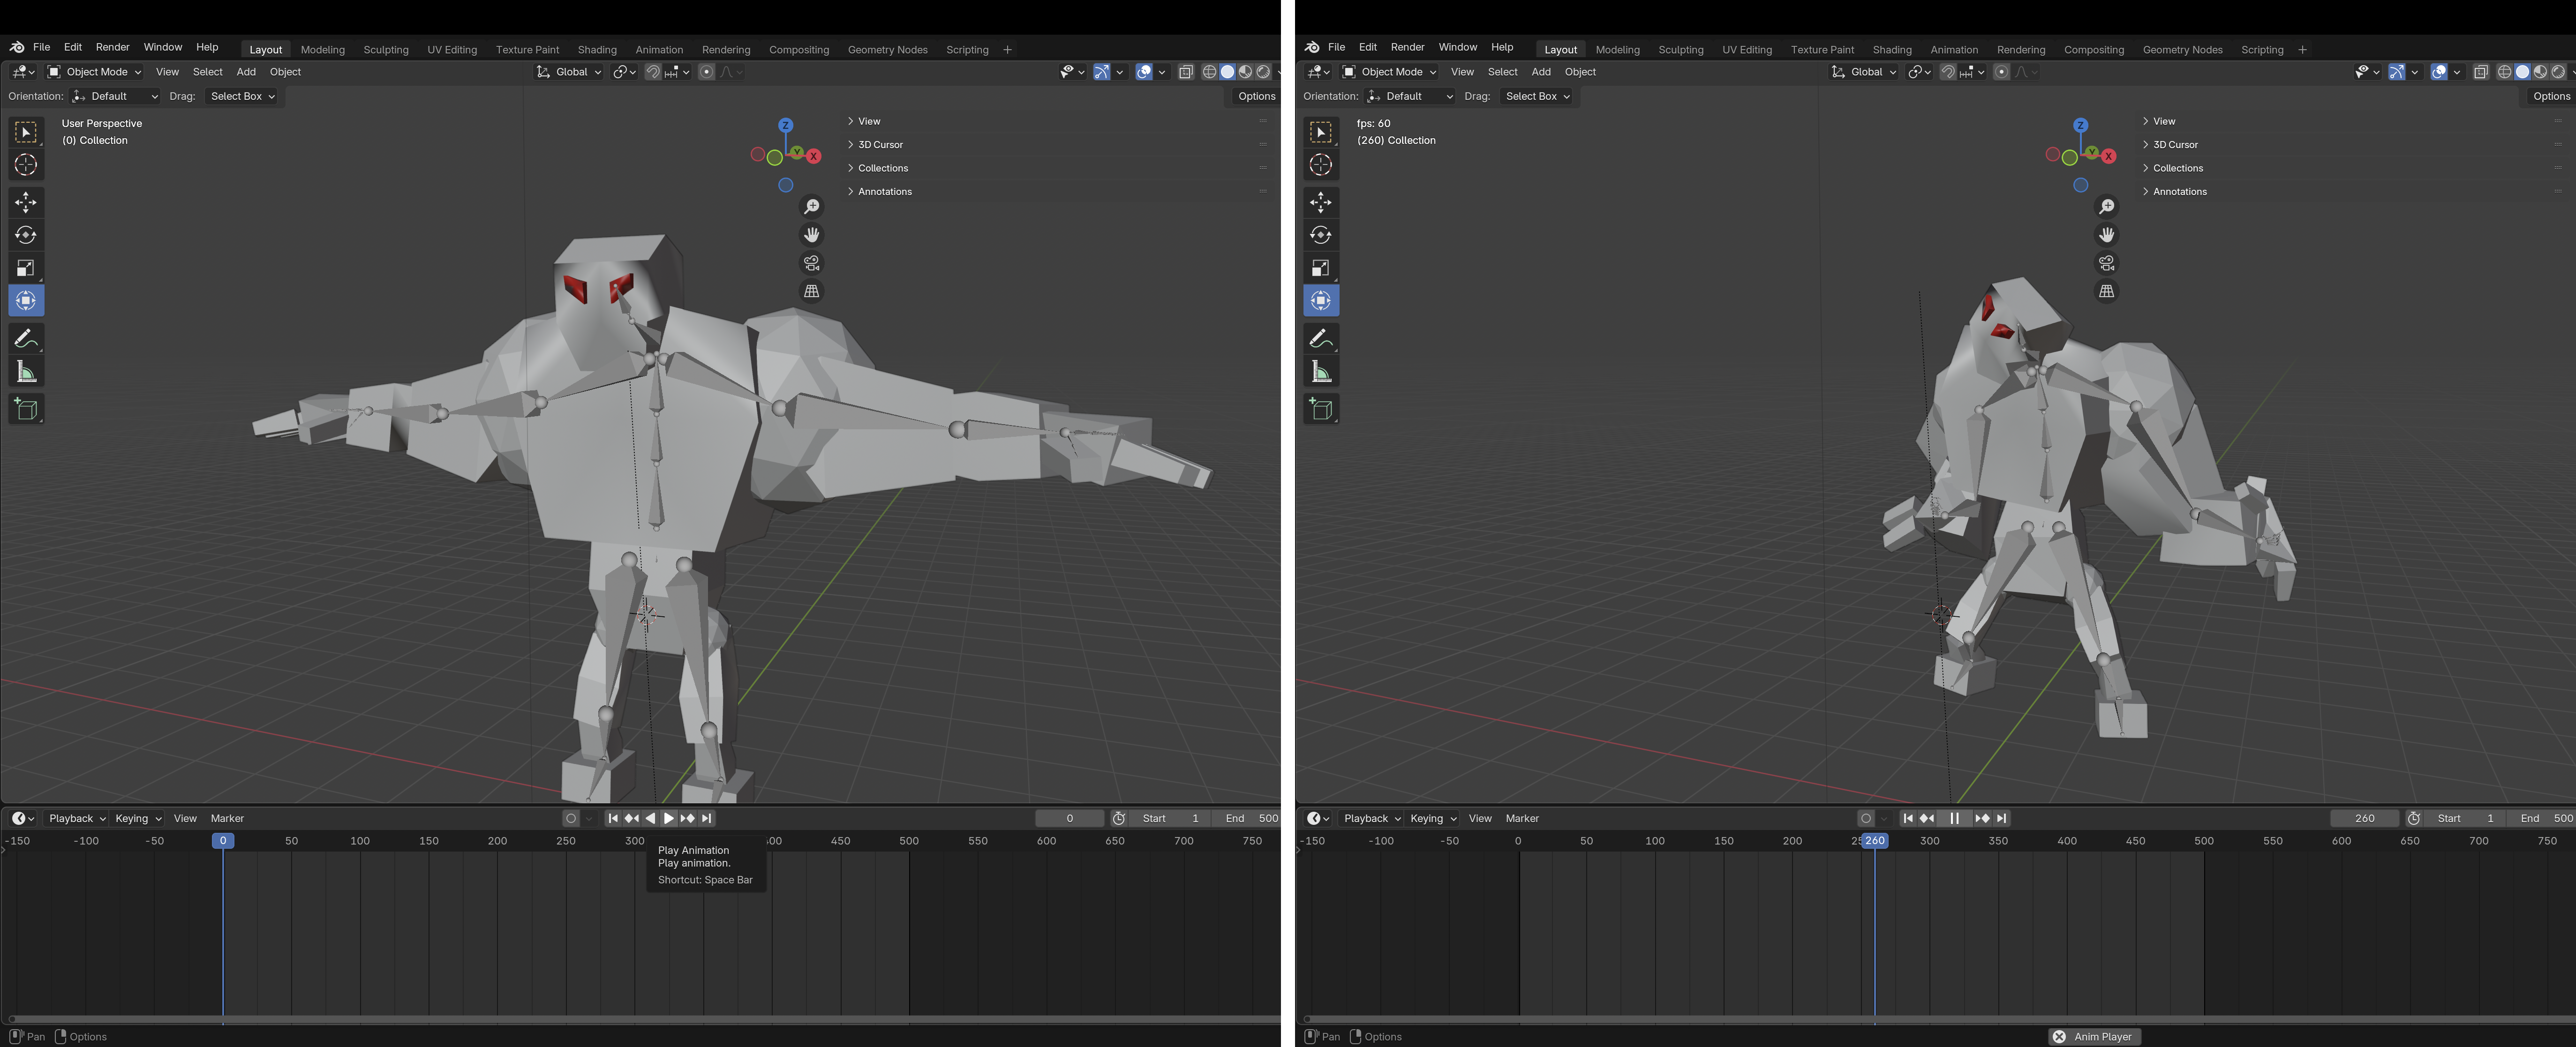
6. Play the Timeline
- Press
Spacebaror drag the timeline to preview the movement - Your BVH skeleton should animate based on the captured motion
7. Export short video
- Go to the Output Properties tab (printer icon in the Properties Panel).
- Set the frame range to max 1-500.
- Under Output, choose a location to save and set the file format to
FFmpeg video. - In the Encoding section (appears when FFmpeg is selected):
- Set Container to
MPEG-4 - Set Video Codec to
H.264
- Set Container to
- Go to Render → Render Animation (
Ctrl + F12). - Once done, your video file will be saved in the selected folder.
Option 2: Retargeting with Auto-Rig Pro – Smart + Remap
This option uses the Auto-Rig Pro add-on for Blender — a powerful tool designed to simplify rigging, animation retargeting, and character preparation for games or film.
💡 Tips
- Make sure your character is in T-pose or A-pose before rigging
- If joints don’t align properly, you can manually adjust bone mapping in the Remap tab
- Auto-Rig Pro also supports batch retargeting for multiple animations
Install Auto-Rig Pro
Auto-Rig Pro is a paid Blender add-on that provides tools for:
- Creating advanced rigging systems with controllers and constraints
- Retargeting motion from external sources (like BVH or FBX files)
- Exporting animations to game engines
➡️ Download and install it from your Blender Preferences:
Edit → Preferences → Add-ons → Install...- Select the
.zipfile, install, and enable Auto-Rig Pro: Rig Tools
Step-by-Step Instructions
First, create a new Blender project and save the file as Character-with-MOCAP-2.blend.
Then, follow these steps:
- Import Your Character Mesh
- In Blender, go to
File → Import → OBJ/FBX(or whatever format your model is in) - Make sure your model does not include an armature
- In Blender, go to
- Watch the video tutorial
- 🎥 Follow only the first 10 minutes of the linked tutorial video to complete the steps below.
- The rest of the video covers advanced features that are not required for this exercise.
- Play the Timeline
- Press
Spacebaror scrub through the timeline to preview the animation on your character
- Press
- Export a Short Video
- Use
Render → Render Animationto export a short.mp4showcasing the result
- Use
Overview of the process
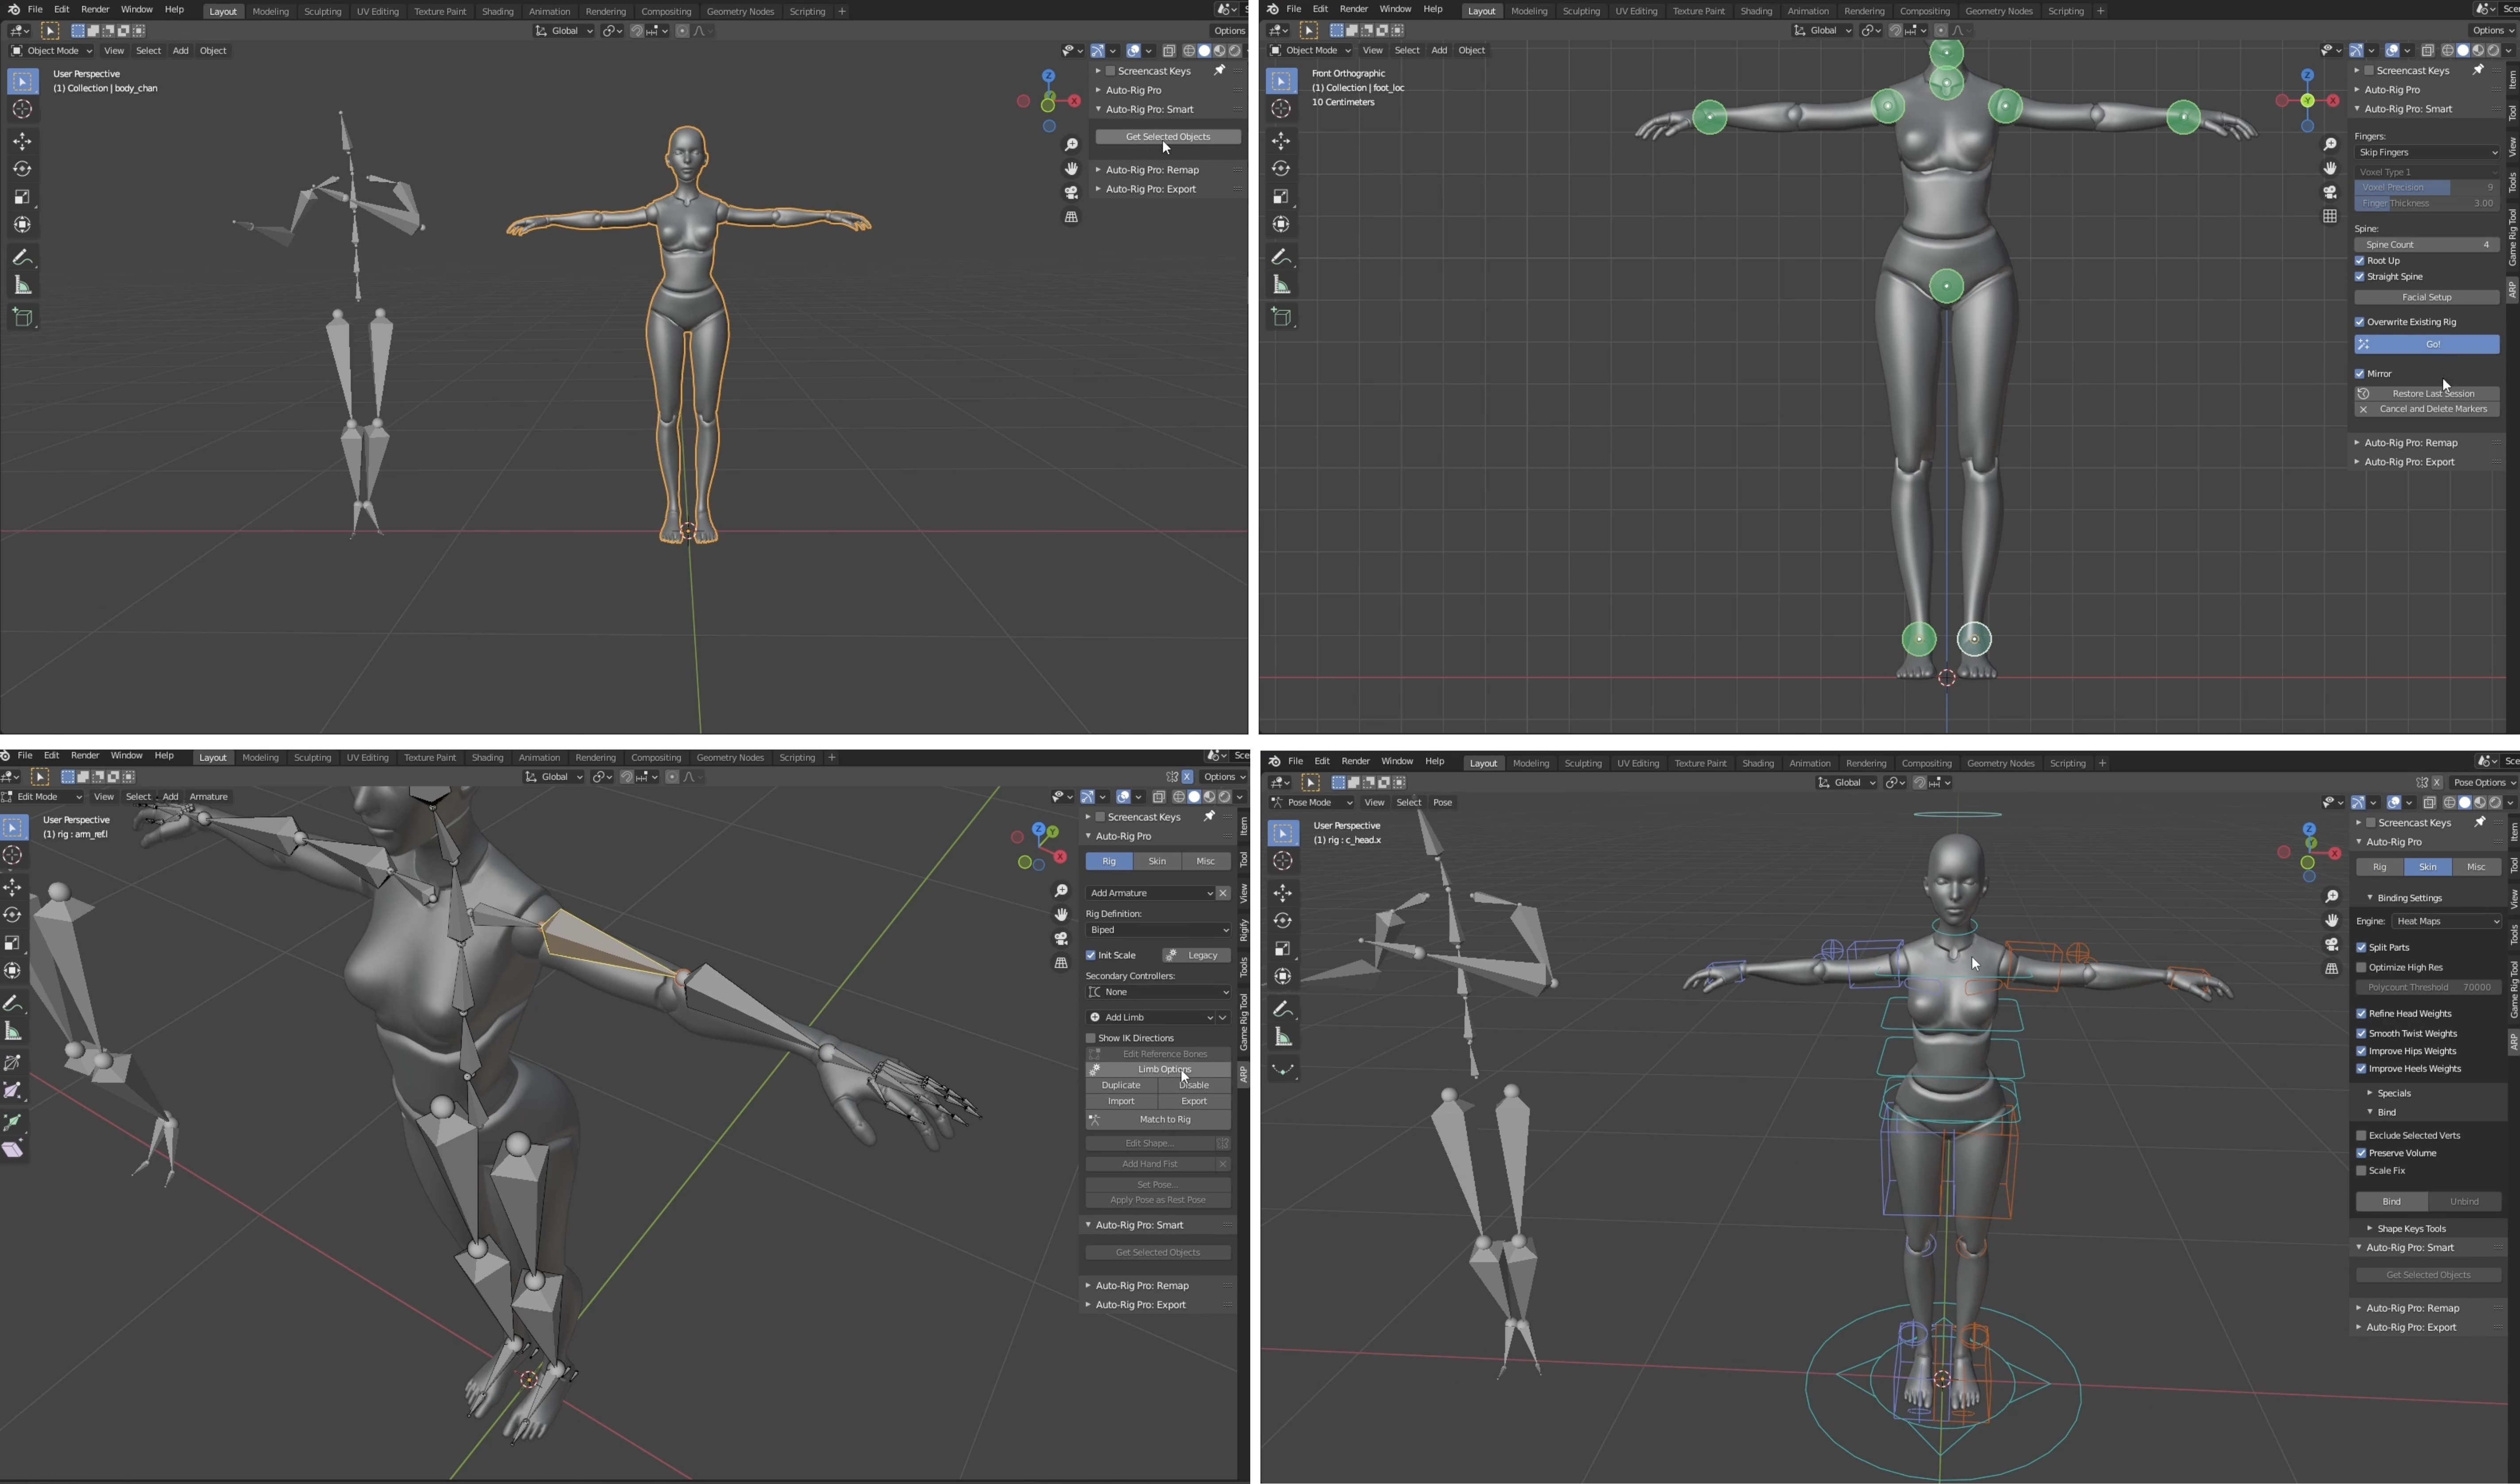
Create a Rig with Auto-Rig Pro: Smart
- Select your character mesh
- Open the Auto-Rig Pro → Smart panel (found in the
Nsidebar under the Auto-Rig tab) - Place the rig markers following your character’s anatomy (chin, shoulders, hips, knees, etc.)
- Click Go! to generate a full Auto-Rig Pro armature
🛠️ You can tweak the rig to better fit your model after generation.
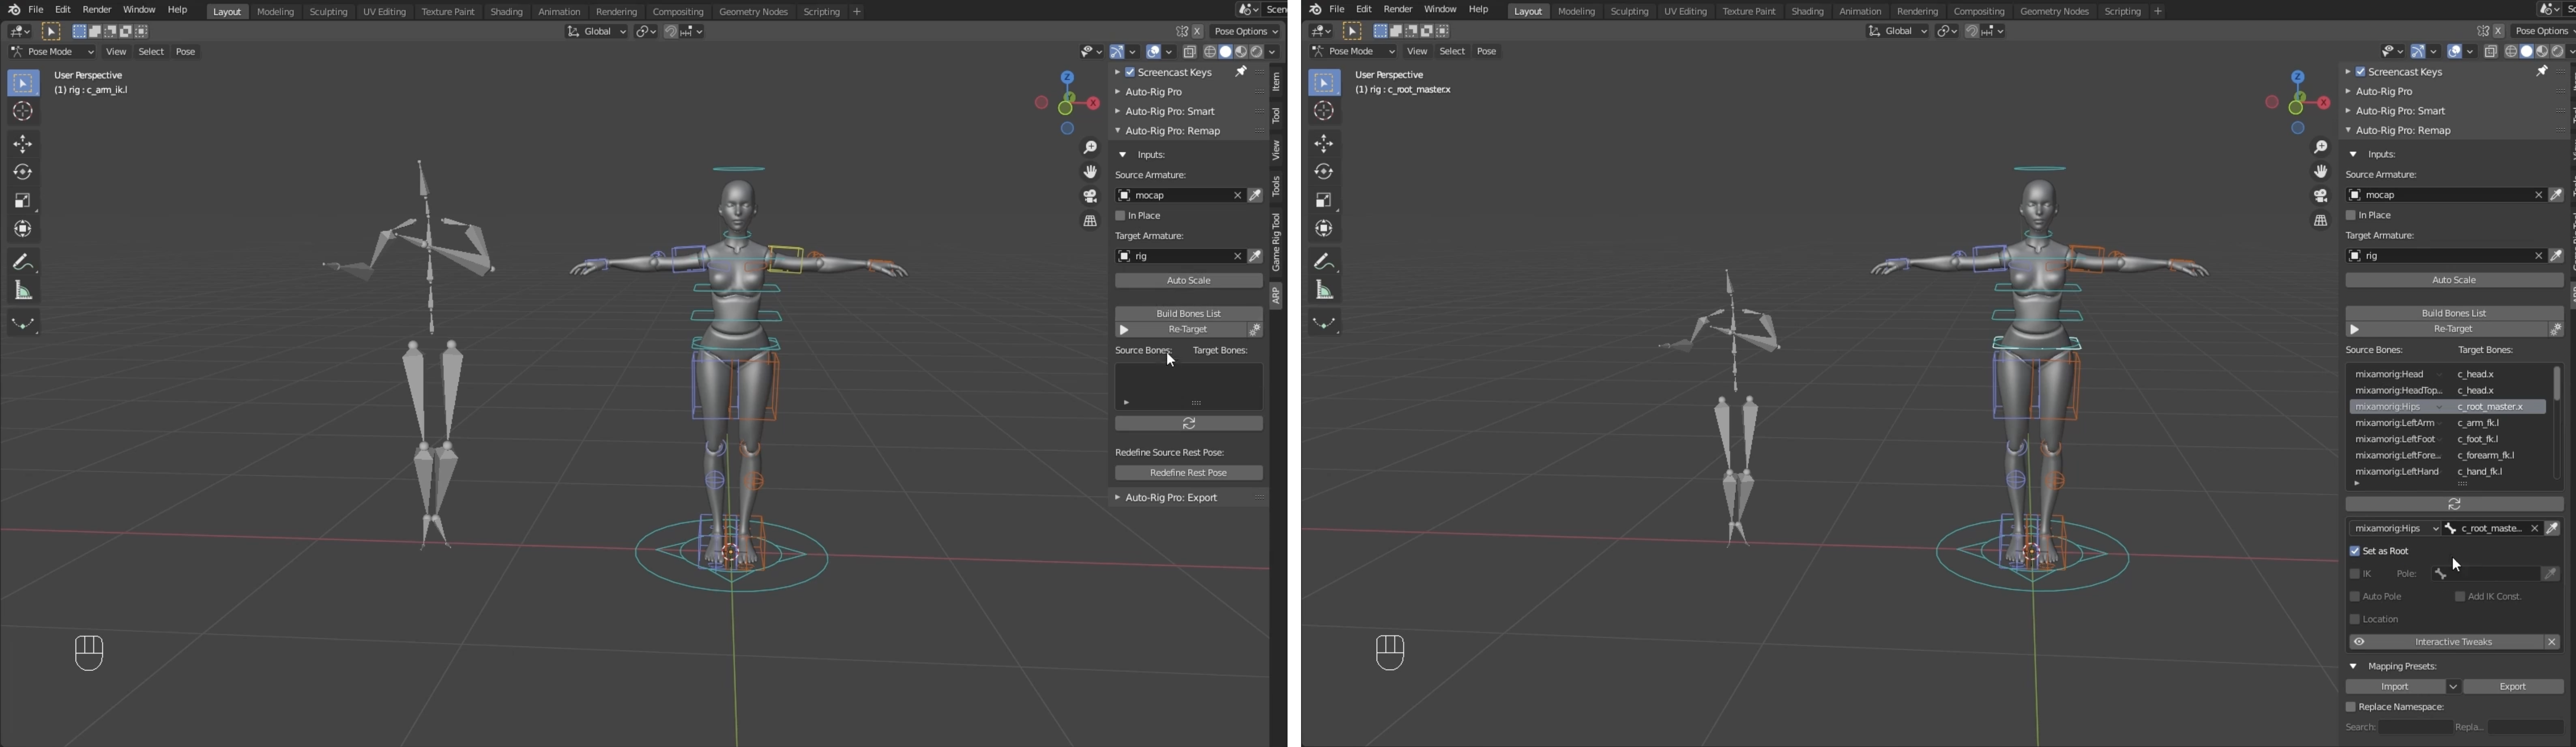
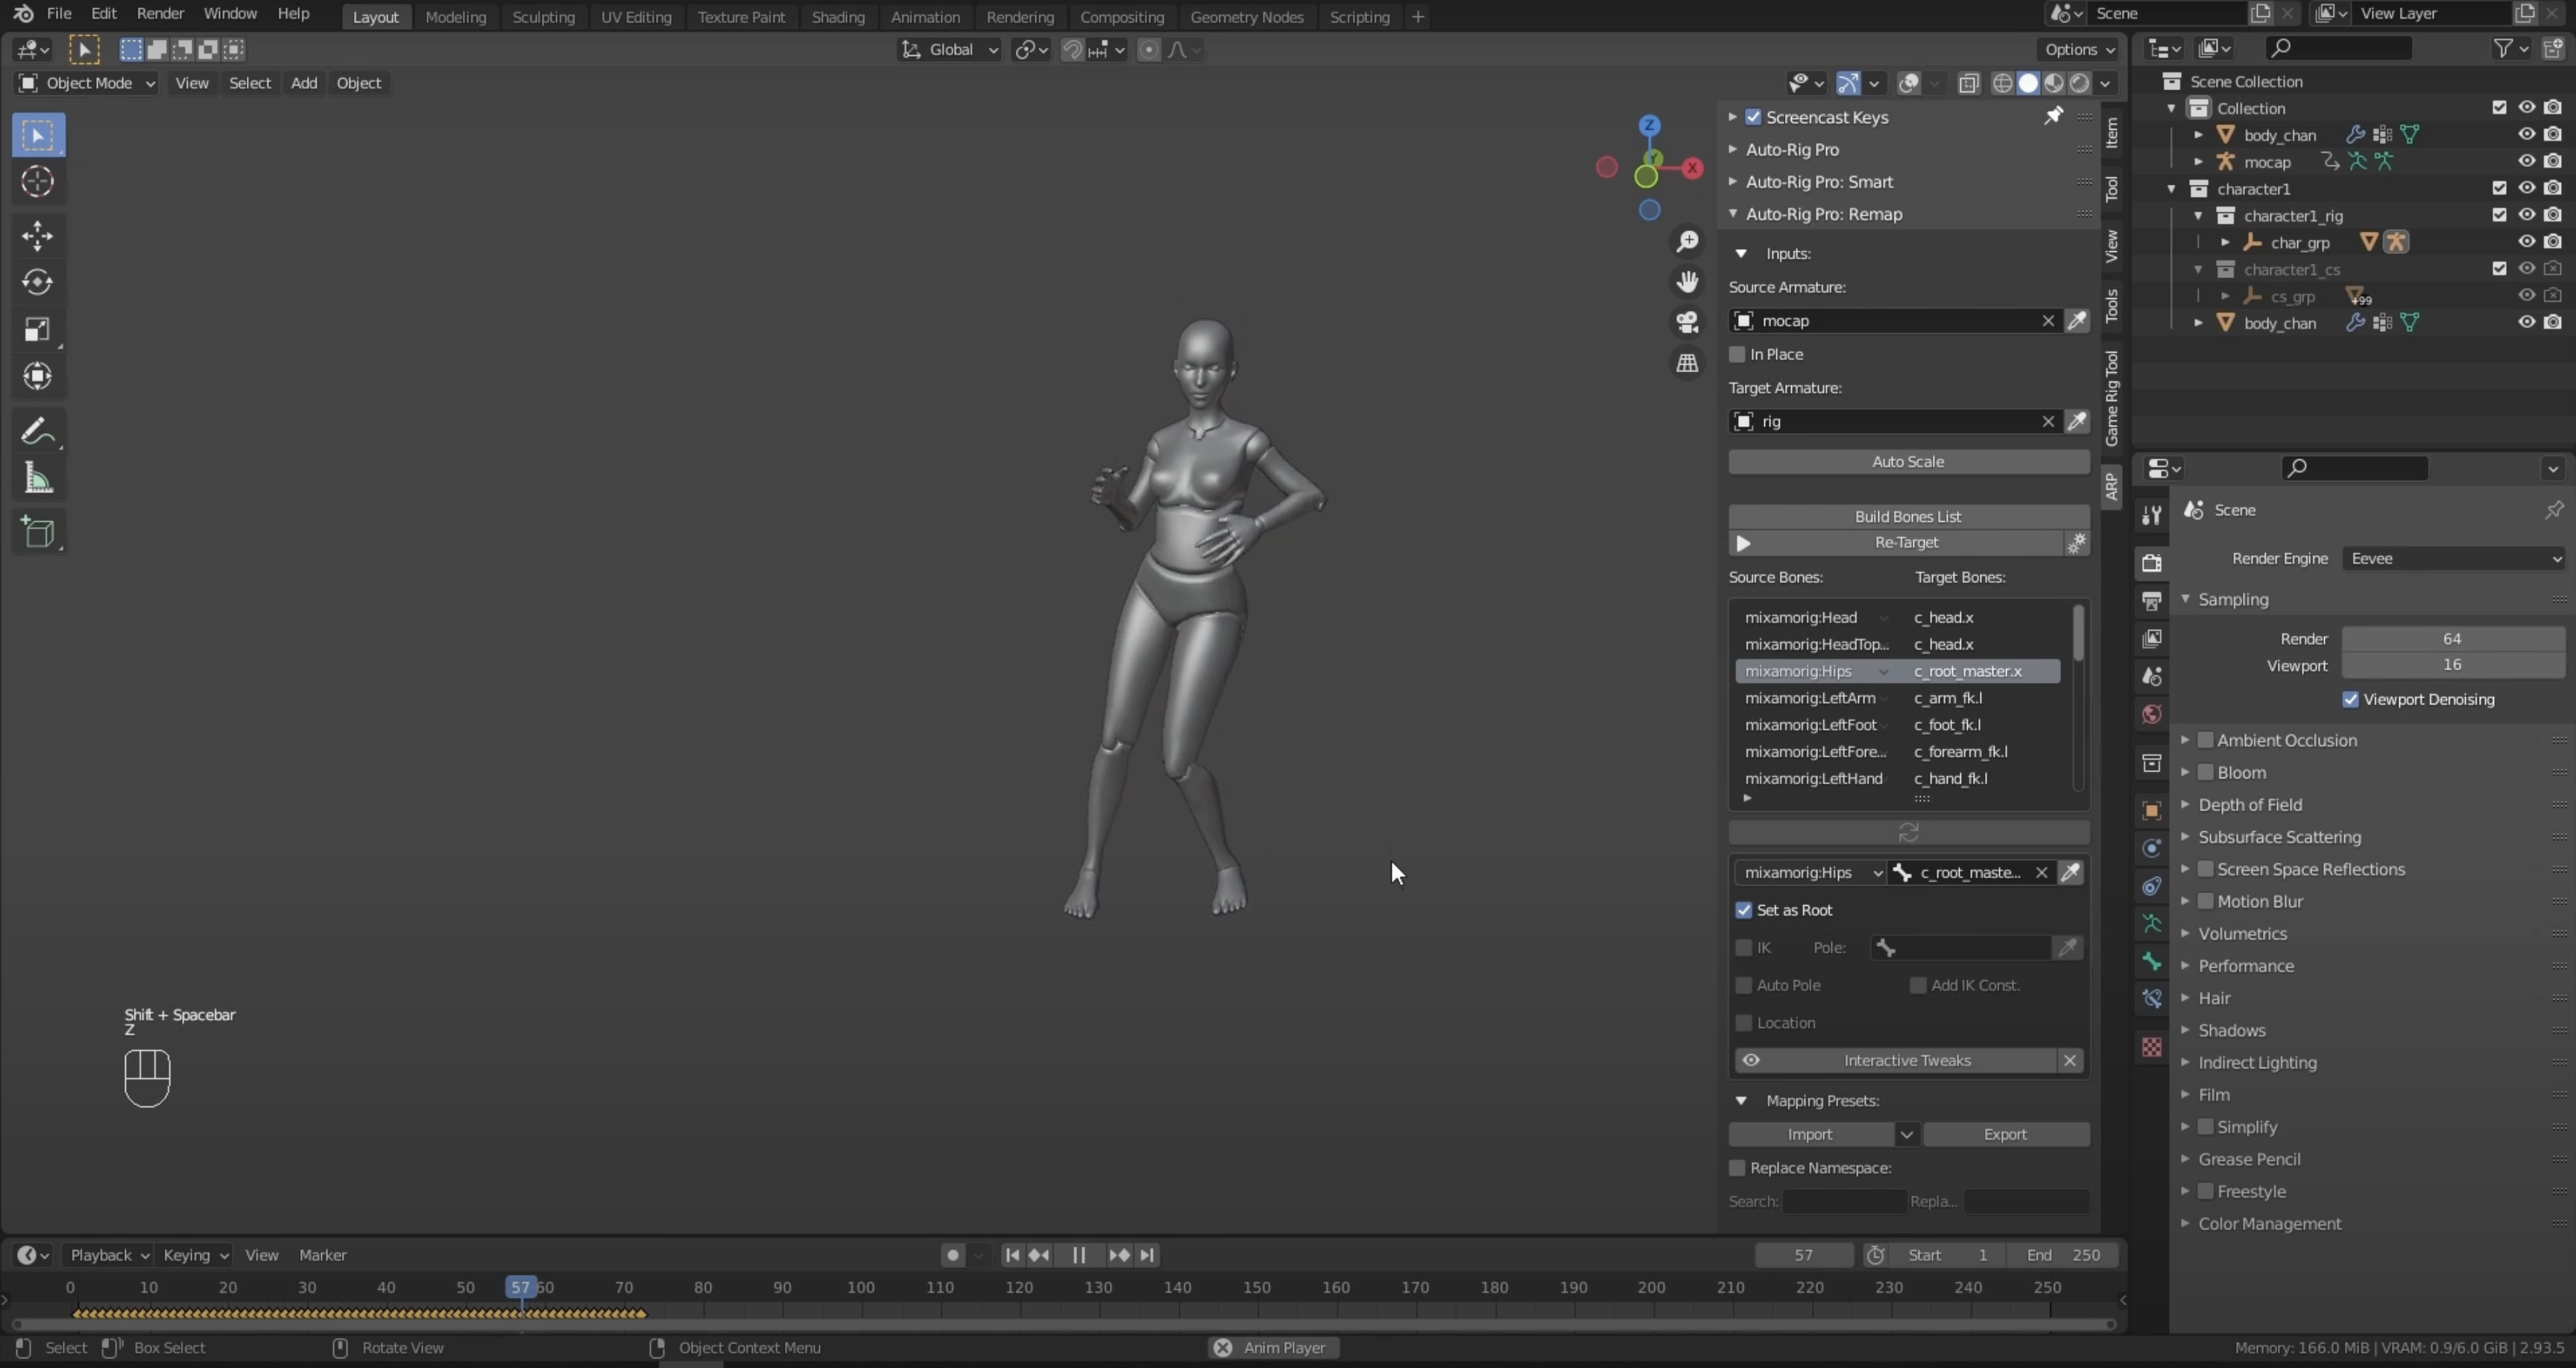
Retarget Using Auto-Rig Pro: Remap
- Go to Auto-Rig Pro → Remap
- Set:
- Source Armature → your imported BVH armature
- Target Armature → your newly created Auto-Rig Pro rig
Then configure the following:
- Enable Auto-Scale to match proportions
- Check Retarget Actions to transfer animation
- Set Root Bone to the hip of the source rig (usually
hiporHips)
Click Remap to complete the transfer.
Preview & Adjust
Play the timeline to see your character animated with the mocap data
Tutorial
Option 3: Retargeting with Auto-Rig Pro – Existing Rig + Remap
This method is ideal if your character already comes fully rigged with Auto-Rig Pro, such as a model you purchased or prepared earlier. Instead of creating a new rig from scratch, you simply retarget motion capture data onto the existing rig using Auto-Rig Pro’s Remap tool.
This is the fastest workflow if:
- Your model already has a working Auto-Rig Pro rig
- You want to test BVH motion on multiple characters quickly
- You’re only interested in applying and previewing motion data
Step-by-Step Instructions
First, create a new Blender project and save the file as:
Character-with-MOCAP-3.blend
Then, follow these steps:
- Import Your Character Mesh
- Go to
File → Import → FBXor open a Blender file that includes your Auto-Rig Pro rigged character
- Go to
- Import the BVH File
- Go to
File → Import → Motion Capture (.bvh) - Set scale to 0.1 in the Transform panel before importing
- Go to
- Use Auto-Rig Pro → Remap
- Open the Remap panel from the Auto-Rig Pro tab
- Set the BVH Armature as the source
- Set your existing Auto-Rig Pro rig as the target
- Enable Auto-Scale, Retarget Actions, and set the hip bone as Root
- Click Remap
⚠️ Warning: Before retargeting, make sure your existing character rig has:
- Bone names that match the BVH armature (e.g.,
hip,spine,left_arm) - Adjusted bone positions that align with the BVH motion structure
If needed, enter Edit Mode on the target armature to rename or reposition bones.
💡 Tips
- If animations look off, check the bone mapping or realign your source and target rigs
- Play the Timeline
- Press
Spacebaror scrub through the timeline to preview the animation on your character
- Press
- Export a Short Video
- Use
Render → Render Animationto export a short.mp4showcasing the result
- Use