MediaArtTutorials
W1 — Tech Walkthrough
Intro to DSLR Photography for Photo Film Activity
Objective
This technical walkthrough introduces the essential DSLR camera controls and workflows required to produce a black-and-white photo sequence for the first assignment: Photo Film (Individual).
Check Available DSLR Cameras
By the end of this session, students should be able to:
- Generally operate the Canon EOS Rebel T4i / T5i / T7i using limited camera settings
- Understand how framing, composition, focus, and depth of field are shaped through aperture, ISO, and camera positioning
- Play and check images on the camera, and properly transfer and save files to a computer
- Recognize how light and contrast function as primary visual elements in black-and-white photography
Camera Anatomy — Getting Familiar (Camera Off)
📌 For this first step, the goal is spatial familiarity: knowing where things are before learning how to use them.
Core External Components
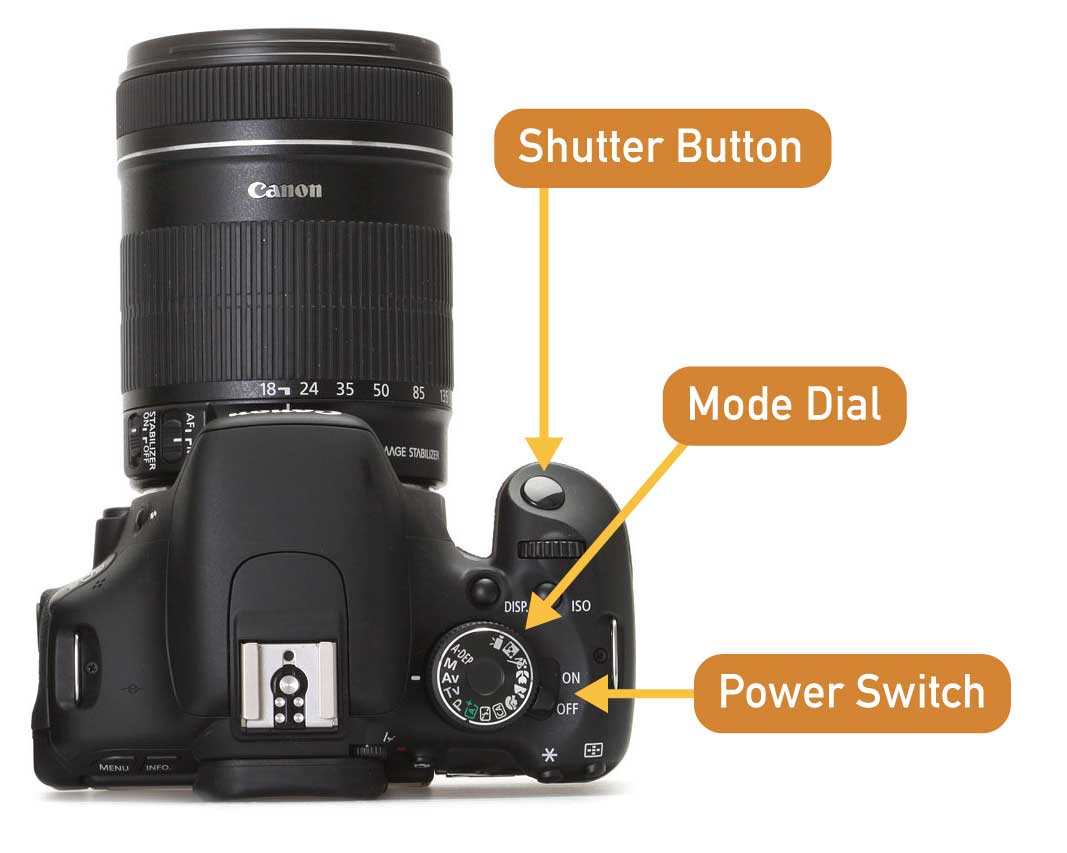
Shutter Button
The button used to take a photograph. Press halfway to activate autofocus; press fully to capture the image.
Mode Dial
Selects the camera’s shooting mode (Manual, Aperture Priority, etc.). We will review these modes later.
Power Switch
Turns the camera on and off. Always switch the camera off before changing lenses.
Lens & Focus Controls
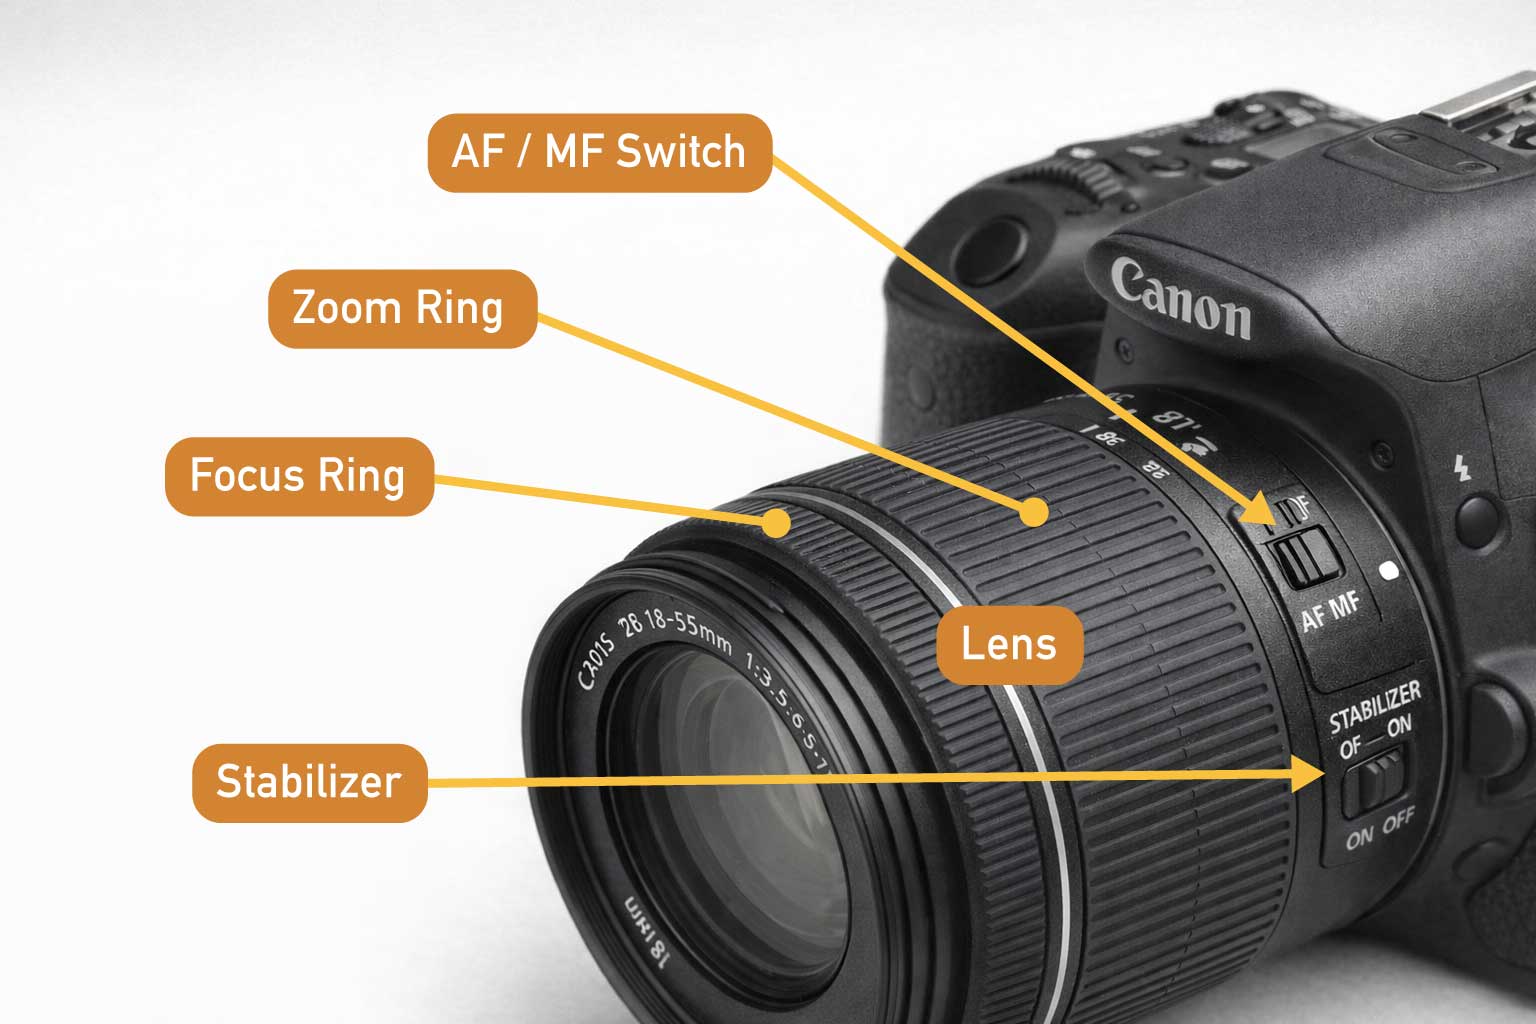
Lens
The optical element that determines field of view and depth of field. For Week 1, you will use the standard kit lens.
AF / MF Switch (on the lens)
- AF (Autofocus): Camera automatically focuses
- MF (Manual Focus): Focus is adjusted manually using the focus ring
Focus Ring
Used to manually adjust focus when the lens is set to MF.
Zoom Ring (if applicable)
Controls focal length on zoom lenses (e.g., 18–55mm).
Stabilizer (IS)
Reduces camera shake when shooting handheld; turn OFF when using a tripod.
Storage & Power
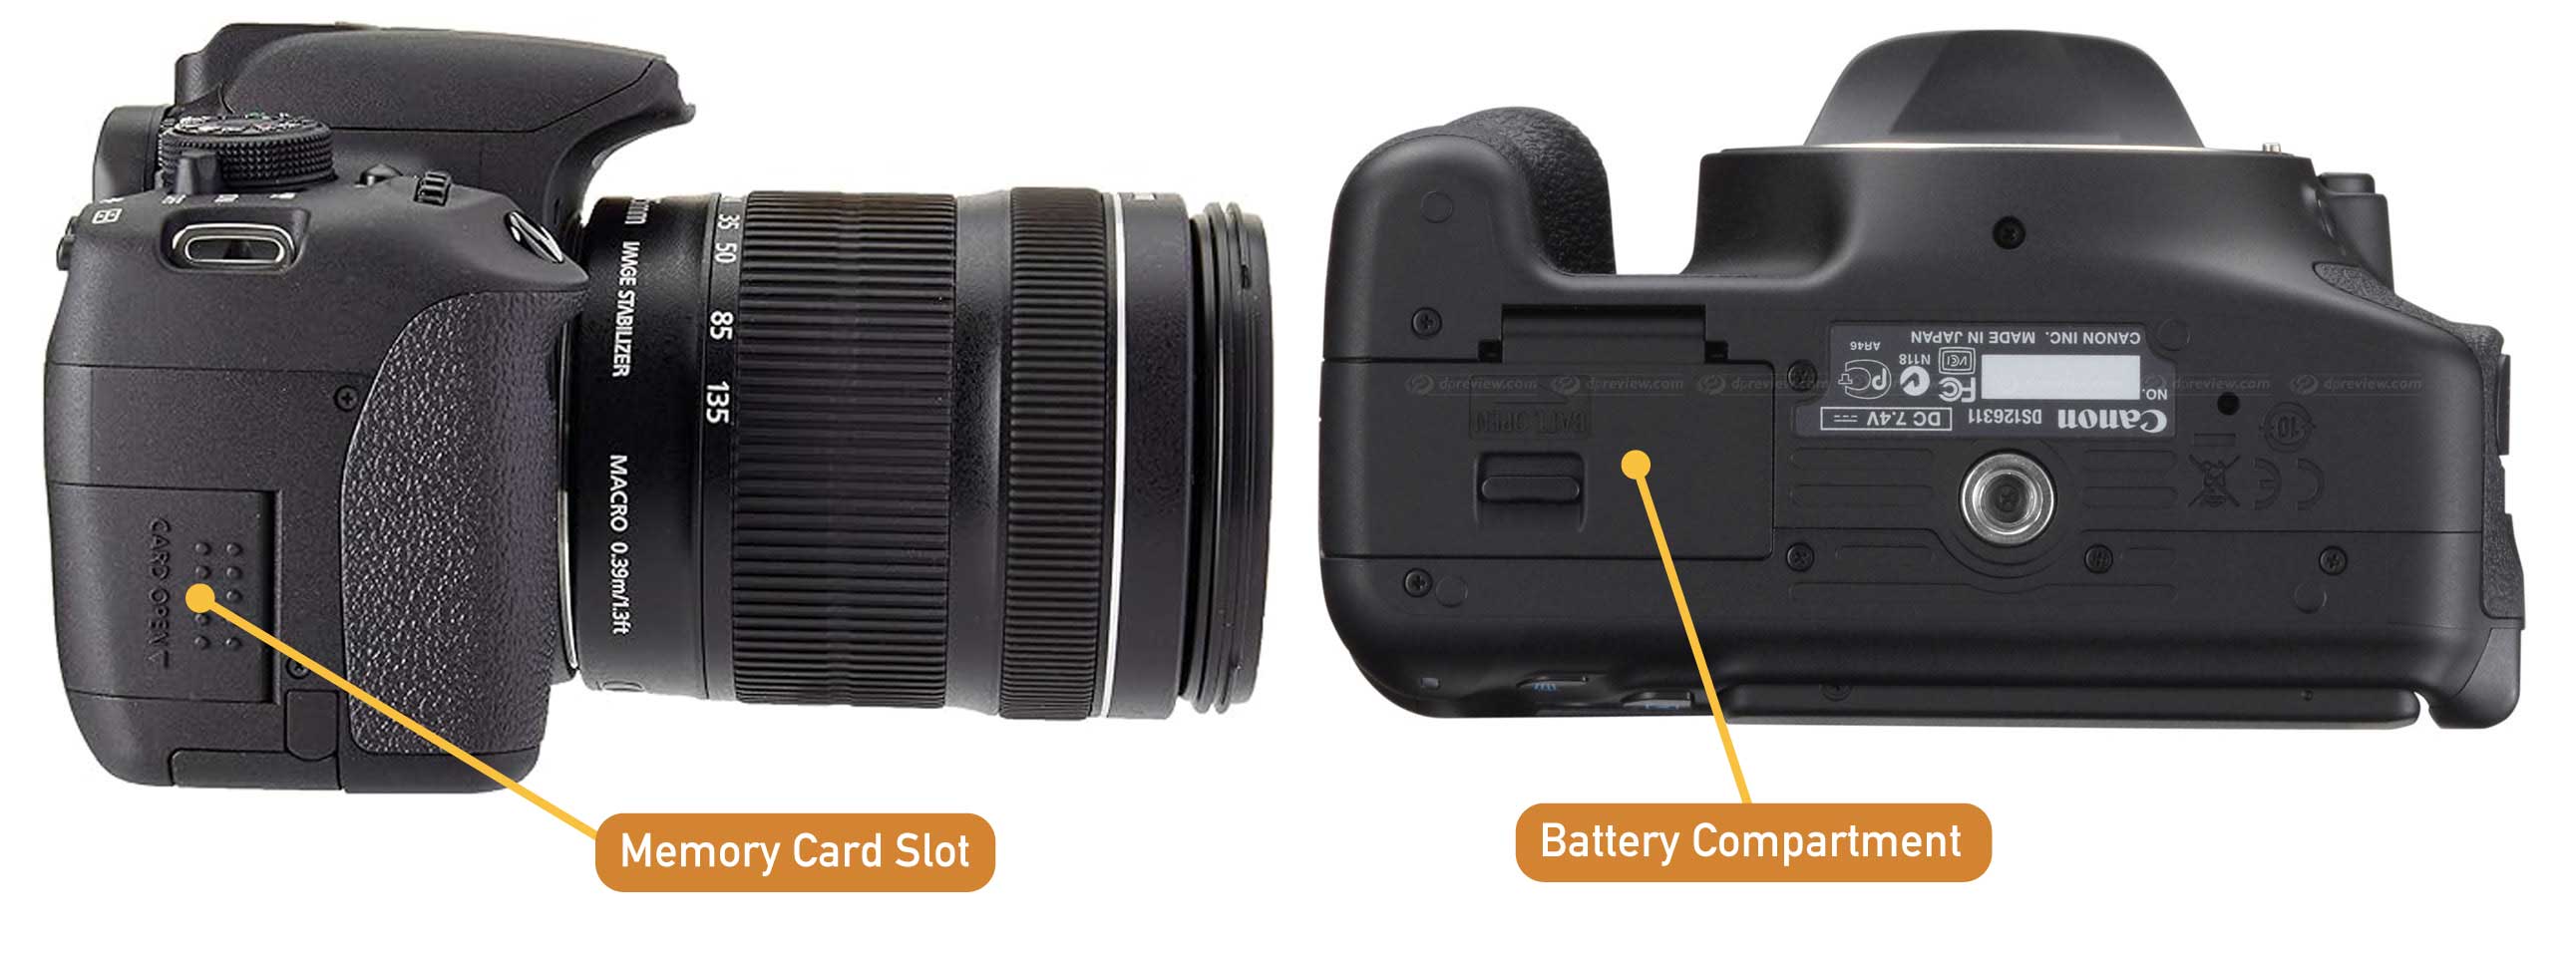
Memory Card Slot
Holds the SD card where images are stored.
Always confirm a card is inserted before shooting.
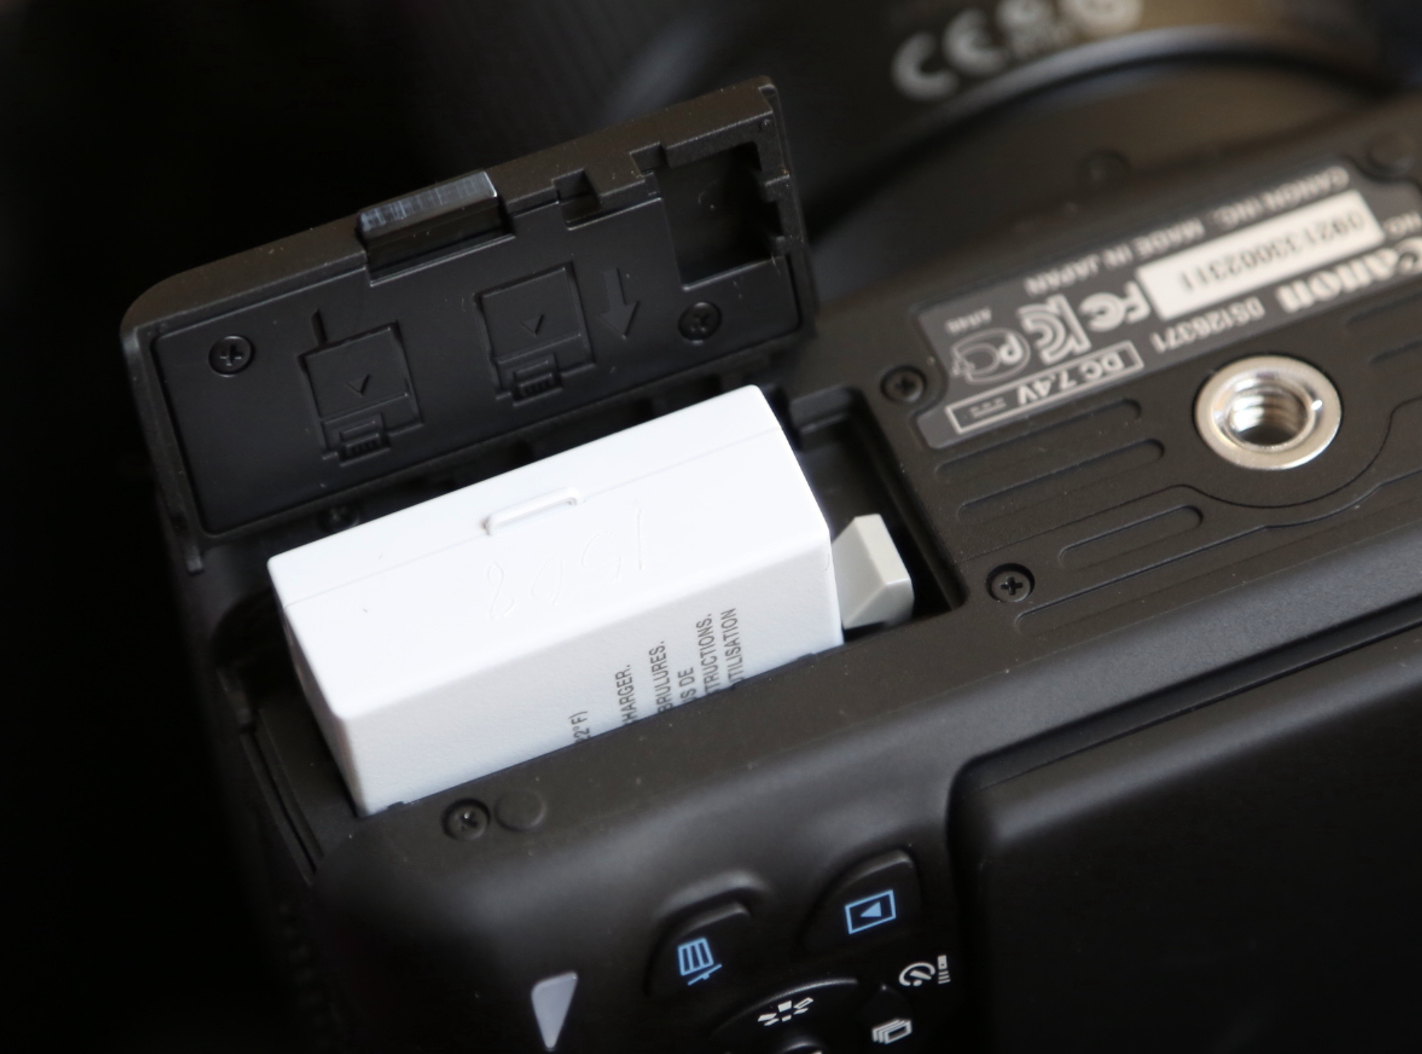
Battery Compartment
Contains the rechargeable battery.
A low battery may prevent the camera from turning on or saving images.
Viewing & Mounting
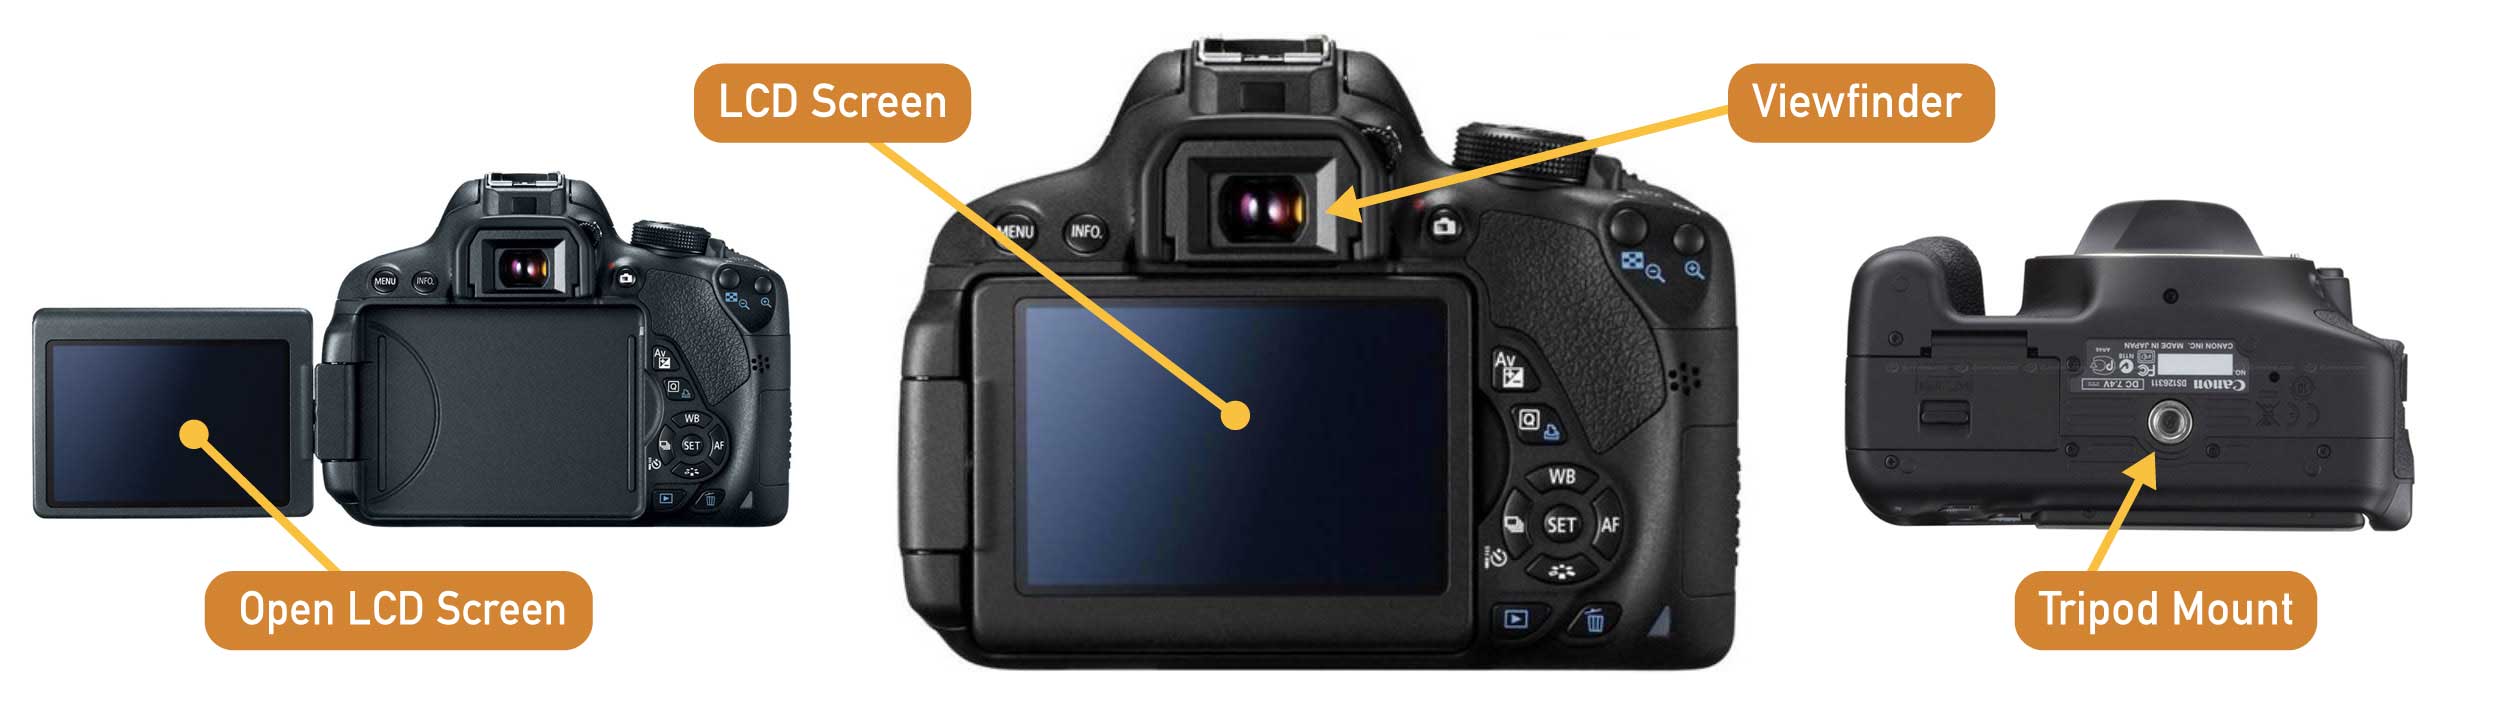
Viewfinder
Allows you to frame the image optically. Useful in bright environments.
LCD Screen
Displays menus, image playback, and live view when enabled.
Tripod Mount (Bottom of Camera)
Used to securely attach the camera to a tripod for stable framing and consistent composition.
General Camera Settings (Camera On)
📌 For this second step, the goal is that you start using and modifying specific camera settings
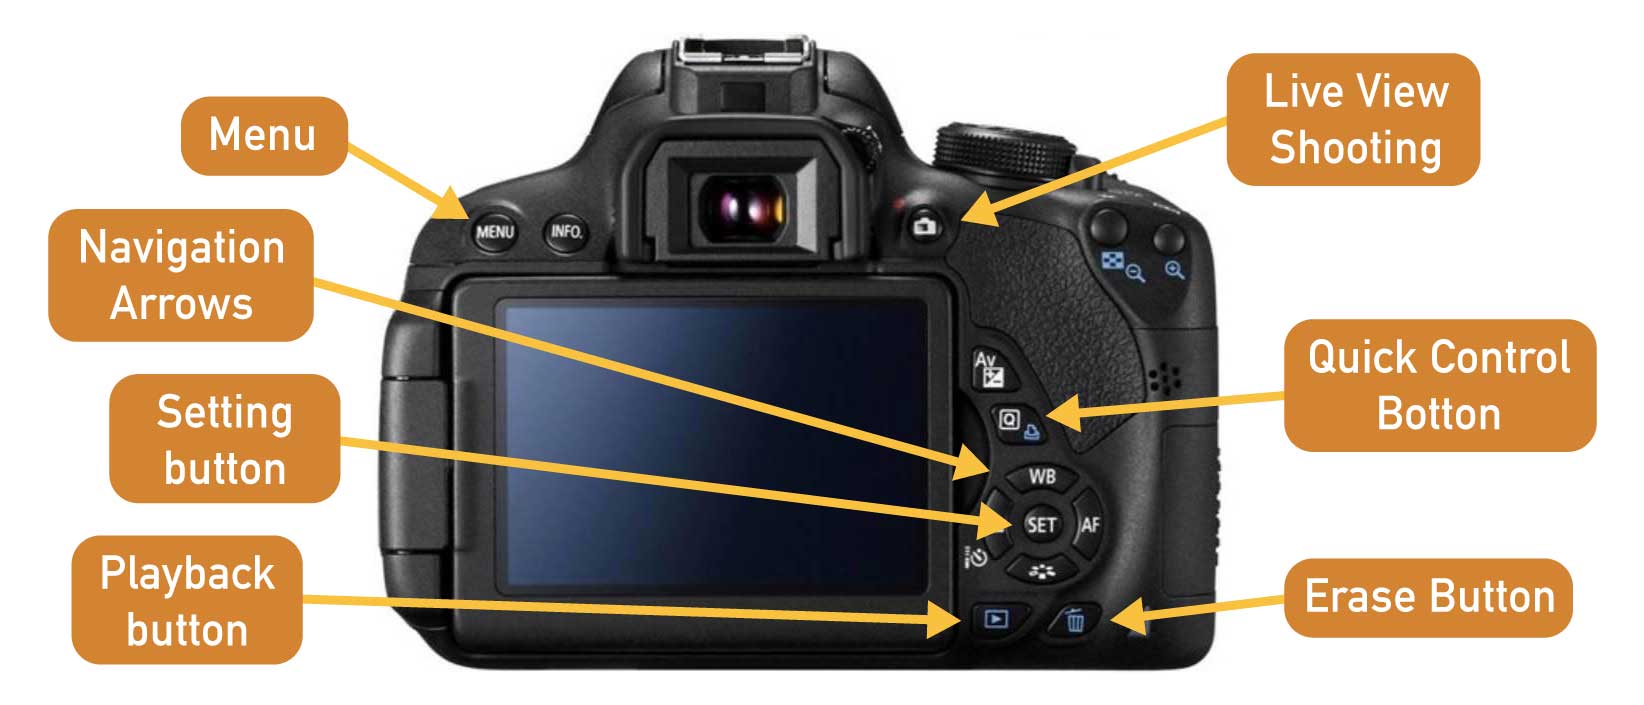
First, become familiar with the main camera buttons used to navigate menus and playback images.
- Menu — Opens the main camera settings and configuration options.
- Navigation Arrows — Move through menus and adjust selected settings.
- Setting Button (SET) — Confirms a selection or applies a setting.
- Playback Button — Displays captured photos on the screen.
- Live View Shooting — Activates the LCD screen for composing and focusing images.
- Quick Control Button (Q) — Opens quick access to commonly used shooting settings.
- Erase Button — Deletes the currently selected image during playback.
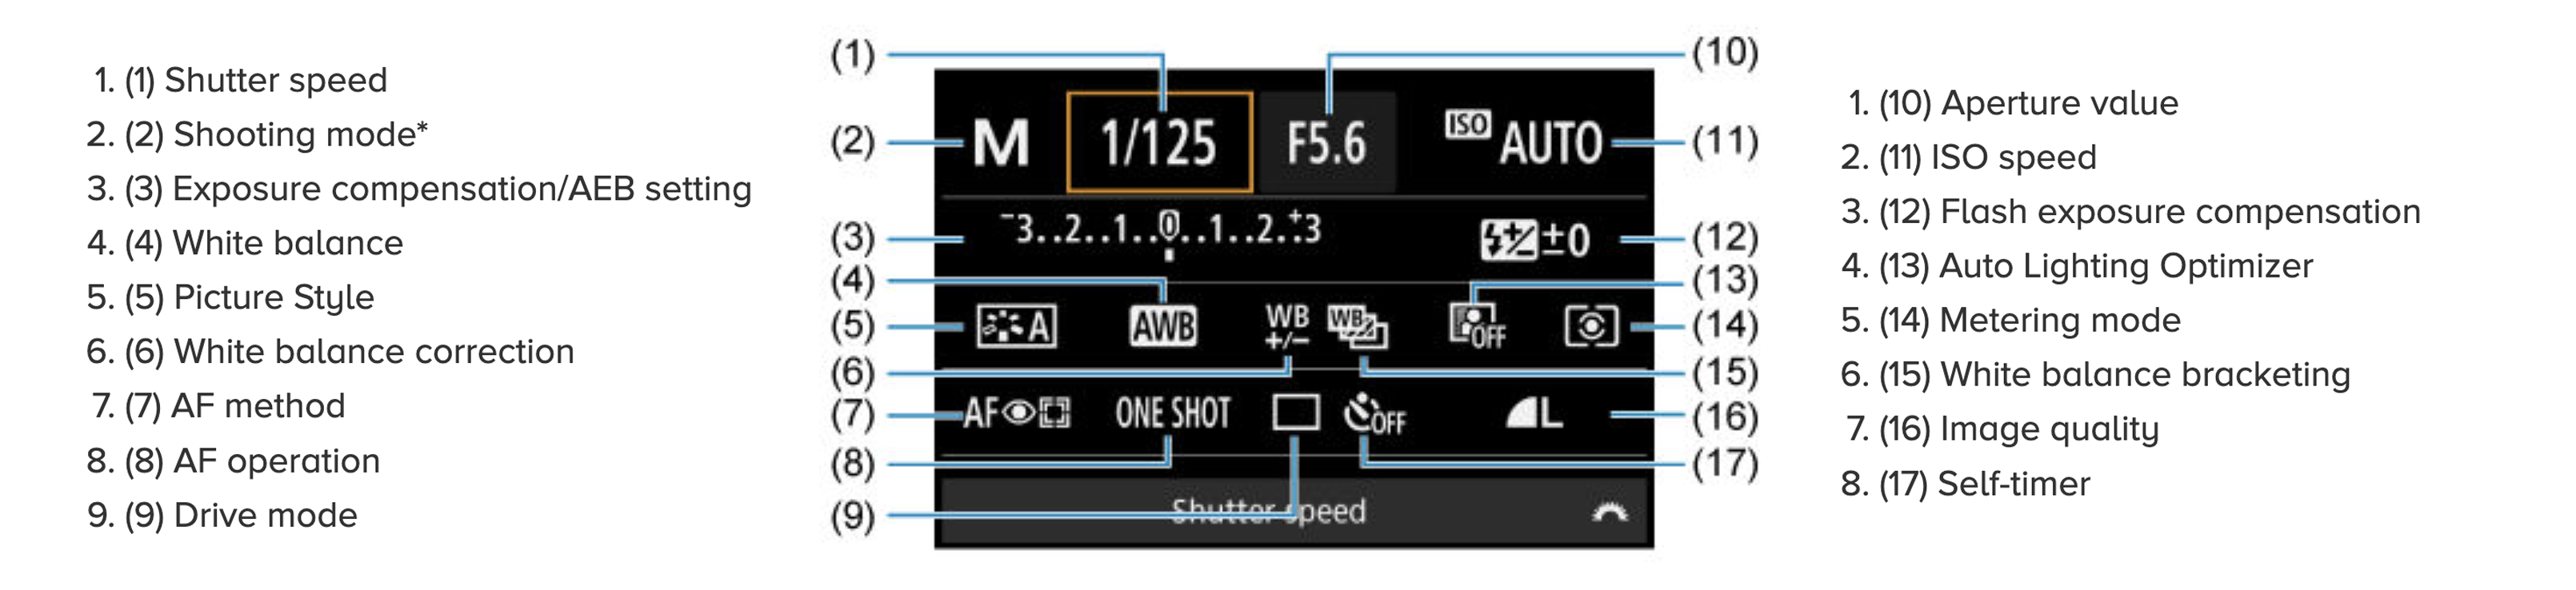
Quick Control Button (Q) - Menu
Initial Setup
- Insert an SD card into the Memory Card Slot.
- Turn on the camera.
- Follow the tutorial below to learn how to navigate the camera menu and adjust basic settings.
- Set Image Quality to RAW + JPEG
- JPEG files are used for quick viewing
- RAW files preserve full image data
- Follow the remaining settings shown in the video:
❗ Check these settings every time you rent a camera
Formatting the SD Card
Before starting a new shoot, format the SD card in the camera to avoid file conflicts.
❗ Format SD Card every time you rent a camera
More Camera Settings — What to Use for Week 1 (Camera On)
For the first activity (Photo Film assignment), we will use a limited set of camera settings.
This is intentional: it allows you to focus on framing, composition, depth of field, and exposure rather than navigating complex settings and menus.
Photos will be captured in colour and converted to black and white later using Adobe Photoshop.
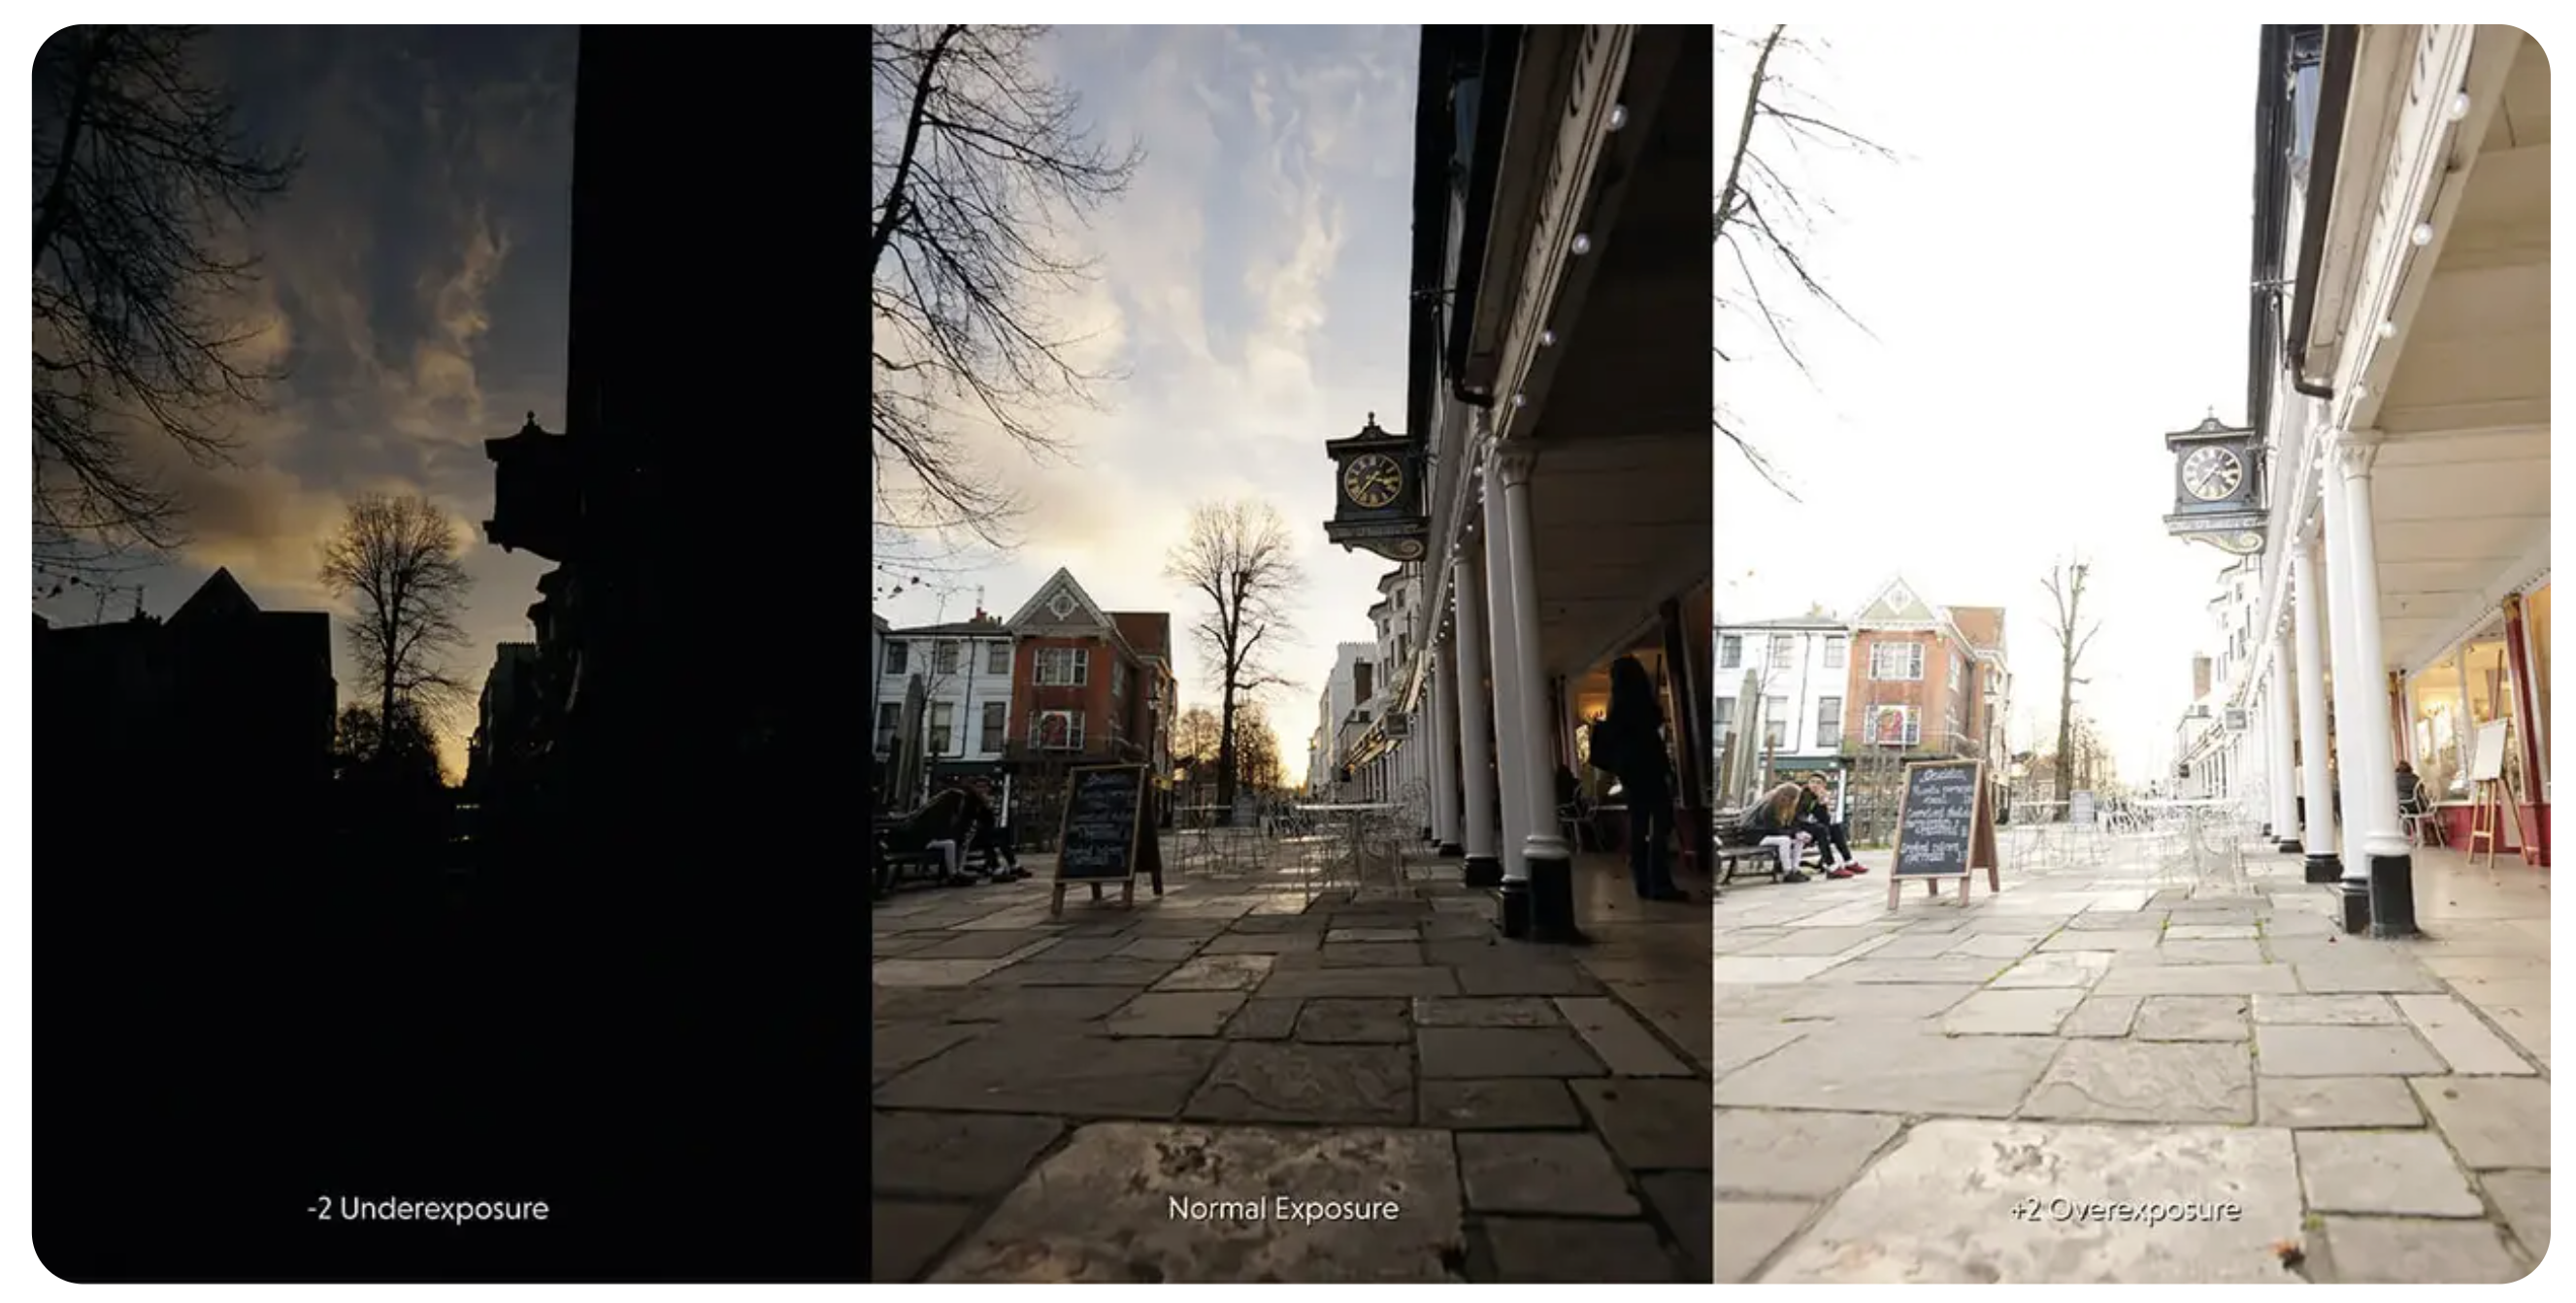
What Is Exposure?
Exposure refers to how much light reaches the camera’s sensor when a photograph is taken.
- Normal Exposure is achieved when the brightness/darkness of an image is generally considered faithfully represent the scene being photographed.
- Over Exposure is when too much light is collected by the sensor, and the image looks too bright and washed out.
- Under Exposure is when not enough light is collected by the sensor, and the image looks too dark and dull.
Exposure is controlled by three settings:
- Aperture — how much light enters the lens
- Shutter Speed — how long light reaches the sensor
- ISO — how sensitive the sensor is to light
For Week 1, you will primarily control exposure through aperture and ISO, while the camera assists by setting the shutter speed.
Shooting Mode

Aperture Priority (Av) — Primary mode for Week 1. In this mode:
- You select the aperture (f-stop)
Aperture is the size of the opening in the lens that controls how much light enters the camera.
- The camera automatically sets the shutter speed
Shutter speed is the amount of time the camera’s shutter remains open.
- This mode gives you direct control over depth of field
Aperture determines depth of field (how much is in focus), while the camera adjusts shutter speed to maintain proper exposure based on your aperture choice.
Aperture (f-stop)

Aperture = size of opening
Each aperture (above) represents a halving or doubling of the volume of light:
- f/4 lets in twice as much light as f/5.6
- f/11 lets in half as much light as f/8
Aperture controls depth of field and how much of the image appears in focus.
-
Wide aperture (f/3.5 – f/5.6)
→ Shallow depth of field
→ Subject isolation, blurred background -
Narrow aperture (f/8 – f/11)
→ Deeper depth of field
→ More of the scene in focus

Follow this tutorial to setup your aperture:
ISO
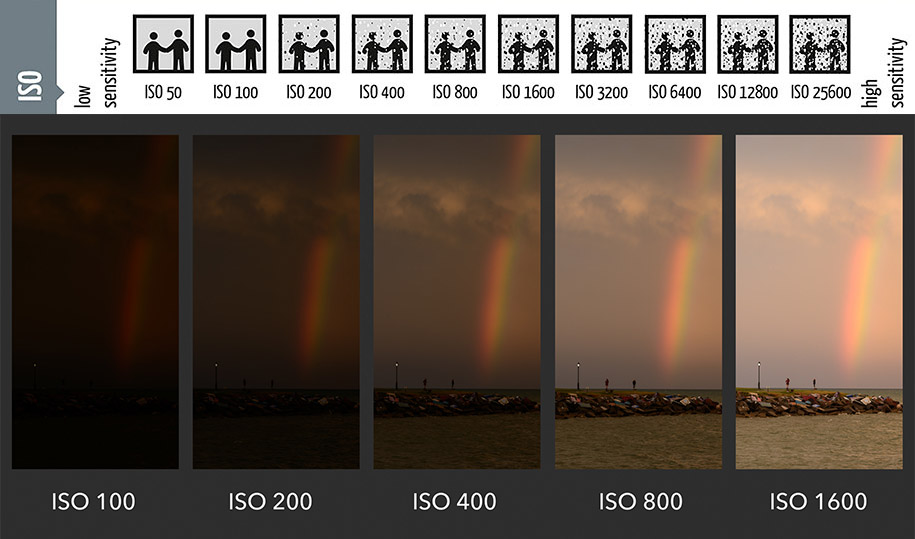
ISO controls the camera’s sensitivity to light.
- Start with ISO 100 or 200
- Increase ISO only if the image becomes too dark
- Higher ISO = more digital noise (especially visible in B&W)
How to setup ISO:
Auto Exposure Bracketing (AEB)
AEB allows the camera to automatically capture multiple images of the same shot at different exposure levels.
Typically, the camera records:
- one image at the suggested exposure
- one slightly underexposed
- one slightly overexposed
Exposure bracketing is useful when lighting conditions are difficult to judge or when you want safety options without changing settings manually.
Watch the following tutorial to learn how to enable and adjust AEB on the camera:
Focus Mode
Manual Focus (MF) — Default for Week 1
- Set the lens switch to MF
- Use the focus ring on the lens to adjust focus manually
- Take time to confirm what is sharp before pressing the shutter
Manual focus encourages:
- Greater attention to depth of field
- Clear identification of the focal point
- Slower, more deliberate image-making
White Balance
- Set to Auto White Balance (AWB)
- Color accuracy is not the focus for this assignment
How to setup AWB (Automatic White Balance) –first 30 seconds:
Stability & Framing
- Turn Image Stabilization OFF when the camera is mounted on a tripod
- Turn Image Stabilization ON with handheld camera
- Take time to adjust framing carefully before shooting
Reviewing & Saving Your Photos
This step ensures that your images are properly reviewed, saved, and backed up after shooting.
Reviewing Images on the Camera
After taking a photograph:
- Press the Playback button to view your image on the LCD screen.
- Use the Navigation Arrows to move between images.
- Check the following:
- Is the image in focus?
- Is the framing intentional?
- Are highlights overly bright or shadows too dark?
- Use the Zoom function to inspect focus and detail.
❗ Do not delete images in the field unless you are certain they are unusable.
Transferring Photos to Your Computer
Once you are done shooting:
- Turn the camera off.
- Remove the SD card from the camera.
- Insert the SD card into a card reader connected to your computer.
- Open the SD card folder and locate the DCIM folder.
- Copy your images to a clearly named folder on
❗ Always save your photos in your computer after a day of work.
Recharging Your Camera
Before your shooting session, always check your battery level and charge the camera if needed.
When returning a rented camera, make sure it is fully charged so it is ready for the next person using the equipment.
Credits: Jessica A. Rodríguez
AI Disclosure:
Microsoft CoPilot and ChatGPT was used for editing and clarity only, as well as to create some to the image visualizations. AI is not used to generate original course content.