MediaArtTutorials
W2 — Camera, Framing & Cinematic Space
Objective
Build on your Week 1 spatial scene by introducing the camera as a spatial body.
This activity focuses on how meaning is produced through camera position, framing, composition, and blocking for camera.
You will move from space → camera intention → multiple points of view, learning how cinematic space is constructed.
Materials Required
- Computer (laptop or desktop)
- Blender (free software)
👉 Download: https://www.blender.org/download/ - Computer mouse (recommended)
- Your Week 1 Blender file (.blend)
- Paper + pen (preferred) or digital drawing tool
Activities
Complete the following in order. Ask your professor or TA for help as needed.
[15 min] Camera Intention — Start Here
Before drawing camera positions or opening Blender, write 3–4 sentences describing the intention of the camera in relation to your space.
You may reuse or revise your Week 1 artistic intention, but now focus on what it means to experience the space through the eyes of the camera.
Guiding Questions
- What does the camera want to reveal or withhold in this space?
- How close or distant should the viewer feel?
- Who or what is centered, peripheral, or excluded through the camera’s position?
➡️ Save this text for submission.
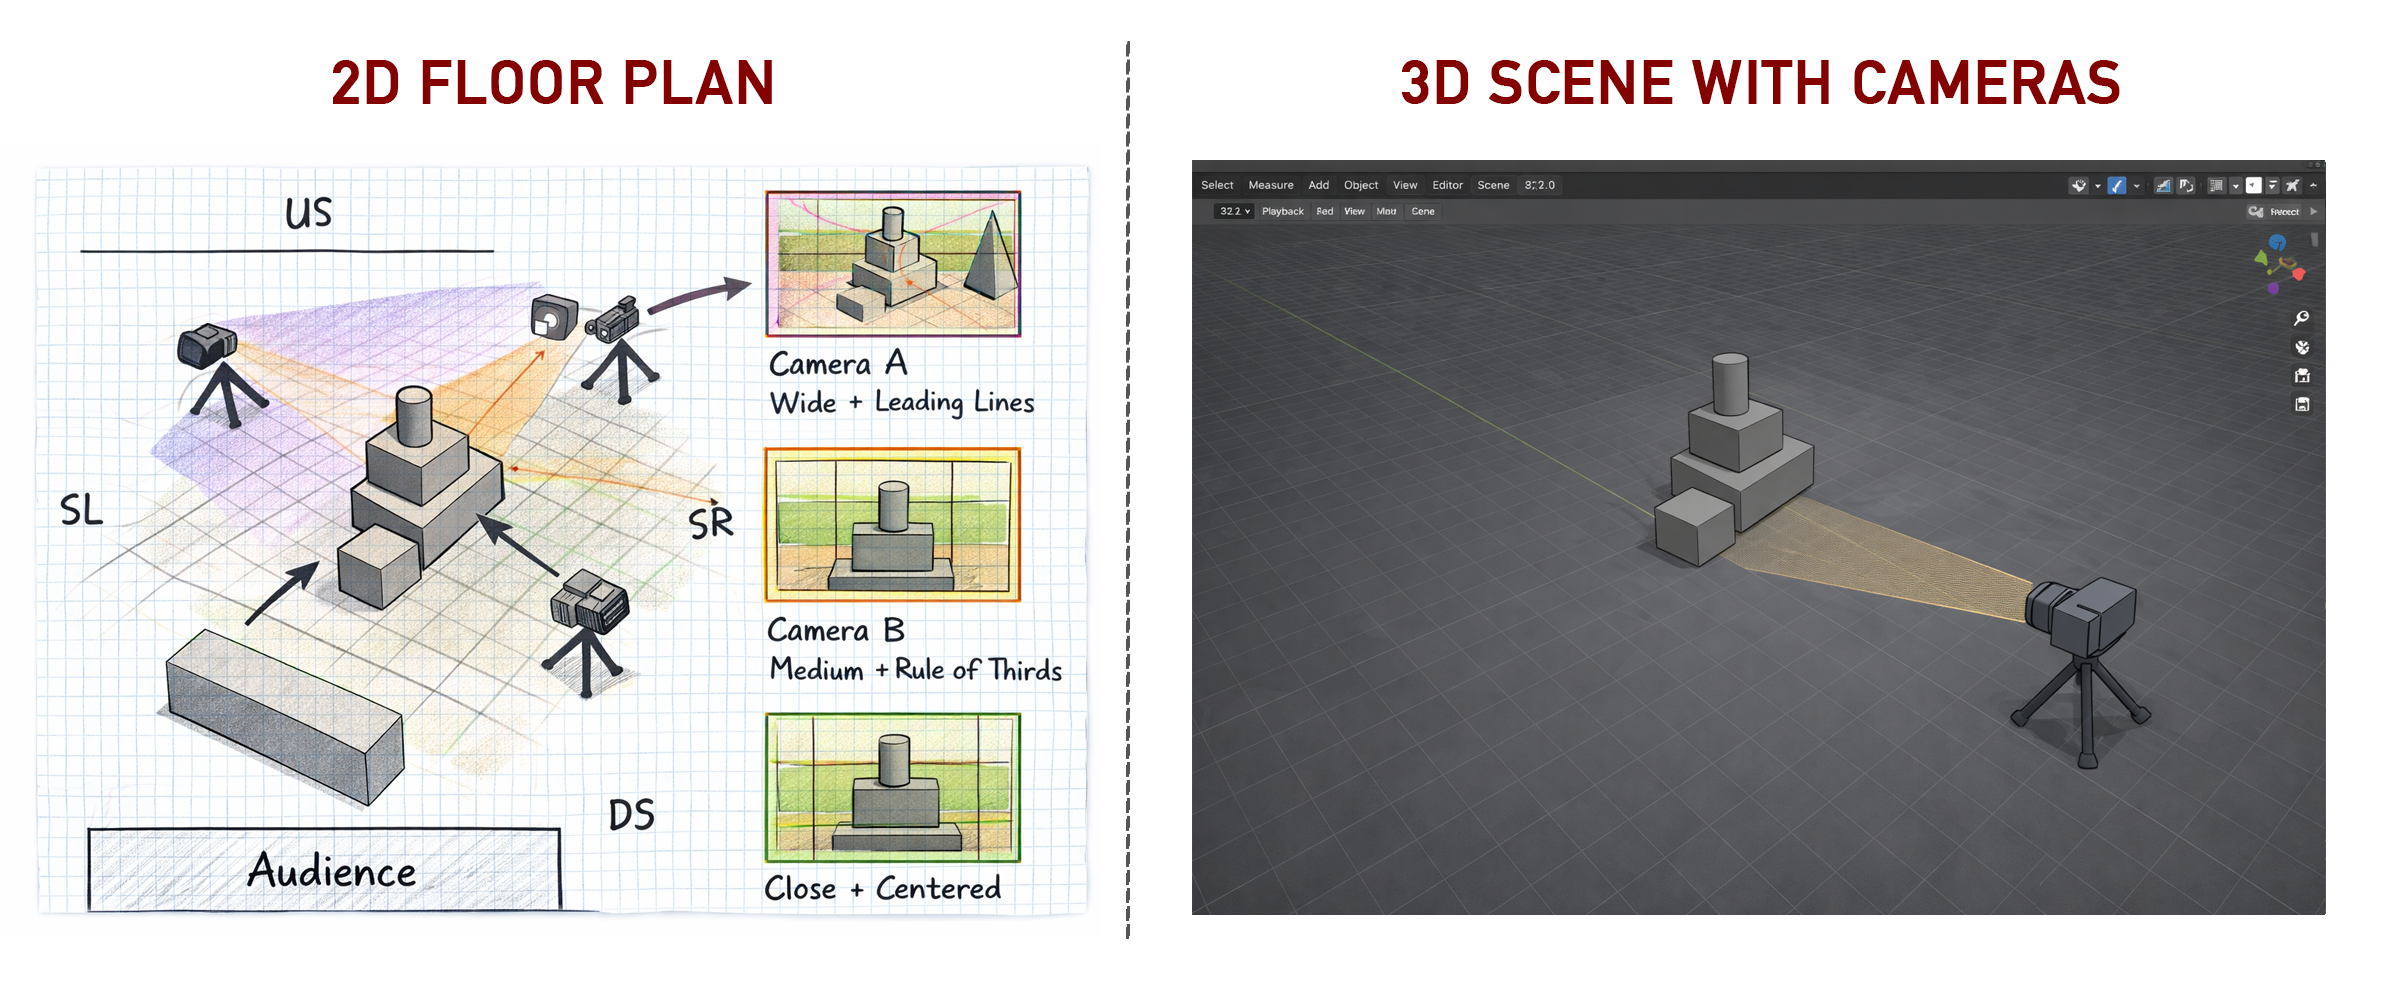
[20 min] 2D Floor Map + Composition Map (Design First)
Using your camera intention as a guide, create a 2D camera planning map. See example above (below the main title)
Note: Your drawing skill is not being graded. You are graded on how clearly your sketch communicates the requirements below.
Requirements
- Hand-drawn (preferred) or digital
- Based on your Week 1 floor plan (you may update it)
- Include THREE (3) cameras, each with a different:
- Position / Point of View
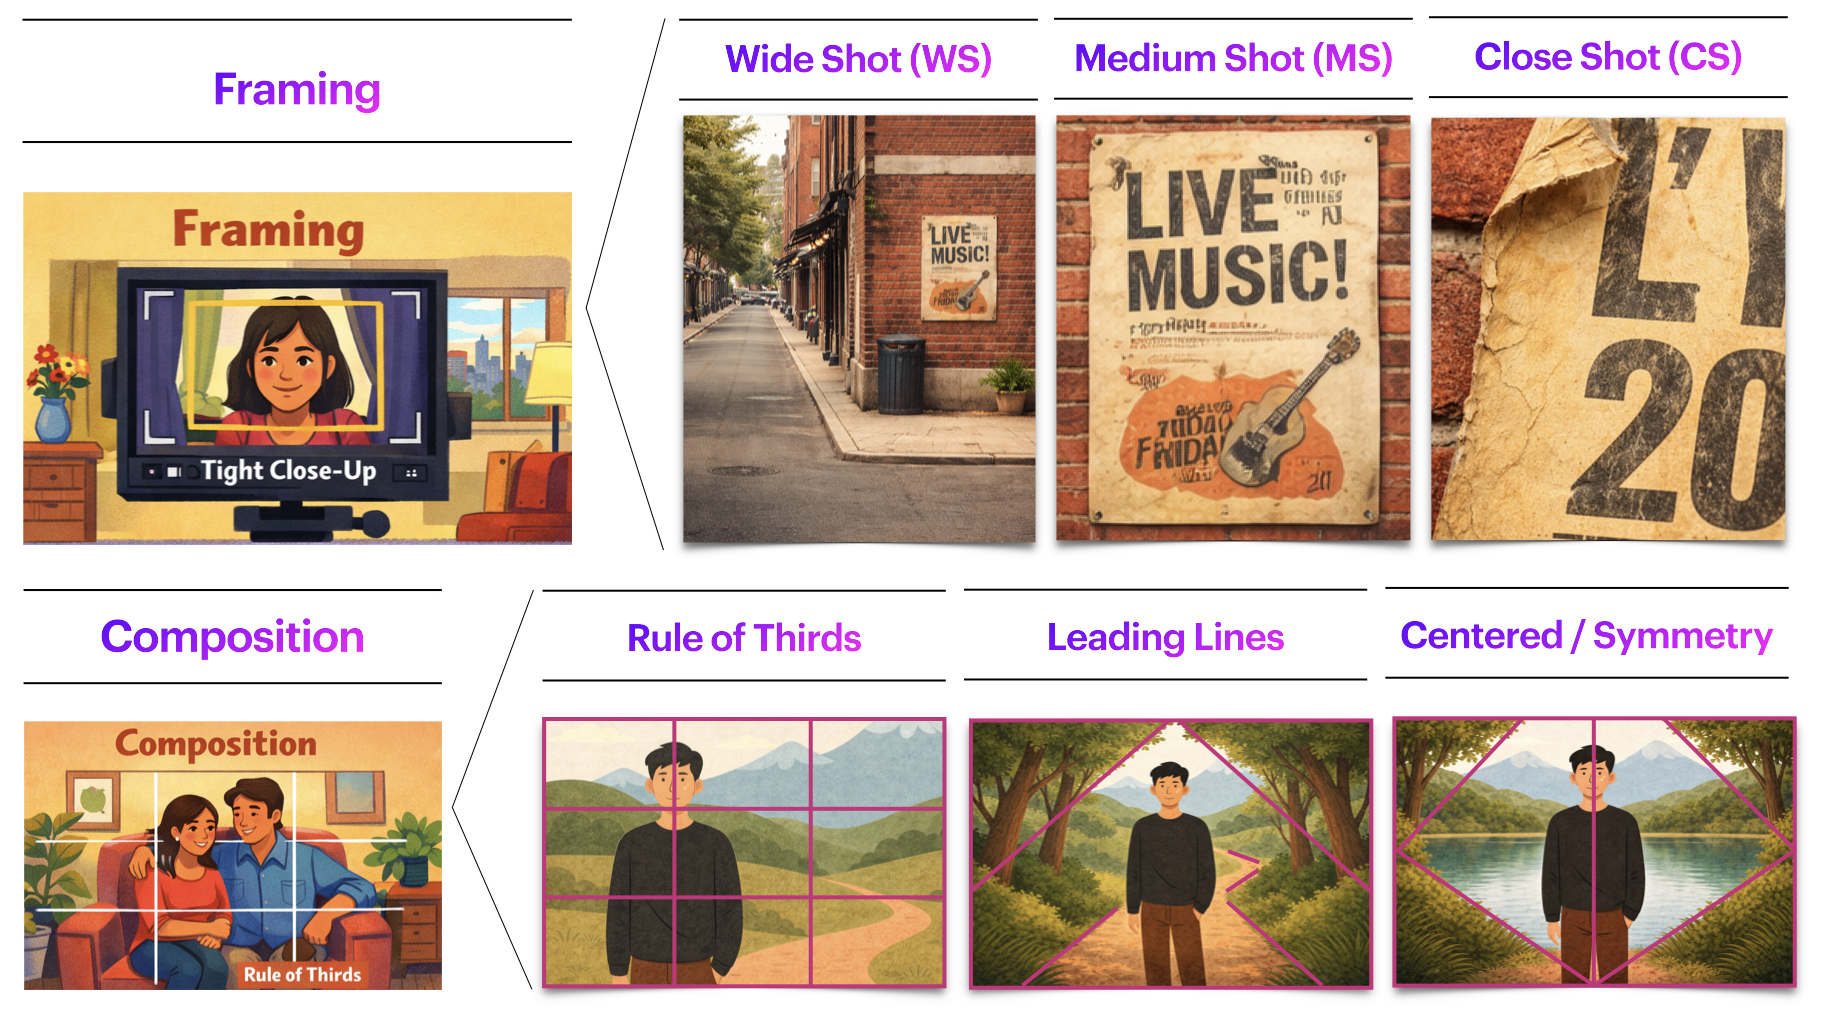
- Framing. You should have one Wide Shot, one Medium Shot, and one Close-Up Shot.
- Composition strategy (Use any: Rule of Thirds, Leading Lines, Centered/Symmetry)
Your map should clearly show:
- Camera positions
- Direction the camera is facing (indicate with an arrow)
- Approximate framing area (what is meant to be captured)
- A small sketch or visual reference for the intended look of each camera
- ✅ Note: You are planning three shots, but you will use one camera object in Blender.
⚠️ This step must be completed before working in Blender.
➡️ Save this image for submission (JPEG or PNG).
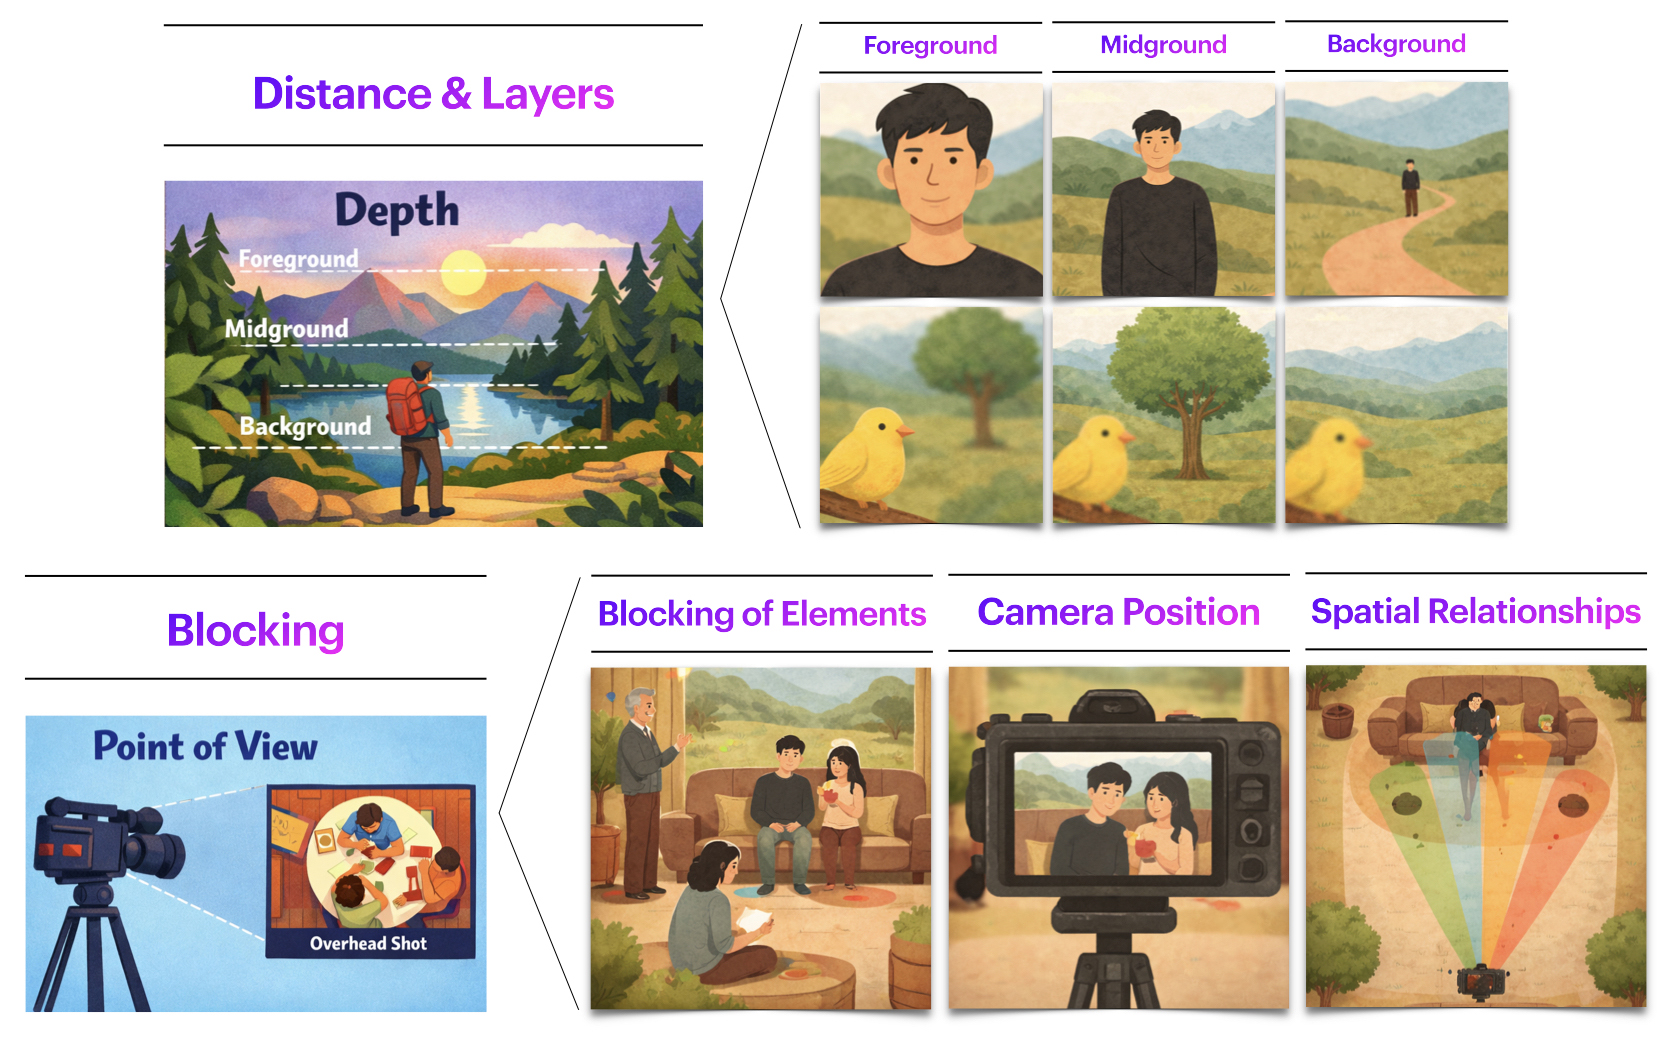
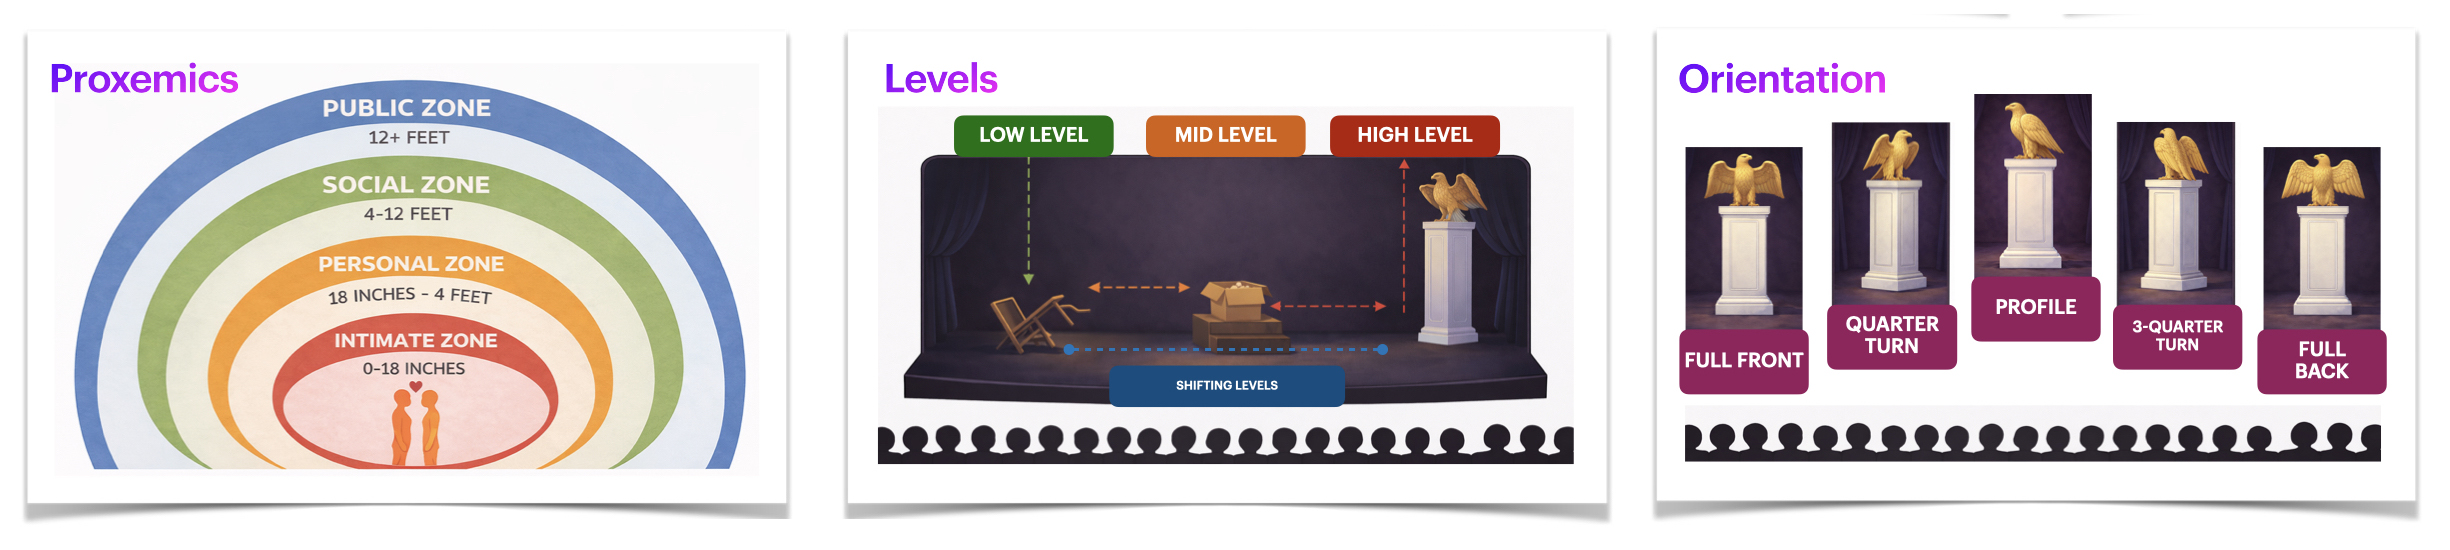
Relevant vocabulary
[60 min] 3D Scene + Camera in Blender
Update or revise your space
- You may adjust, refine, or rebuild your Week 1 scene if needed.
- Continue using only basic geometric shapes.
- Keep the Week 1 constraints:
- ❌ No materials or textures
- ❌ No lighting changes
- ❌ No modifiers
- ❌ No animation
Add ONE Camera (New for Week 2)
You will work with one camera in Blender and create three different renders by repositioning it.
Workflow (do in order)
- Place the camera for Shot 1 (Wide) → Render Image 1
- Move the same camera for Shot 2 (Medium) → Render Image 2
- Move the same camera for Shot 3 (Close-Up) → Render Image 3
Important: Keep your scene the same across all three renders.
Only the camera position should change.
Camera Constraints
- ❌ No changes in the type of camera
- ❌ No animation
- ❌ Ignore lighting, materials, animation, and other more advance shapes for now
- ✅ Focus only on:
- camera position (point of view)
- framing (wide/medium/close)
- composition strategy (thirds/lines/symmetry)
- optional: focus and depth of field
Adding a Camera (Try this intro video first)
How To Render Image In Blender - Full Guide
How to Use the Camera in Blender (Full)
- 00:00 — Intro (skip)
- 00:46 — Adding a Camera
- 01:14 — Using the Camera View
- 01:43 — Changing the Active Camera
- 02:34 — Speed Up Preview Times (skip)
- 03:15 — Moving the Camera
- 04:08 — Trackball Rotation
- 05:39 — Move Around
- 07:11 — Fly Mode
- 08:03 — Camera View
- 09:17 — Resolution (skip)
- 09:56 — Composition Guides
- 10:53 — Transparency (skip)
- 11:29 — Lens Settings
- 12:13 — Orthographic Settings (skip)
- 12:39 — Panorama Settings (skip)
- 12:32 — Clip Start Clip End (skip)
- 14:20 — Depth of Field
- 14:50 — Object Focus
- 15:22 — Eyedropper (skip)
- 15:45 — FStop (skip)
Submission Documents
Create a single document with the following sections:
- General Information
Full name, student number, and tutorial number.
- Camera Intention
3–4 sentences describing how the camera relates to and interprets the space.
- 2D Camera + Composition Map
Include your labeled plan showing all three cameras and intended framing/composition.
Note: Your 2D Floor Plan must take up at least half a page. - Rendered Images (3 total)
One rendered image per camera.
These must be renders, not screenshots.
Note: Each of your screenshots must take up at least half a page.
➡️ Export as PDF
📄 Filename: Lastname-Firstname-W2-Tutorial.pdf
Save Blender File
➡️ Save as .blend
📄 Filename: Lastname-Firstname-W2-3Dscene.blend
📤 Submission
| Component | File Name |
|---|---|
| Project document | Lastname-Firstname-W2-Tutorial.pdf |
| Blender file | Lastname-Firstname-W2-3Dscene.blend |
⚠️ Follow submission protocols carefully. Incorrect submissions may result in lost points.
Assessment
This Week 2 activity is graded lightly based on:
- Completion and effort
- Clarity of camera intention
- Thoughtful use of point of view, framing, and composition
- Basic technical application of cameras and rendering in Blender
This is an exploratory exercise — clarity and spatial thinking matter more than polish.
Credits: Jessica A. Rodríguez
AI Disclosure:
AI Disclosure: ChatGPT was used for editing and clarity only. No original course content was generated using AI.