MediaArtTutorials
W11 - Projection, Video Surfaces & Hybrid Media
Objective
You will return to your W7 scene and create a video composition that extends your sound layer and integrates it into a hybrid media scene in Blender.
This activity focuses on how moving image, surface, light, and sound work together to reshape atmosphere and meaning inside a staged environment.
Materials Required
- Computer (laptop or desktop) + Computer mouse (recommended)
- Headphones
- Blender (free software)
- Video Editing Software; Options:
- DaVinci Resolve 20 - Free Download (highly recommended)
or - Clipchamp - Access Through McMaster Email
⚠️ No other editing software is permitted for this activity.
- DaVinci Resolve 20 - Free Download (highly recommended)
- Your existing W7 files:
- 30-second sound composition (.wav)
- Blender scene (.blend)
- Personal video footage or royalty-free / free-use video footage from Pexels Video
Activities
Complete the following in order. Ask your professor or TA for help as needed.
[10 min] Visual Intentions — Start Here
Define the visual approach of your 30-second video in direct relation to your existing sound composition and Blender scene. Write 4–5 lines that answer the following:
-
How does your video build on your sound composition?
Does it reinforce the sonic mood, create contrast, slow it down, intensify it, or redirect attention? -
What kind of footage will you use?
Will it be observational, abstract, environmental, symbolic, gestural, architectural, atmospheric, or texture-based?
Your video must be thematically connected to your existing sound work.
Think of the video as an extension of the scene’s emotional and conceptual direction, not as a random visual layer.
[20 min] Gather & Curate Video Resources
Gather the materials you will use to build your 30-second video. You may use:
- Your own original footage, or
- Royalty-free / free-use footage from Pexels
👉 https://www.pexels.com/videos/
You should gather 5–10 video clips to create a small working palette. You may not use all of them, but you should collect enough material to explore a clear visual direction.
Look for footage that matches your intentions, such as:
- Environmental footage (water, sky, hallways, windows, urban movement, landscape)
- Abstract or textural footage (shadows, reflections, light flicker, smoke, grain, surfaces)
- Architectural or spatial footage
- Bodily or gestural details
- Objects, materials, or repeated motions
⚠️ Do not use copyrighted film clips, music videos, or random footage from social media or YouTube.
Save all files in an organized folder and record the credit information for each external clip used (title, creator/uploader, source link, platform).
[60-80m] Create a 30-Second Video in DaVinci Resolve or Clipchamp
Using DaVinci Resolve or Clipchamp only, create a 30-second video that will later be integrated into your Blender scene.
To learn DaVinci Resolve (highly recommended), follow the first section “Intro to Linear Video Editing” in the tutorials below:
DaVinci Resolve Tutorials
Optional: you may also explore the other two tutorial sections — “Intro to Video Collage” and “Intro to Keyframe Animation.”
Your video must:
- Be exactly 30 seconds long
- Include your original Week 6 sound composition as the audio track
- Be visually connected to your existing sound composition
- Use at least 3 different video clips or visual segments
- Your edit should demonstrate a clear relationship between the visual material and the sound composition through rhythm, pacing, contrast, or atmosphere.
When finished:
Export your edited video as MP4
📄 Filename: Lastname-Firstname-W11-Video.mp4.
Export Settings Reminder
Recommended export settings:
- Format: MP4
- Codec: H.264
- Resolution: 1920 x 1080
- Frame rate: 24 fps
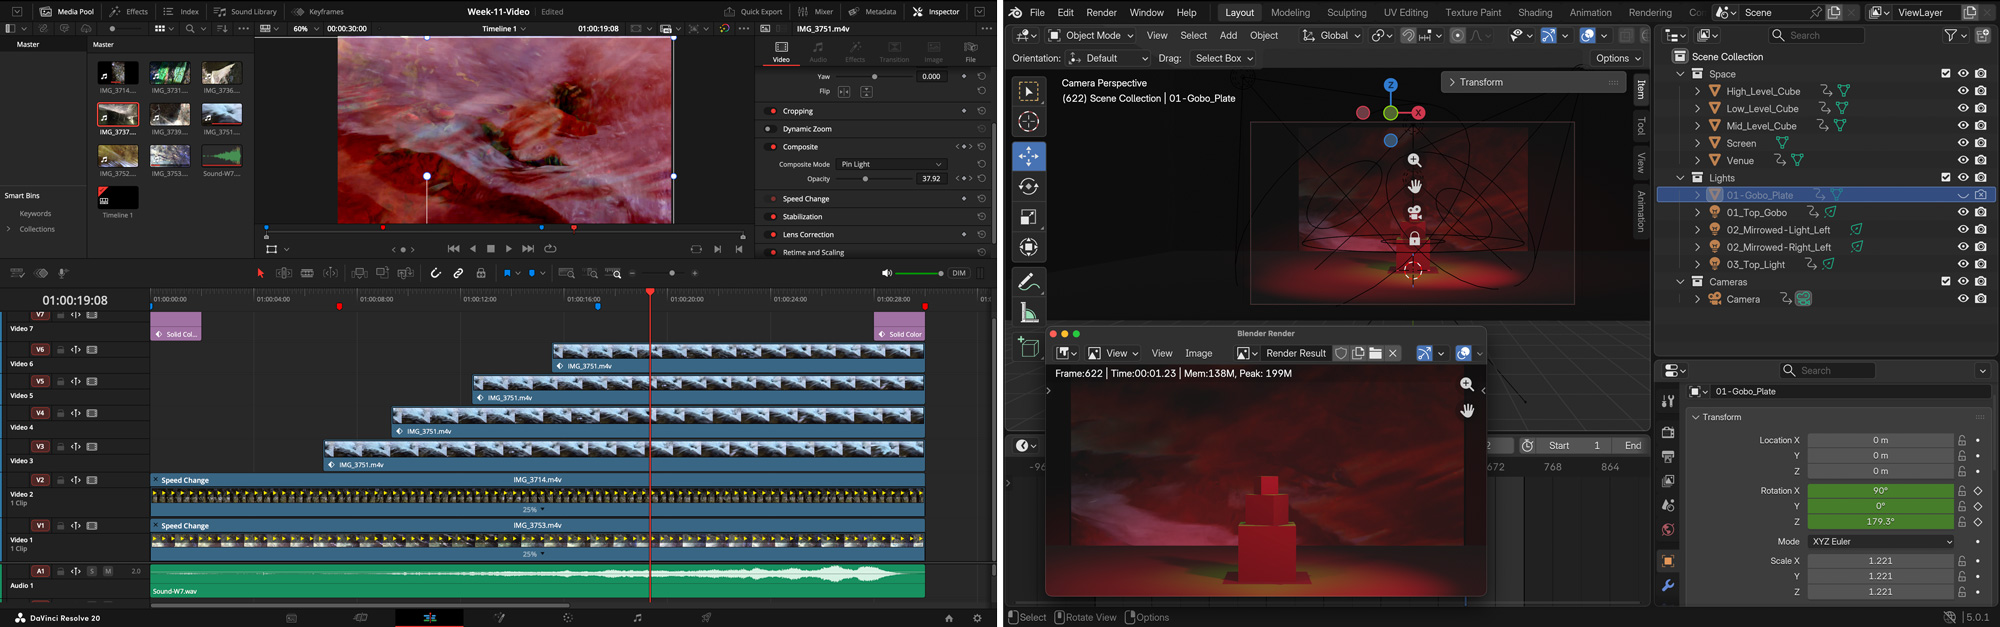
Video Submission Example
[30 min] Blender: Integrate the Video into Your Scene
❗ Review this week’s slides for practical tips on workspaces in DaVinci Resolve, intro to Aspect Ratios, and Exporting.
Bring your edited video into your Blender environment.
First:
- Open your Blender scene.
- Keep your timeline at 720 frames (30 seconds at 24 fps).
- Keep the sound file from the scene. Don’t remove it!.
- Keep the camera in a static general wide framing showing the whole scene.
⚠️ For this week, the camera should remain static. No camera movement.
Then:
- Follow the tutorial below to add your video.
- Add a Plane that will act as the projection surface — keep same aspect ratio as your video.
- Apply your video to the plane as a video texture.
- If need it, change (rotate or scale) video texture if it doesn’t match your plane.
- Position and rotate the plane so it sits correctly on the wall in your scene.
- Change the playing frames under Materials.
- Fix and adjust your lighting so the video remains visible
Your lights should support the projected video rather than wash it out completely. The video will look darker in Blender: apply a Brightness & Contrast modifier (see below).
Alternativelly, re-render your video increasing the overall brightness in DaVinci Resolve.
Save your updated Blender file as:
📄 Lastname-Firstname-W11.blend
➡️ Export 1 still image that clearly documents your stage setup using a wide shot.
➡️ Export final video as MP4, codec H.264
📄 Filename: Lastname-Firstname-W11-Scene.mp4
⚠️ This must be a final render, not a viewport screen recording.
Tutorials
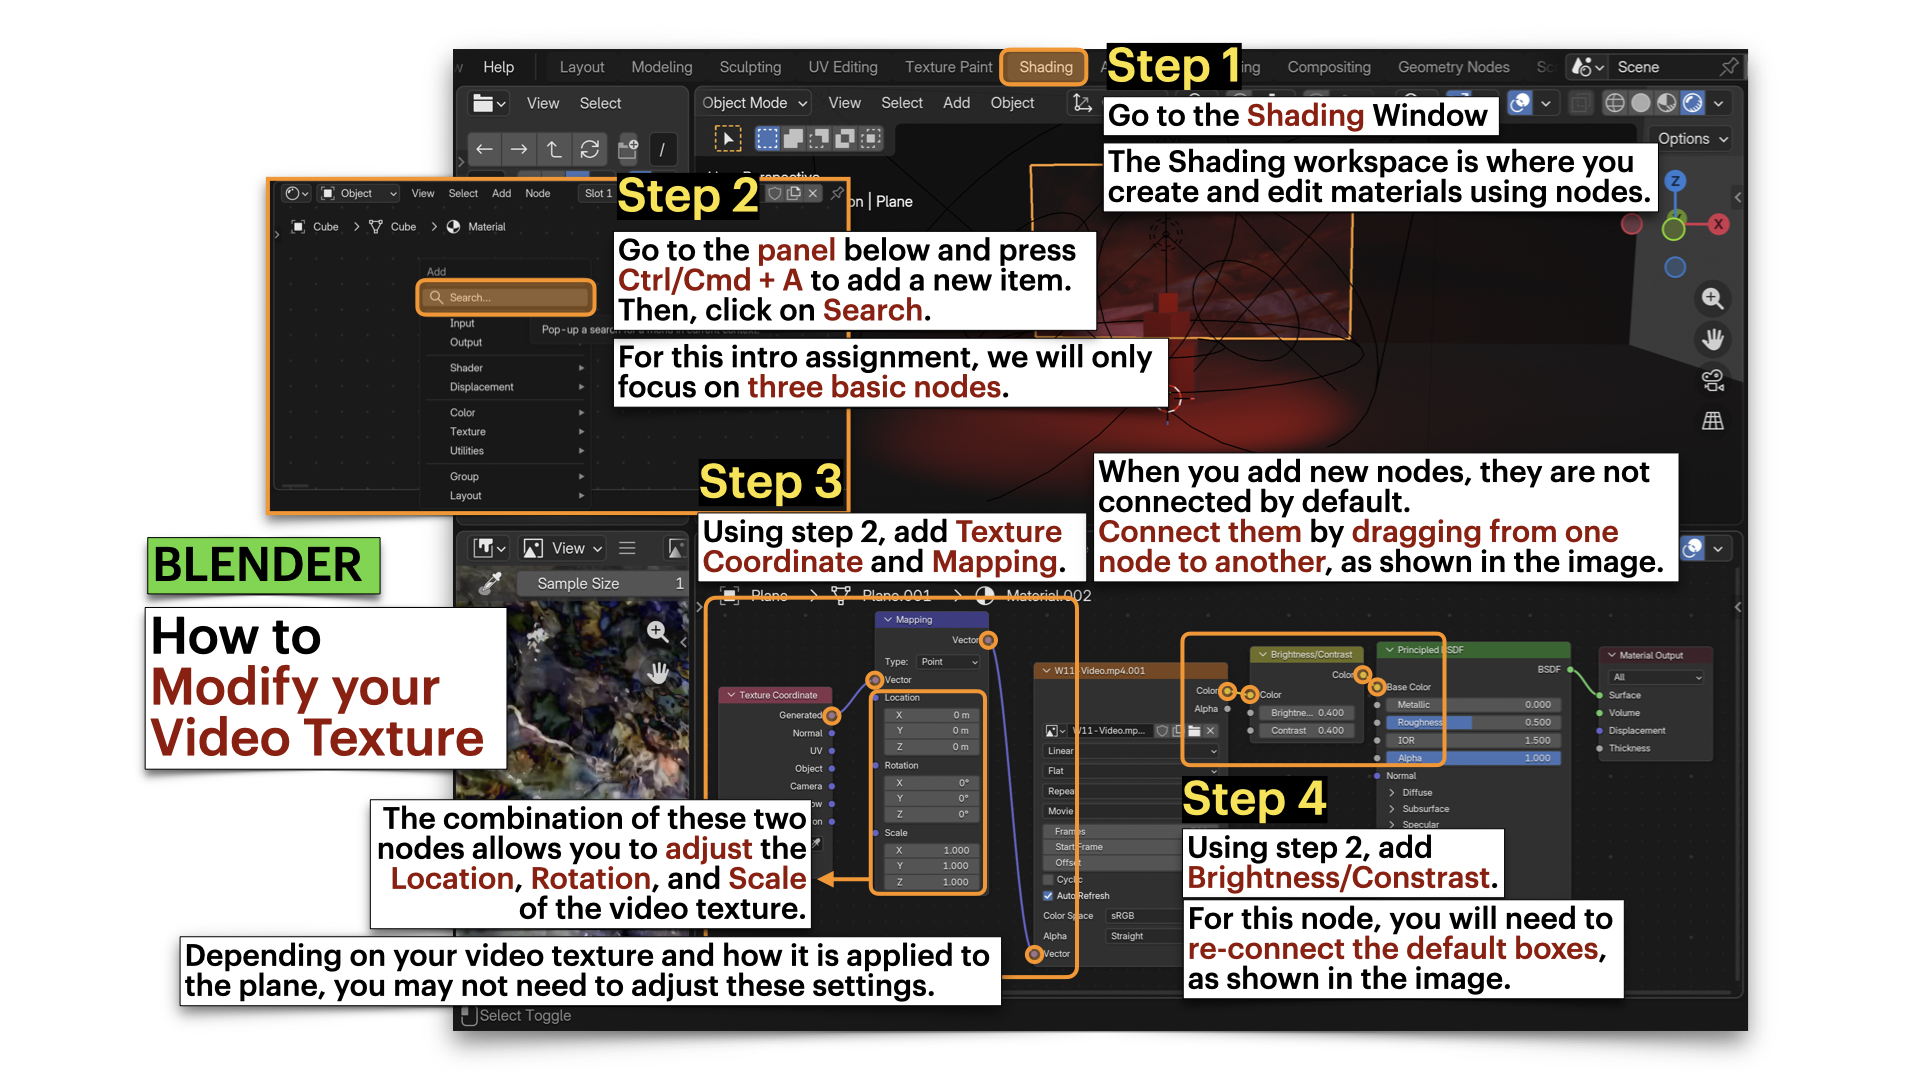
❗ Review this week’s slides for practical tips on applying video textures, organizing screen/projection surfaces, maintaining aspect ratios, and adjusting video materials (mapping + brightness/contrast).
How to import videos into blender
Texture Animation | Import Any Video Into Blender With Animated Image Texture or Video Texture (Advance)
Blender: How to Modify your Video Texture
Blender: Troubleshooting - Video Taking TOO LONG to Render
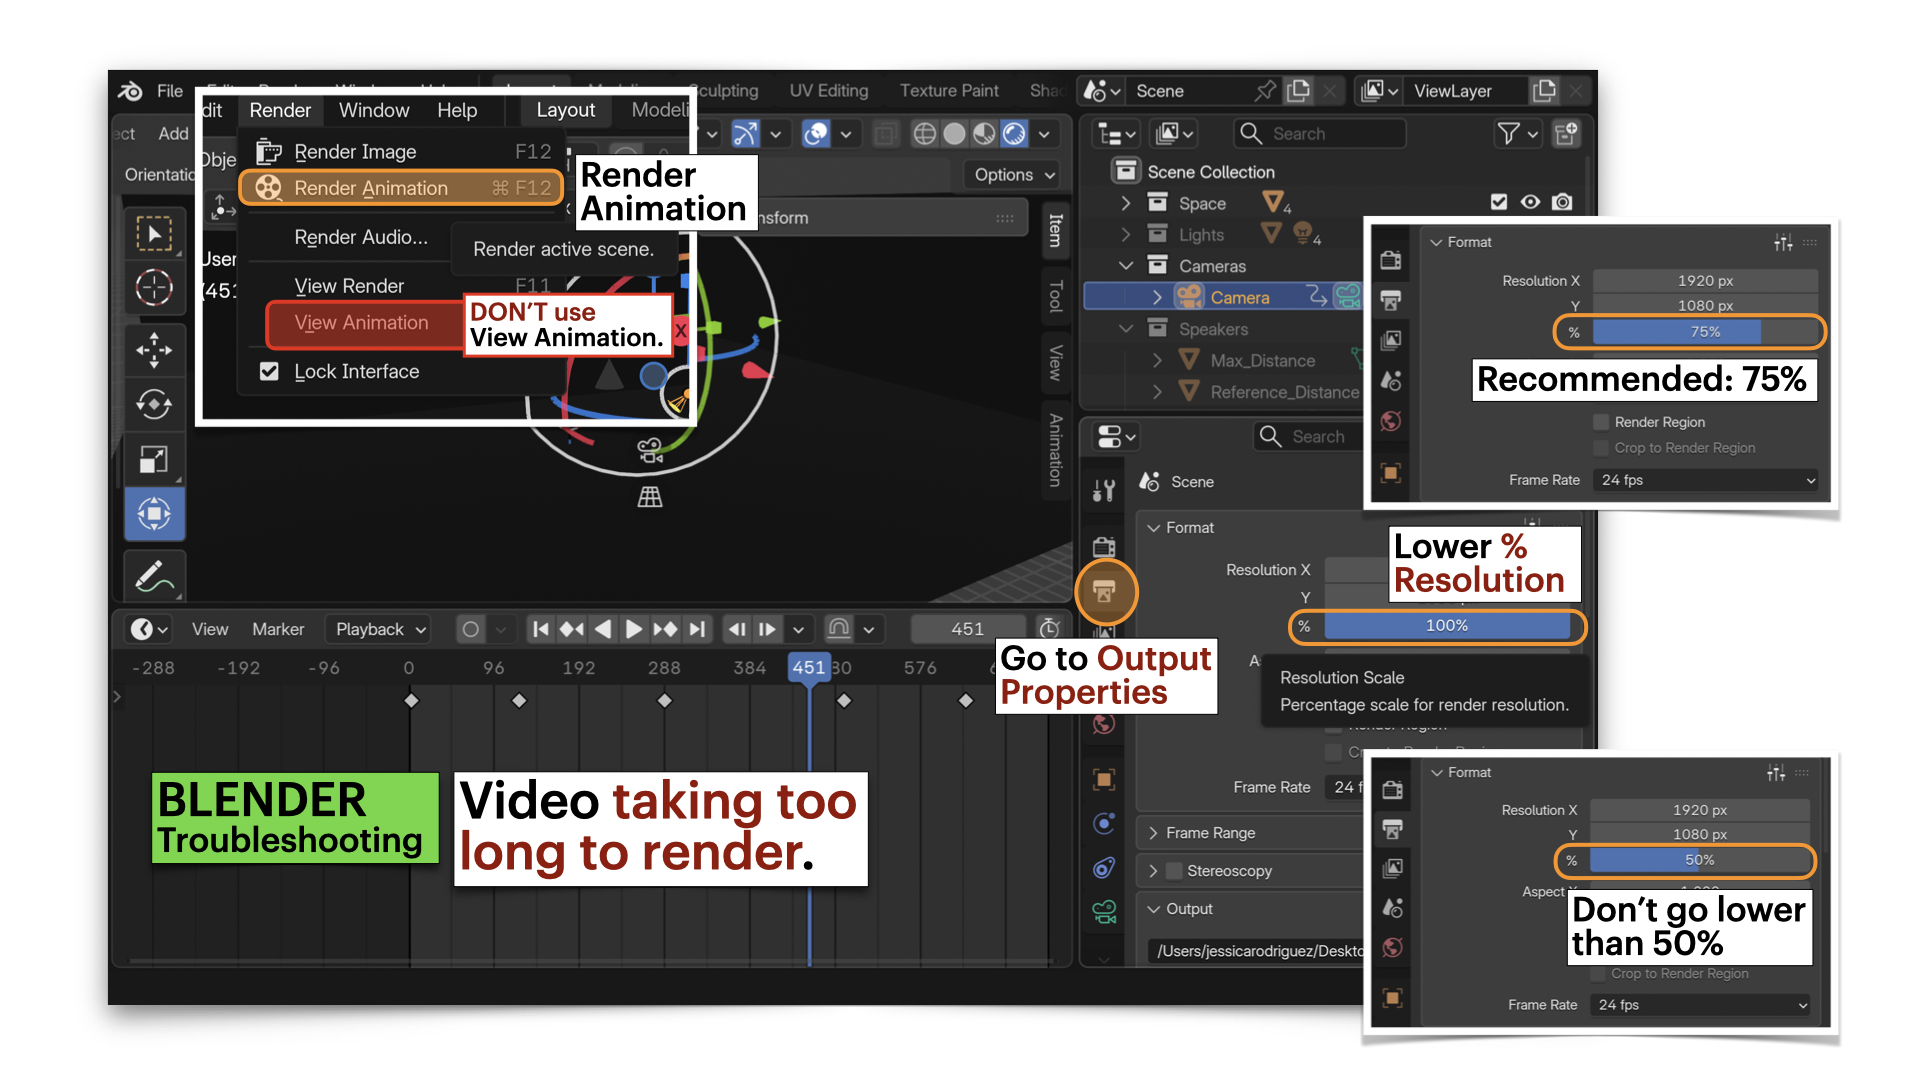
If your video is taking too long to render, you can:
- Lower the quality to 30%, or
- (recommended) Export 100–200 frames at a time, then use video editing software to combine each section.
Image & Video Submission Example

Submission Documents
Create a single PDF that includes:
-
4–5 sentence visual intention description
Briefly explain the visual approach of the video and how it relates to your sound composition and scene. - List of video sources used
Include for each external clip:- Title
- Creator / uploader
- Source link
- Platform
- One image of your Blender scene setup
Include the still image exported from Blender (not a screen capture) that clearly shows your stage setup, including the lighting, objects, and video surface in a wide shot.
➡️ Export as PDF
📄 Filename: Lastname-Firstname-W11.pdf
| Component | File Name |
|---|---|
| Project document (PDF) | Lastname-Firstname-W11.pdf |
| Edited video file (DaVinci) | Lastname-Firstname-W11-Video.mp4 |
| Blender scene | Lastname-Firstname-W11.blend |
| Rendered scene (Blender) | Lastname-Firstname-W11-Scene.mp4 |
⚠️ Follow submission protocols carefully. Incorrect submissions may result in lost points.
Assessment
Your work will be assessed based on:
-
Visual Concept & Video Editing (PDF + Edited MP4)
The visual description explains the video’s approach and its relationship to the sound composition and scene. The 30-second edit shows intentional selection and sequencing of footage using the permitted software. -
Blender Integration & Final Render (BLEND + Final MP4)
The video is integrated into the 3D scene as a visible projection surface, with lighting adjusted so the image can be clearly seen. The final render uses a static wide shot, lasts 30 seconds, includes sound, and is properly exported (not a screen capture). -
File Organization & Submission Accuracy
All required files follow naming conventions and are submitted in the correct format.
Credits: Jessica A. Rodríguez
AI Disclosure:
AI Disclosure: ChatGPT was used for editing and clarity only. No original course content was generated using AI.