MediaArtTutorials
W10 - Multi-Channel Installation Design — Part 2 (Spatial Implementation)
Objective
In Part 1 - Week 9, you designed the concept and spatial layout of your multi-channel installation and created the sound compositions for each speaker.
In Part 2 (Week 10), you will implement this design in Blender, building the installation environment and producing a simulation of the audience experience within the space.
Materials Required
- Computer (laptop or desktop) + Computer mouse (recommended)
- Headphones
- Blender (free software)
- 📄 LFS: Venue - Blender file
- Paper + pen (preferred) or digital drawing tool
Activities
Complete the following in order. Ask your professor or TA for help as needed.
[60-80m] Blender — Spatial Application & Audience POV
You will begin with this Blender file, which contains a collection named “Venue” with the following:
- A simplified 3D model representing the dimensions of the LFS Blackbox, with a separate front wall that can be hidden to allow easier arrangement of your objects.
- A human scale model. You must use this figure to accurately apply your floor design and evaluate proportions, distances, and audience circulation.
- A general ambient light to softly illuminate the space so your renders are properly lit. You can only change the color of this light but don’t modify its intensity.
Requirements
- Position geometric objects, Speaker objects, and lights exactly as designed in your floor map.
- Import and assign each WAV file to its corresponding Speaker object.
- Animate your lights following your defined cue logic and written instructions.
- If needed, loop each light animation for 2–3 cycles, resulting in approximately 30 seconds of continuous installation playback.
➡️ Save as:
Lastname-Firstname-W9.blend
Organization
When working on your scene, you must organize it using three types of collections:
- Venue (already included in the file)
- Cameras (already included in the file)
- New Collections named
GRP1,GRP2,GRP3, etc.
Inside each GRP collection, you must include:
-
All geometries (meshes) belonging to that group.
Naming format:GRP1_OBJ1,GRP1_OBJ2,GRP1_OBJ3, etc. -
All lights belonging to that group.
Naming format:L1,L2,L3, etc. -
All speakers belonging to that group.
Naming format:SPK1,SPK2,SPK3, etc. -
Correct naming protocol:
Do not use spaces in object names. Always use underscores_between words.
⚠️ Important: Your Blender file will be checked for proper organization.
Installation Photos
Export 3–4 still images from Blender that clearly document your installation.
Images must include:
- A full spatial overview (top or angled view)
- One perspective view (POV) for each zone
The human scale model must be visible in the scene to communicate proportion, perspective, and spatial dimensions.
Images should be clearly framed, well lit, and readable.
Audience POV Video
Create a 20 to 30-second video from the point of view of an audience member navigating the installation.
The video should simulate how someone physically walks through the space.
This is not a cinematic study — it is an embodied navigation.
The movement must:
- Follow your designed audience circulation path
- Move clearly between speaker zones
- Reveal shifts in light intensity, colour, and spatial sound relationships
- Maintain smooth and intentional transitions (no abrupt cuts or erratic motion)
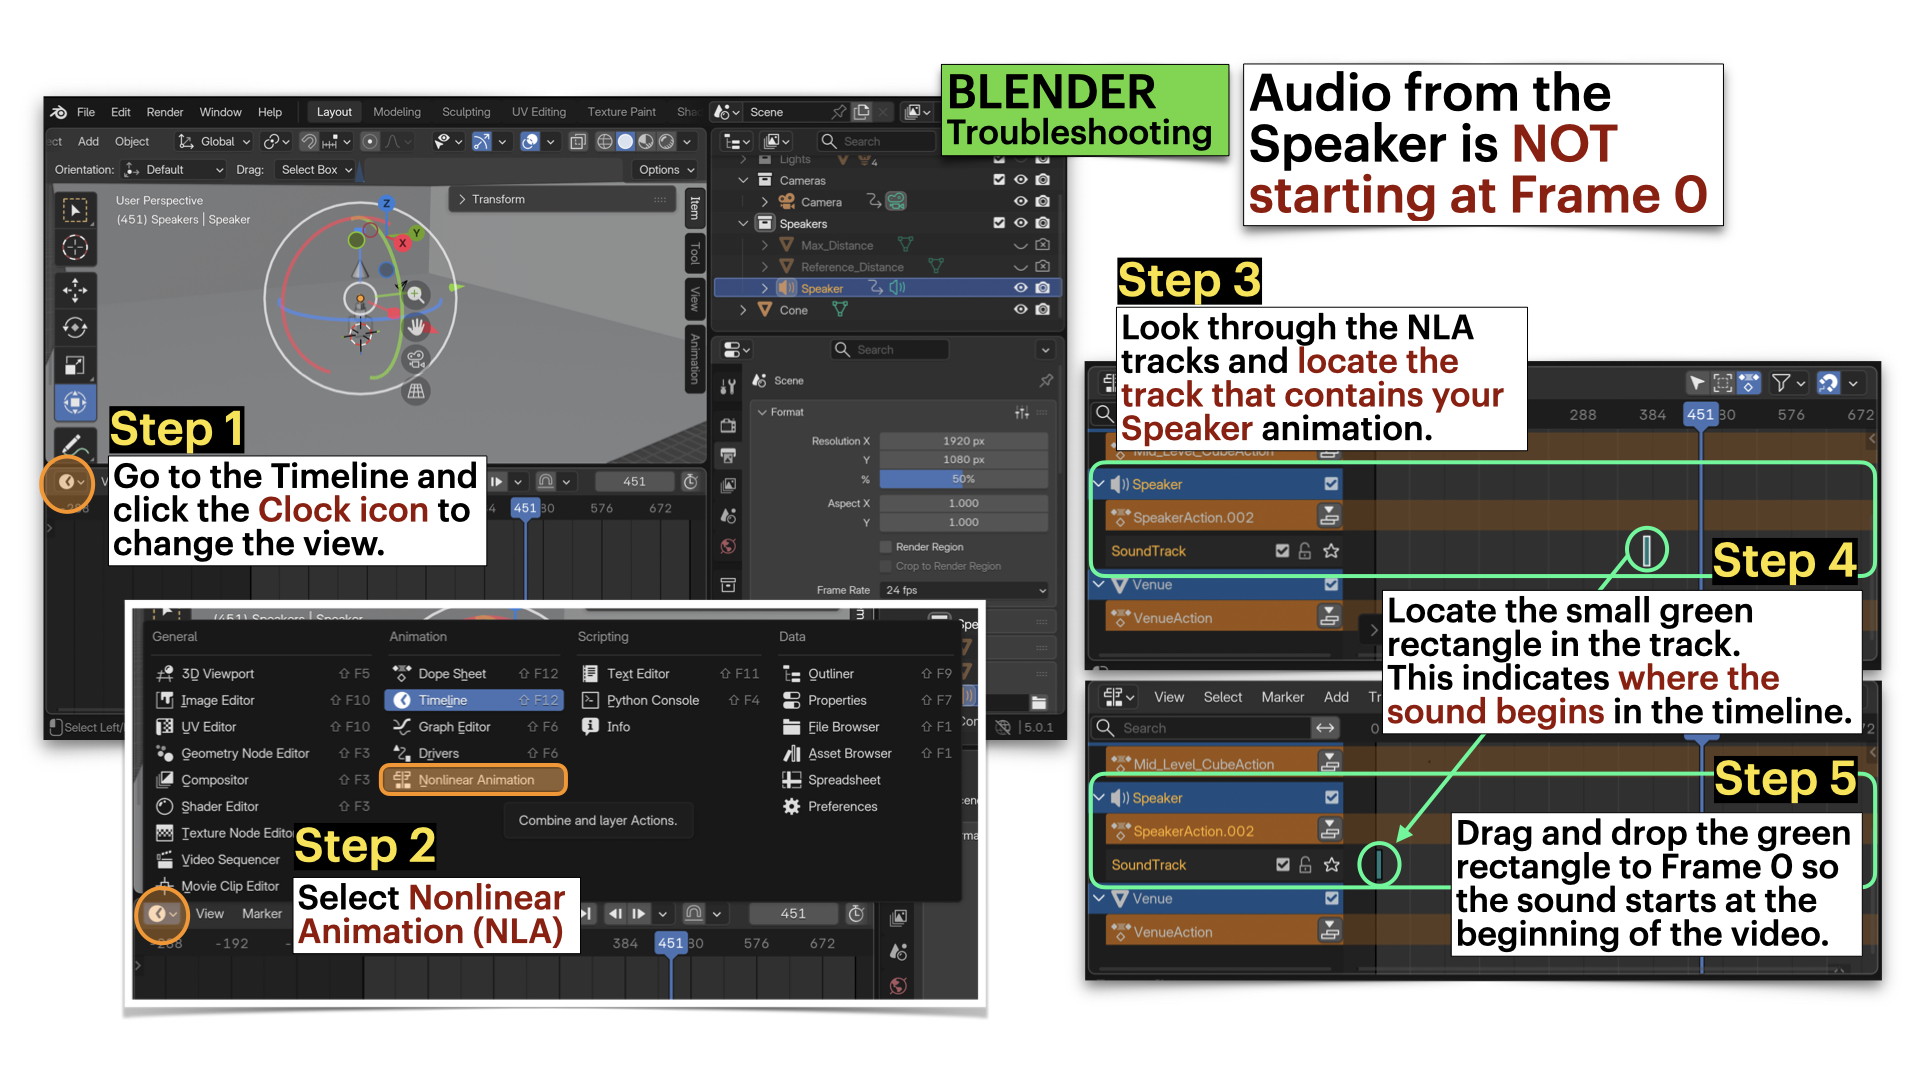
- For the sound, you can use the Non-Linear Animation editor to make some speakers play at specific points while your camera is passing by (not all from the beginning).
⚠️ The human scale model must be hidden before rendering the final video.
➡️ Export:
Lastname-Firstname-W9.mp4
Format:
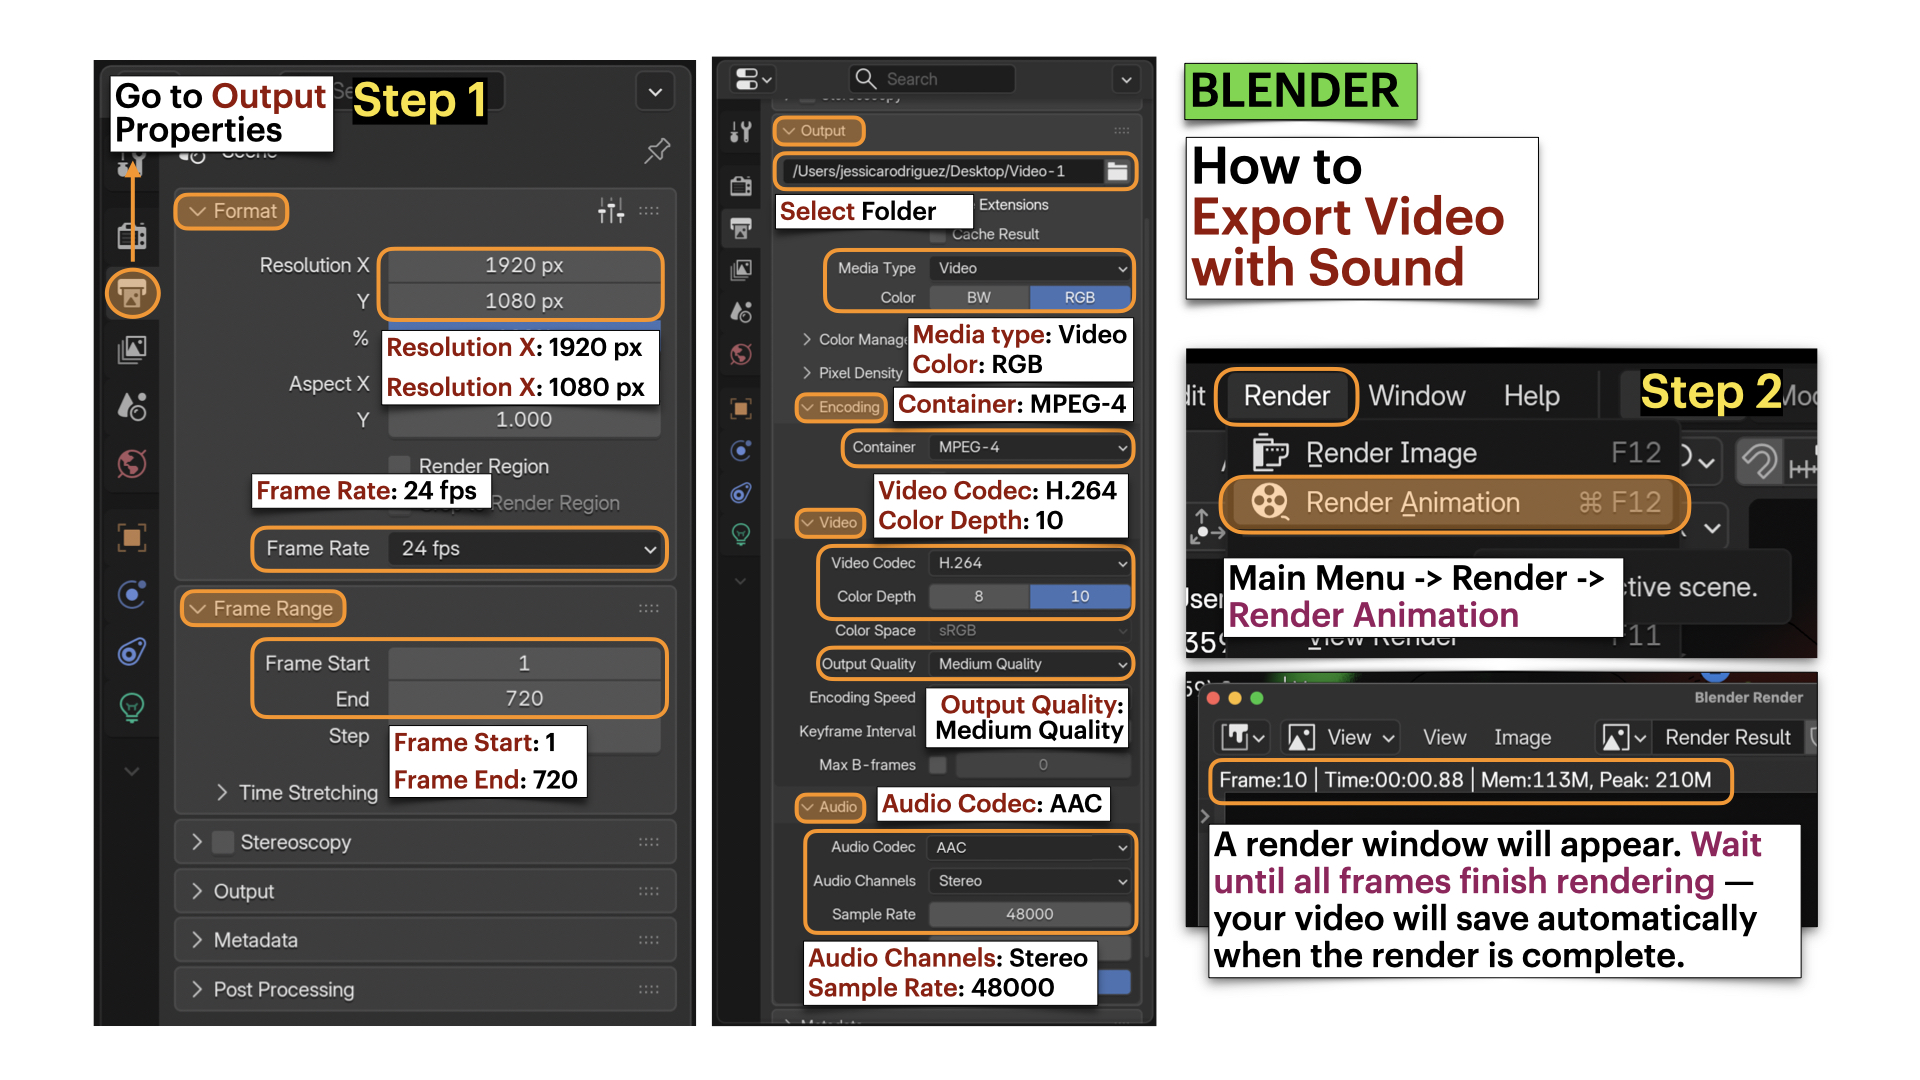
MP4 (H.264), 1920x1080, 24fps
Blender: Troubleshooting - Audio From Speaker NOT Starting at Frame 0
Blender: Export File with Audio
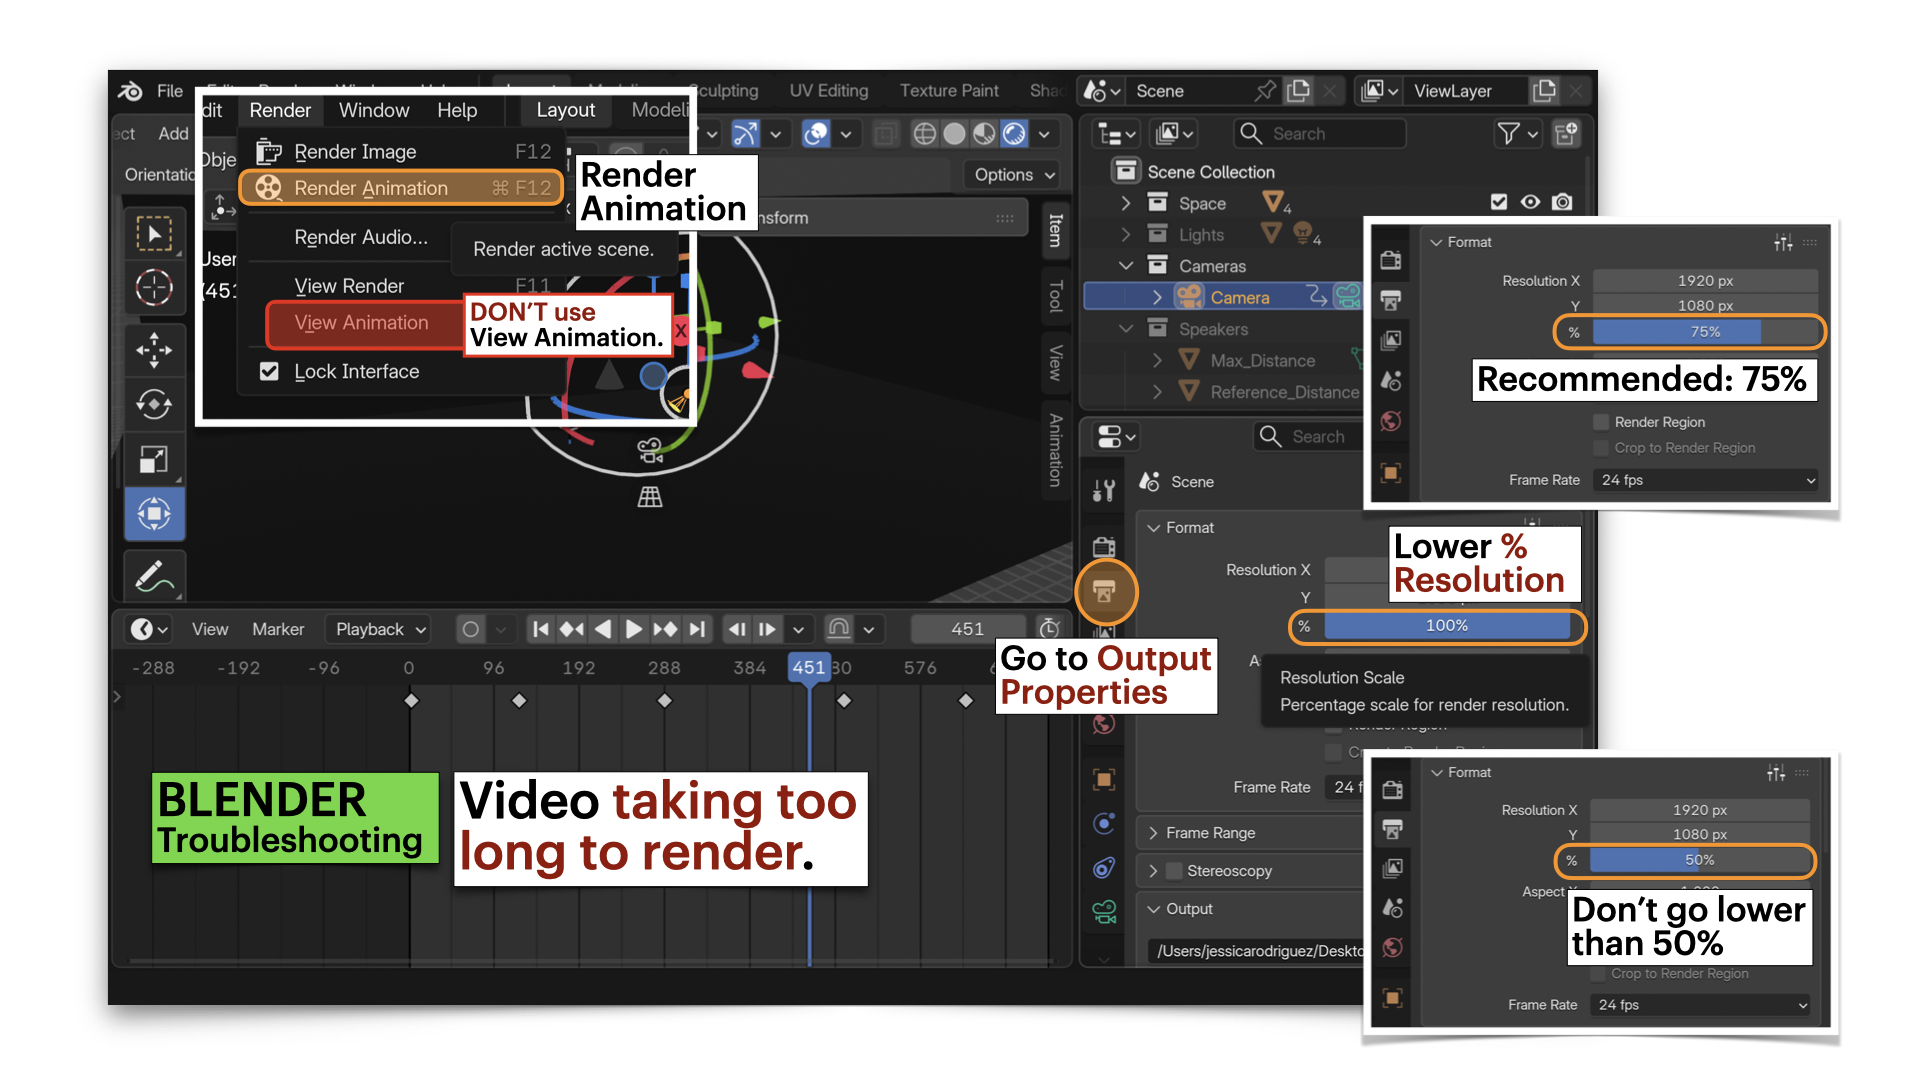
Blender: Troubleshooting - Video Taking TOO LONG to Render
Video Submission Example
Submission Documents - Part 2
Create a single PDF including the following:
1. Installation Concept (250–300 words)
- Title of the Installation
- Name of the Artist (your full name)
- One paragraph clearly defining:
- Your spatial intentions
- Audience movement
- Zone differentiation
- How sound and light function across the installation
2. Floor Plan + Lighting Cue List (Full Page)
- The floor plan must occupy one full page.
- Must include:
- Labeled speaker locations (SPK1–SPK4)
- Labeled light placements (L1–L6)
- Object placements
- Audience circulation path
- Clearly defined zones
- Include a lighting cue list for each light (2–3 looped cues per light).
- The floor plan and cue lists must be clean, readable, and clearly labeled.
3. Installation Photos
- Include 3–4 rendered images from Blender.
- Each image must occupy at least 1/3 of a page.
- Each image must include a one-sentence description explaining what it showcases (e.g., zone focus, audience perspective, spatial overview).
- The human scale model must be visible in these images to demonstrate proportion and perspective.
4. Sound Sample Credits
For each sound sample used, include:
- Title
- Creator
- Source link
- License information
➡️ Export as PDF
Lastname-Firstname-W10.pdf
| Component | File Name |
|---|---|
| Project document (PDF) | Lastname-Firstname-W10.pdf |
| Blender File | Lastname-Firstname-W10.blend |
| Video file | Lastname-Firstname-W10.mp4 |
⚠️ Follow submission protocols carefully. Incorrect submissions may result in lost points.
Assessment
Spatial Installation Implementation
The 3D scene clearly translates the floor plan into the Blackbox environment, with accurate placement of speakers, geometric objects, lights, and audience circulation.
Multi-Channel Sound Integration
Each mono sound composition is correctly assigned to its corresponding speaker, contributing to a coherent spatial atmosphere.
Light Loop Animation
Each light includes 2–3 clearly defined looped cue states (colour, intensity, transition) that support the installation’s spatial atmosphere.
3D Spatial Construction
The OBJ model is used correctly. Objects, lights, and speakers are properly organized and positioned according to the design plan.
Audience Experience
The POV video follows the defined circulation path with smooth, intentional movement and perceptible shifts in spatial sound and lighting.
Documentation & Technical Accuracy
Required installation photos are included, the human scale model is visible in images but hidden in the POV render, and all files follow the required naming conventions.
Credits: Jessica A. Rodríguez
AI Disclosure:
AI Disclosure: ChatGPT was used for editing and clarity only. No original course content was generated using AI.